15 Cool Pumpkin Carving Ideas for a Stylish Halloween
Some pumpkins stop you in your tracks. Most just slump on the porch by Saturday. These cool pumpkin carving ideas are built to do the first thing, and to last long enough to enjoy it. I’m Emily, a plant scientist by training living in Austin, and I’ve learned that a pumpkin is a fruit with a protective rind; every technique here works with that rind instead of fighting it. Inside, you’ll find fifteen designs, from a luna moth cut like lace to a succulent-filled vessel, each with the pumpkin variety, exact tools, lighting, and realistic lifespan. In my experience, one confident technique beats a dozen cartoon faces. Save this post and pick your first pumpkin.
Most carved pumpkins fail the same way: they slump. Cutting through a pumpkin’s rind breaks its protective skin and starts decay, so a fully carved pumpkin generally lasts only a few days to about a week, depending on temperature. Designs that leave part of the skin intact, like etching or shaving, hold up better than cut-through ones, and a real flame speeds softening while LEDs run cooler. My first porch pumpkin, a wide grin carved on a warm Austin afternoon, was sagging by the weekend. This post gives you fifteen designed-looking pumpkins, each with the technique, tools, and lifespan spelled out.
1. Luna Moth Lace,Cool Pumpkin Carving Ideas
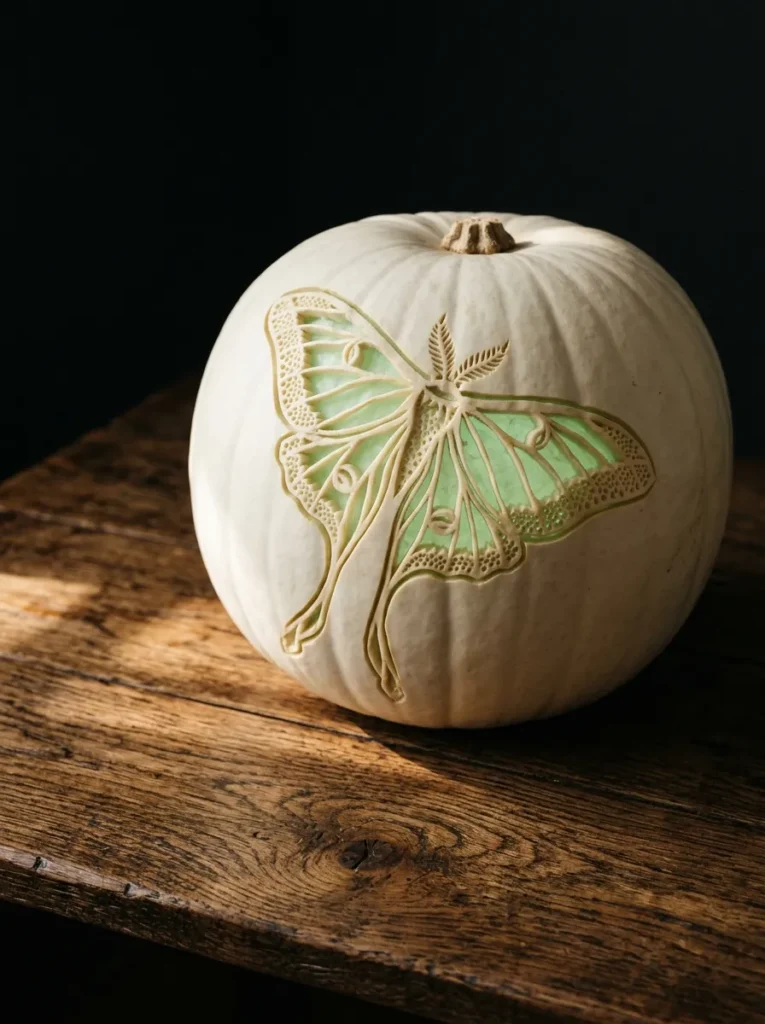
Pumpkin: Full Moon white pumpkin, about 14 inches wide. Its smooth, pale skin and thick wall give fine cuts a firm backing, and the cream rind glows softer than orange does.
Technique and design: Cut-through silhouette in a fine-detail style. The wing membranes are cut out, while the veins, body, and two long tail points stay as uncut skin lace.
Tools and materials: Fine-blade pumpkin saw, pin-poke tool, printed moth pattern, painter’s tape, metal scoop, sage-green lighting gel (2-inch squares), petroleum jelly. An adult handles all cutting; kids can scoop and tape the pattern.
Difficulty and time: Advanced, about 3 to 4 hours.
Lighting: Warm-white 2700K LED puck light, with the gel taped behind the wing panels.
Lifespan and preservation: Fully cut designs generally last a few days to about a week. Carve close to display day, keep it cool, and brush petroleum jelly along every cut edge.
Display: A bare oak console, out of the sun.
Standout detail: The sage-green gel turns warm light into the pale green of a real luna moth.
Why this works: Wing veins double as structural bridges, so a pumpkin can carry intricate cut-through lace without collapsing.
A luna moth is already a stencil: its wings are panels of pale membrane held up by thin veins. Cut the membrane and keep the veins, and those veins become the bridges that hold the design together. That is the structural trick behind this pumpkin. Tape the pattern to a Full Moon pumpkin, poke every line with a pin tool, then cut the smallest panels first while the wall is still intact. Finish with the long tails last. Lit from inside, the wings glow like stained glass, and the cream rind keeps the whole piece looking soft rather than harsh.
Here is the part that makes people stop: a 2-inch square of sage-green lighting gel taped behind the wing panels turns warm light into the pale green of a real luna moth. Skip the gel and it still looks lovely, but the green is what guests remember. What to avoid is rushing the veins; any vein thinner than a quarter inch will crack when you scoop, so scoop gently and first. Fully cut designs like this generally last a few days to about a week, so carve close to display day and keep it cool in between.
2. Gold Ginkgo Drift
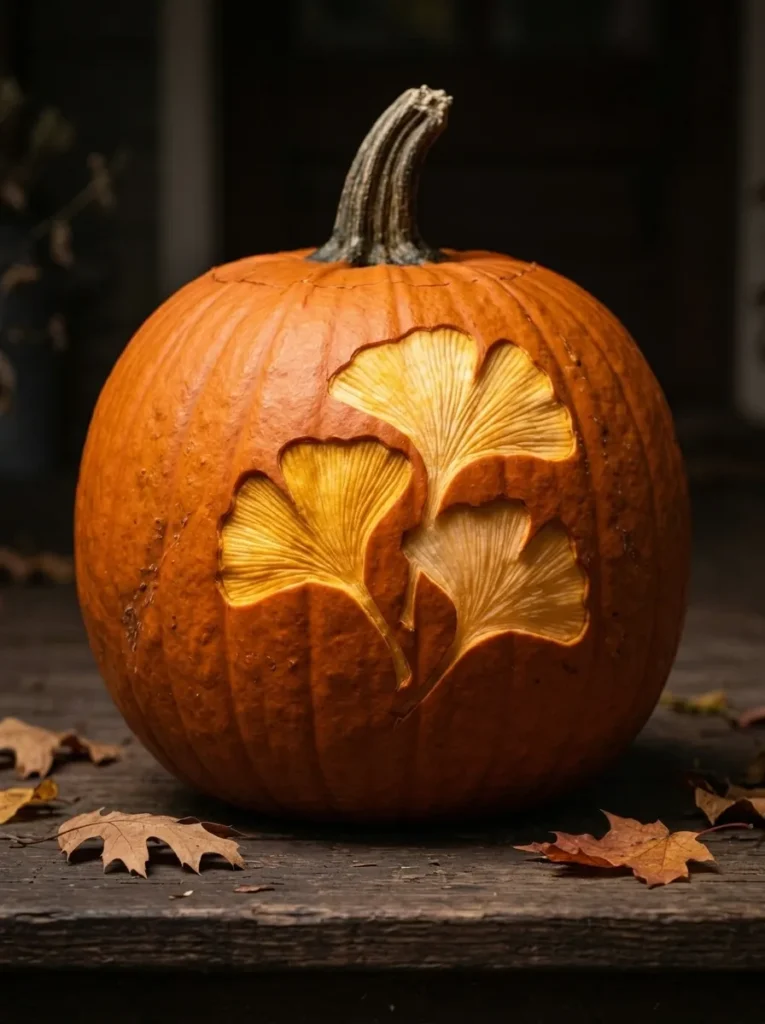
Pumpkin: Connecticut Field, about 14 inches tall. Its smooth, deep-orange rind is thin enough that shaving through it exposes pale gold flesh, the same yellow ginkgo leaves turn in fall.
Technique and design: Etching and shaving, with no cut-through on the face. Nine ginkgo leaves drift down the pumpkin, each shaved to a different depth, with veins scored by a V-gouge.
Tools and materials: 3/8-inch clay loop tool, linoleum cutter with V- and U-gouges, tracing paper, pencil, painter’s tape, pumpkin saw for the bottom opening, petroleum jelly. Adults handle all cutters.
Difficulty and time: Intermediate, about 2 to 3 hours.
Lighting: Steady 2200K amber LED puck, no flicker mode, so the depth gradient reads clearly.
Lifespan and preservation: Etched pumpkins generally outlast cut-through designs because most of the skin stays intact. A thin coat of petroleum jelly over shaved areas slows drying.
Display: A deep north-facing windowsill.
Standout detail: A hair-thin rim of untouched orange skin outlines each leaf, so the gold looks edged in copper.
Why this works: Shaving to different depths turns one pumpkin into a gradient of light, so leaves read as near and far without a single hole in the face.
Last October, a neighbor stopped mid-walk and asked if my pumpkin was lit by something gold. It wasn’t; it was just ginkgo leaves shaved into a Connecticut Field pumpkin and lit with one amber LED. I fell for ginkgo in my plant science days: the fan-shaped leaf, the fine parallel veins, the clean yellow in fall. Nine leaves drift down the face, no two shaved to the same depth. The deepest glow like lit amber, the shallowest like a blush, and together they feel like leaves falling through lamplight, not a stencil pressed on a pumpkin.
Start by tracing nine leaves in pencil, varying their size from three to five inches. Shave each blade with the loop tool in light, overlapping strokes, then score the veins with a V-gouge. Leave a hair-thin rim of untouched orange skin around every leaf; it frames the gold like copper wire. Stop shaving the moment the flesh glows amber under a phone flashlight, because going too thin invites collapse and mold. Because most of the skin stays intact, etched pumpkins generally outlast cut-through ones. A thin coat of petroleum jelly over the shaved areas slows drying further.
3. Dandelion Wish
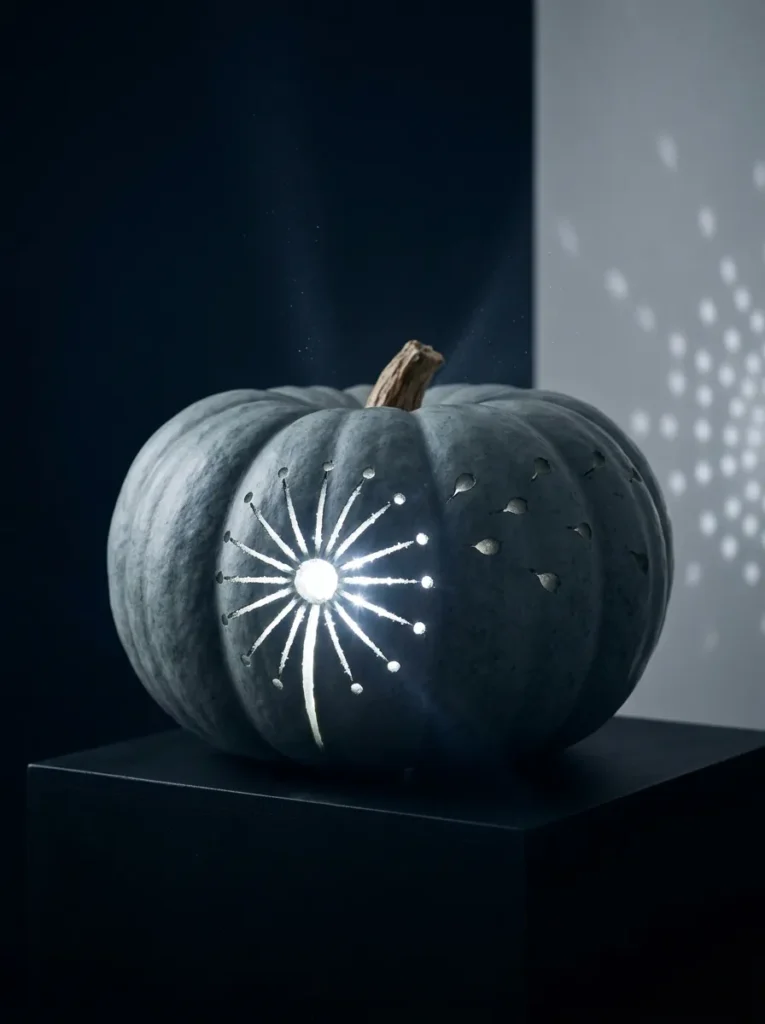
Pumpkin: Jarrahdale, about 10 inches wide. Its blue-gray skin is dense and its flesh firm, so drilled holes keep crisp edges instead of tearing.
Technique and design: Drill-hole pattern at two depths. Sixteen spokes of 1/8-inch through-holes radiate from a 3/8-inch center to form a dandelion seed head, while seven drifting seeds are drilled only partway so they glow softly.
Tools and materials: Cordless drill, brad-point bits (1/8, 1/4, 3/8 inch), painter’s tape for a depth flag, pushpins, printed dandelion pattern, pumpkin saw for the bottom opening, rolled towels, nonslip mat. Adults handle the drill and saw; kids can pick the seed layout and scoop.
Difficulty and time: Beginner, about 2 hours.
Lighting: Bare 5000K cool-white LED puck, no diffuser. Never open flame.
Lifespan and preservation: Small holes expose less flesh than large cut-outs, so drilled pumpkins tend to last longer. Petroleum jelly around each hole slows drying.
Display: A black plinth, two feet from a pale gray wall.
Standout detail: A tape flag on the bit stops the seed holes about two-thirds of the way through the wall, so the drifting seeds glow dimmer than the head.
Why this works: Drilling some holes through and others only partway gives one pumpkin two brightness levels, which is what makes a dandelion look like it is dissolving into the air.
A dandelion seed head is nothing but dots and spokes, which makes it perfect for a drill. My husband, who spends his days around drills, taught me the trick that makes this pumpkin look alive: wrap a strip of painter’s tape around the bit as a depth flag. Holes in the seed head go all the way through and glow bright white. Holes in the drifting seeds stop about two-thirds of the way, so they glow dim and distant. Two depths, one pumpkin, and the whole design appears to dissolve into the dark as the seeds float away.
Jarrahdale works here because its dense, blue-gray flesh holds a clean hole at both depths. Map the pattern with pushpins, drill at low speed, and cradle the pumpkin in rolled towels on a nonslip mat so it cannot spin. Practice a partial hole on the scooped-out lid first to check your tape flag. Use a bare, cool-white LED with no diffuser for sharp points, and never a candle, since heat softens the thin rind between holes. Small holes expose less flesh than big cut-outs, so a drilled pumpkin tends to last longer; petroleum jelly around each hole helps.
4. Dotted Arch Sunrise
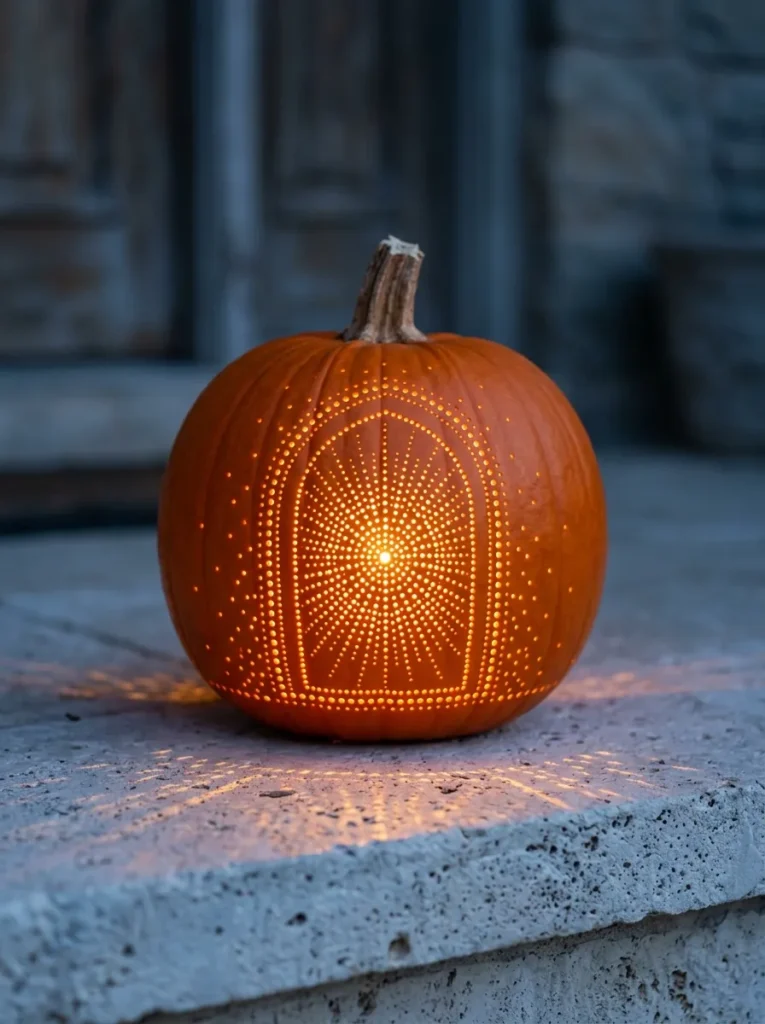
Pumpkin: Sugar Pie, about 8 inches wide. Its fine-grained, thinner wall lets a poker pass through cleanly without the flesh tearing.
Technique and design: Pierced stencil. A taped paper pattern is punched with a poking tool to form an arched doorway outlined in dots, with a rising sun of about 40 tight pokes inside it.
Tools and materials: Pumpkin poking tool or sharp awl, printed pattern, painter’s tape, pumpkin saw for the bottom opening, metal scoop, felt-tip marker. Adults handle the awl and saw; kids can tape the pattern and scoop.
Difficulty and time: Beginner, about 1.5 hours.
Lighting: Warm 3000K LED puck set on the floor of the pumpkin.
Lifespan and preservation: Tiny punctures expose far less flesh than cut-outs, so pierced pumpkins generally outlast cut-through designs. Wipe the scooped interior dry before setting the light inside.
Display: A pale limestone step.
Standout detail: The sun’s pokes sit tightest at the center, so the glow is brightest where the arch frames it.
Why this works: Tiny punctures expose far less flesh than a cut-out, which is why pierced designs stay crisp while reading as delicate line art.
Dots can draw anything, and they are the gentlest way to open a pumpkin’s skin. A poking tool punches a pin-sized hole instead of slicing a wide channel, so far less flesh is exposed to air and mold. It is the friendliest technique for beginners. Choose a clean architectural shape, like an arch with a rising sun inside it, and tape the pattern flat over the curve with small snips in the paper. Poke along every line, spacing dots about a quarter inch apart. Pull the paper away and the arch appears, drawn in light.
Sugar Pie is the right pumpkin here. Its fine-grained flesh lets the poker slide through without tearing, and its small size keeps the pattern tight. Make the sun from about forty pokes, packed densely at the center and spreading outward, so the light is strongest where the arch frames it. Avoid pokes closer than an eighth inch apart, because the skin between them can crumble. Set a warm LED puck on the floor of the pumpkin and display it on a pale limestone step, where the dots cast tiny freckles of light on the stone.
5. Kintsugi Gold Leaf
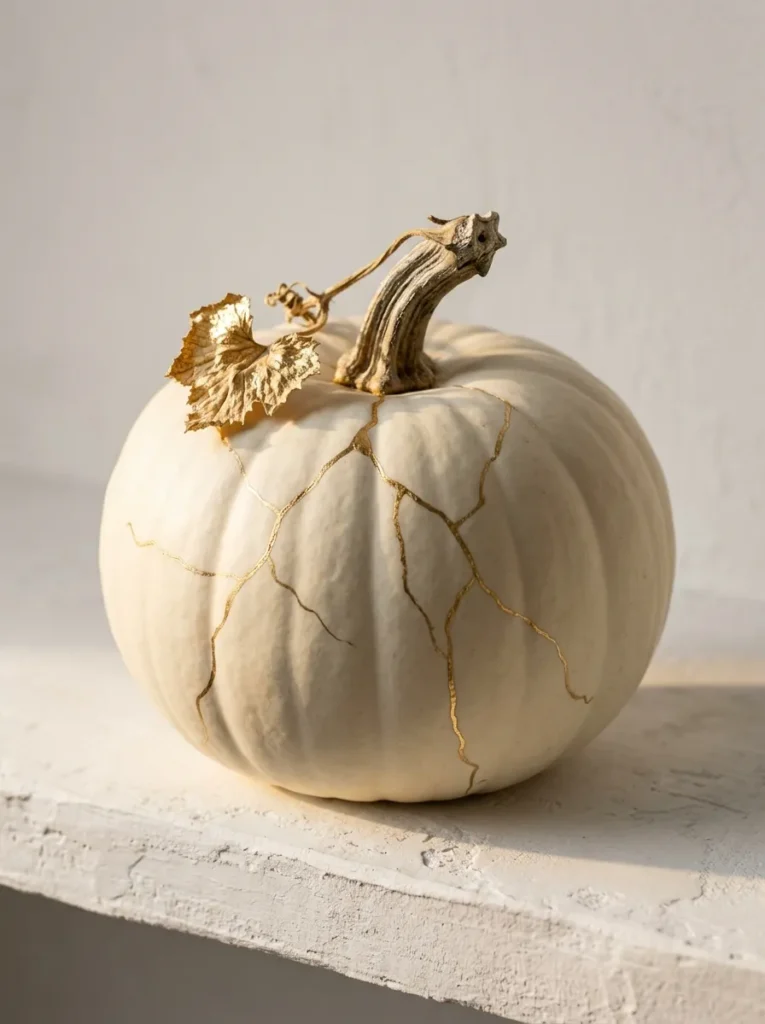
Pumpkin: Lumina, about 10 inches wide. Its smooth, powdery-white rind has no deep ribs to break the gilded lines, so the cracks read as one continuous drawing.
Technique and design: No-carve gold leaf. Hairline “cracks” radiate from the stem and are gilded like kintsugi repairs, then finished with a matte sealer.
Tools and materials: Gilding size, imitation gold leaf sheets, fine round brush, soft dry brush, pencil, damp cloth, matte clear spray sealer. An adult applies the spray outdoors.
Difficulty and time: Intermediate, about 1.5 hours plus the size’s tacking time.
Lighting: No interior light. A 2700K LED picture light or spot placed to the side catches the leaf.
Lifespan and preservation: An uncarved, gilded pumpkin generally stays fresh for weeks indoors. Keep it dry, since moisture lifts leaf.
Display: A white plaster shelf.
Standout detail: Each crack widens briefly into a small, irregular gold patch, the way real repaired pottery shows its joins.
Why this works: Because the rind stays uncut, a gilded pumpkin can stay fresh for weeks, and fine gold lines make it look like repaired ceramic rather than seasonal decor.
I fell for kintsugi the day a favorite stoneware bowl cracked in my Austin kitchen. Instead of tossing it, I read about the Japanese craft of repairing pottery with gold, and the lines looked more beautiful than the unbroken bowl. A pumpkin wants the same treatment. Lightly pencil cracks radiating from the stem, brush them with gilding size, and wait until the size turns tacky. Lay a gold leaf sheet over it, press gently, and brush away the excess. What remains are glittering seams that look repaired, not painted, on a pumpkin the color of fresh plaster.
Work in short sections so the size never dries before the leaf goes on. Gold leaf is wafer-thin and will tear if you rush or touch it with a damp finger, so use dry hands and a soft brush. Let it settle for a few minutes, then seal the pumpkin with a matte clear spray outdoors, since the fumes are strong and an adult should handle it. Keep the finished piece dry, because moisture lifts leaf, and a gilded, uncarved pumpkin generally stays fresh for weeks indoors, far longer than any carved design.
6. Pressed Fern Spiral
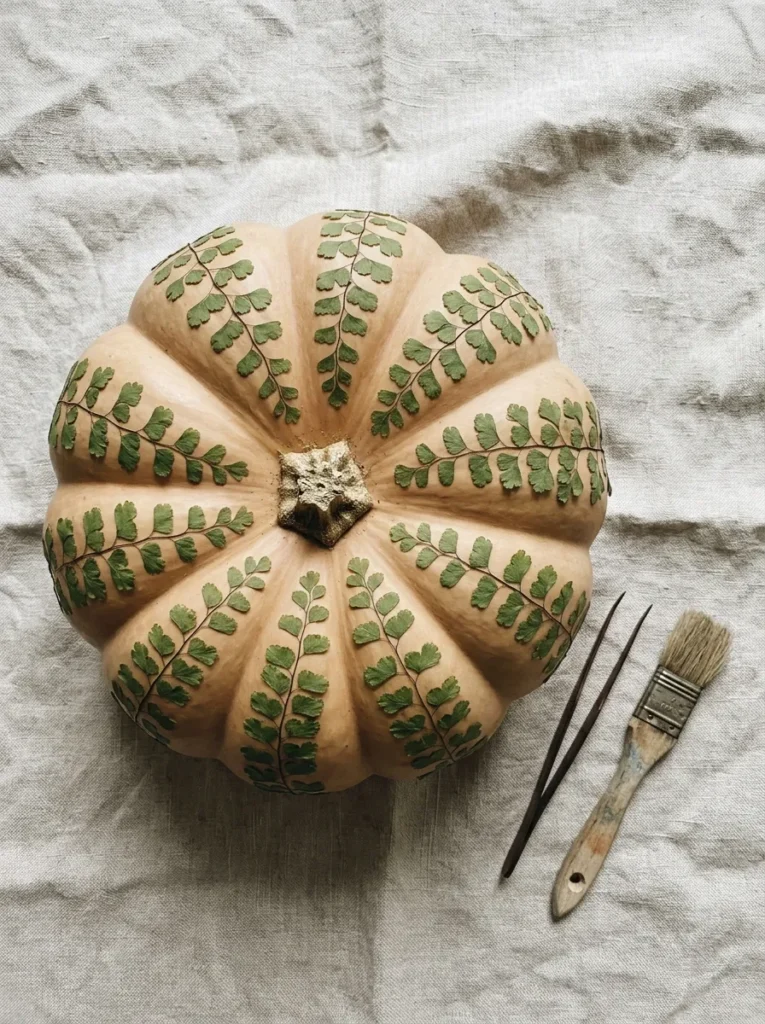
Pumpkin: Long Island Cheese, about 12 inches wide. Its flat, tan, lightly ribbed skin is a warm, quiet backdrop, and the shallow ribs guide the spiral.
Technique and design: No-carve pressed botanicals with decoupage. About nine pressed maidenhair fern fronds spiral along the ribs, bases tucked under the stem so the pattern looks grown, not stuck on.
Tools and materials: Pressed maidenhair fronds (a week or two between blotting paper under heavy books), tweezers, matte water-based decoupage medium, soft flat brush, damp cloth, matte clear spray sealer applied by an adult outdoors.
Difficulty and time: Beginner, about 1 hour plus drying between coats.
Lighting: No interior light. A warm 3000K LED uplight set at an angle shows off the fern texture.
Lifespan and preservation: Uncarved, it generally stays fresh for weeks if kept cool and out of rain. Three thin sealing coats protect the botanicals.
Display: A walnut side table.
Standout detail: The frond bases tuck under the stem, so every line of the spiral seems to grow from one point.
Why this works: Pressed botanicals sit flat in a clear matte layer, so the pumpkin reads as a specimen print and, left uncarved, generally lasts for weeks.
Think of a botanical specimen sheet, but wrapped around a pumpkin. Maidenhair fronds press beautifully because they are thin and flat, drying in a week or two between blotting paper under heavy books. Arrange them carefully with tweezers in a spiral that follows the shallow ribs of a tan Long Island Cheese pumpkin, with each frond’s base near the top and leaflets fanning outward. Paint matte decoupage medium over each frond, working outward from its center. The result looks collected rather than crafted, like a page from an old field guide.
My husband’s finishing rule applies here: thin coats cure, thick coats skin over and stay soft underneath. So brush on three thin layers of matte decoupage medium, letting each dry fully, then finish with a matte clear sealer. Wash the pumpkin with a damp cloth first and dry it completely so the medium bonds to clean skin. Avoid glossy finishes, which make ferns look laminated. Because the pumpkin is uncarved, it generally stays fresh for weeks if kept cool and out of rain, and it needs no light inside at all.
7. Pine Ridge Trio
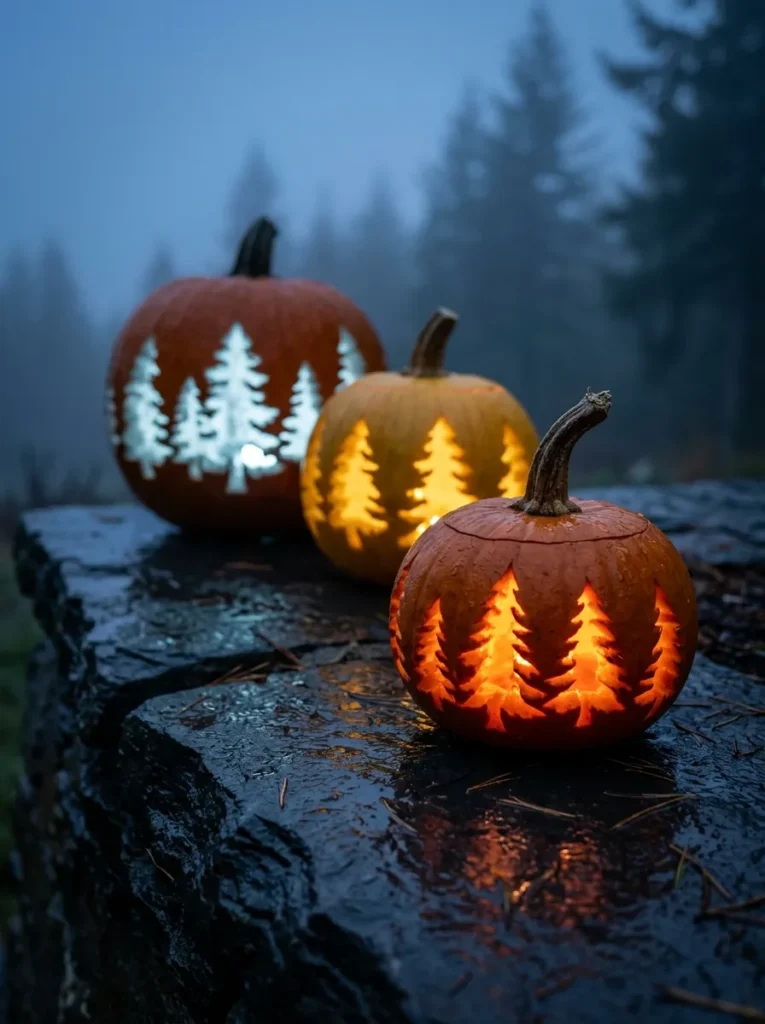
Pumpkin: Howden (about 14 inches), Aspen (about 10 inches), and Baby Pam (about 6 inches). Howden’s tall, flat-sided body gives the largest tree field room, while Baby Pam’s thin wall carves easily at tiny scale.
Technique and design: Layered multi-pumpkin scene. One row of fir silhouettes is cut through each pumpkin at a smaller scale, so the trio reads as a forest receding into mist.
Tools and materials: Serrated pumpkin saw, detail saw, pin-poke tool, three printed fir patterns at 100%, 70%, and 45% scale, painter’s tape, metal scoop, cedar shims. Adults handle all saws; kids can scoop.
Difficulty and time: Intermediate, about 4 hours for all three.
Lighting: Three battery LED pucks: 4000K in the largest, 3000K in the middle, and 2200K in the smallest, so the glow cools toward the back like haze.
Lifespan and preservation: Fully cut designs generally last a few days to about a week. Carve all three the day before display and brush petroleum jelly along every cut edge.
Display: A stone ledge, largest pumpkin at the back.
Standout detail: The cool-to-warm light shift, which creates atmospheric haze without a single extra prop.
Why this works: Shrinking a pattern and shifting the light from cool to warm mimics atmospheric perspective, so three small pumpkins read as one deep landscape.
Distance makes things smaller, paler, and cooler, and you can borrow all three effects for a pumpkin scene. Print one row of fir trees at three sizes: full scale for the largest pumpkin, about 70 percent for the middle, and about 45 percent for the smallest. Cut each pattern through the wall with the same sharp triangular shapes, keeping every trunk connected to the ground line by a bridge. Line the pumpkins up with the tallest at the back and they become a forest receding into mist. It is a landscape painting made from a vegetable.
The warm-to-cool light is the quiet trick. Put a 4000K puck in the biggest pumpkin, 3000K in the middle, and 2200K in the smallest, so the glow cools toward the back like haze over distant hills. My husband’s rule for any uneven ledge is level first, then shim, so tuck a pair of cedar shims under each pumpkin to stop rocking in a breeze. Avoid crowding the trees; a quarter inch of skin between neighboring firs keeps the wall strong. Carve all three the day before display and brush petroleum jelly on every cut edge.
8. Ink Wash Mist
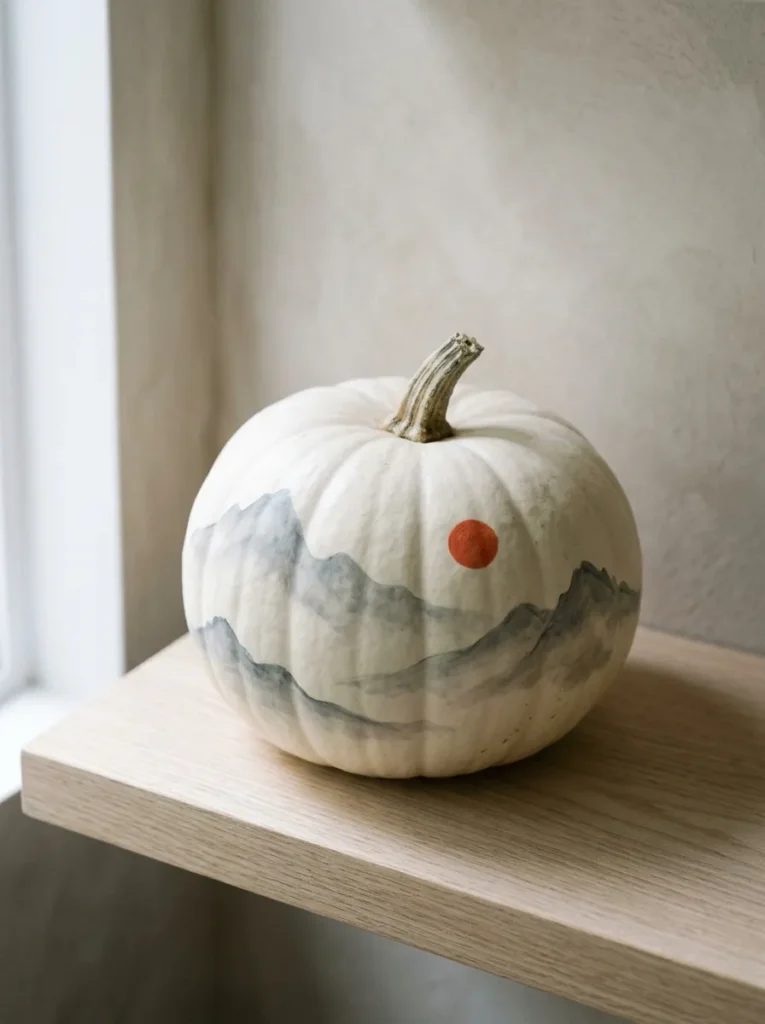
Pumpkin: Casper white, about 10 inches tall. Wiped clean and dried, its smooth, pale rind holds thin washes without streaking and has no deep ribs to interrupt the landscape.
Technique and design: Matte-paint finish, no carving. Three diluted matte acrylic washes layered wet-on-wet form mountain ridges dissolving into mist, in the style of Japanese ink painting.
Tools and materials: 1.5-inch flat brush, #8 round brush, matte acrylics in charcoal black, slate gray, and warm putty gray, plus a dab of vermilion red, small spray bottle of water, paper towels, damp cloth, matte clear spray sealer applied by an adult outdoors.
Difficulty and time: Beginner, about 1 hour plus drying.
Lighting: No interior light. Natural window light shows the washes best; at night, a 3000K LED spot from the side works.
Lifespan and preservation: Left uncarved, it generally stays fresh for weeks indoors. Keep it out of rain and seal the paint.
Display: A pale oak bookshelf.
Standout detail: One vermilion circle, the size of a dime, as the sun.
Why this works: Thin matte washes bleed into each other like ink, so the pumpkin looks hand-painted by an artist even when the brushwork is simple.
I am a plant person, not a painter, which is exactly why I love this pumpkin. Ink wash punishes fussing and rewards restraint. Mist a white Casper pumpkin lightly with water, then drag a flat brush loaded with pale putty gray across the middle. Drop slate gray above it while the first layer is still wet and let the colors bleed. Finish with charcoal ridgelines at the base, painted in one confident stroke each. When the mist turns slightly uneven, stop. That softness is the whole point, and it looks like a mountain range seen through fog.
Dilute each paint with about two parts water to one part paint, and test on the pumpkin’s back first, because every rind absorbs a little differently. Wipe the pumpkin clean and dry before you start; any dust or moisture makes washes bead. Add the vermilion sun last, a single dab of matte red the size of a dime. Seal outdoors with a matte clear spray, handled by an adult. Left uncarved and painted, the pumpkin generally stays fresh for weeks indoors, so this is the idea to start early in October.
9. Ammonite Cameo Relief
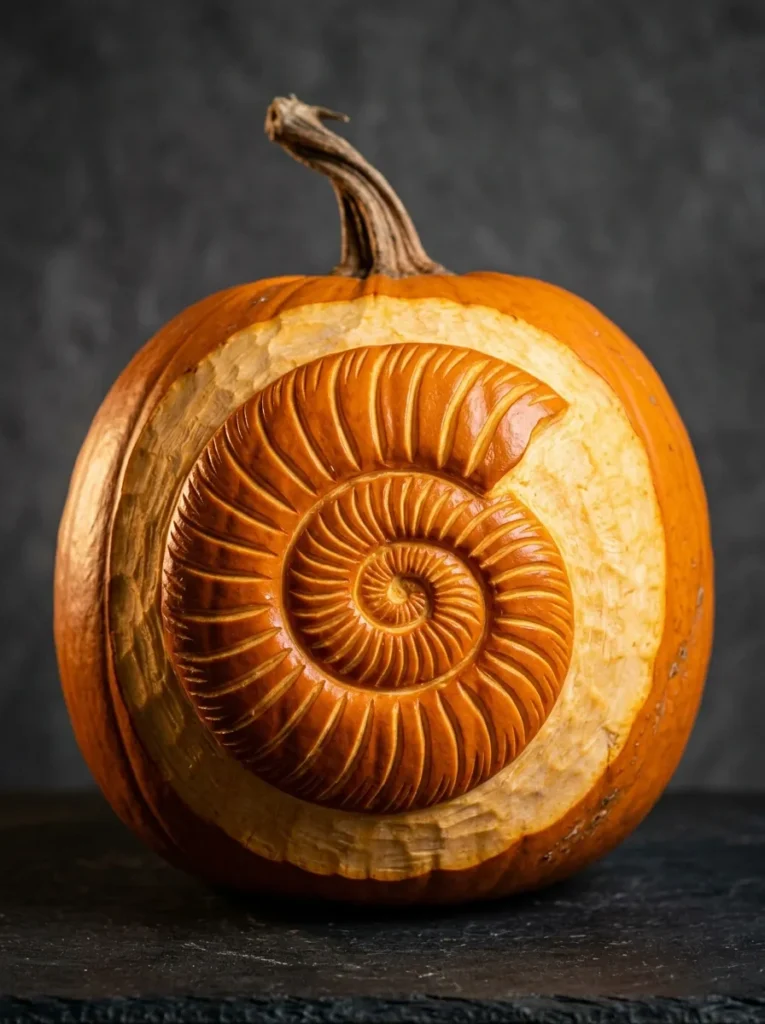
Pumpkin: Autumn Gold, about 10 inches tall. Its smooth, ribless, glossy rind gives the raised spiral a clean surface, and the pale flesh beneath makes the lowered background read clearly.
Technique and design: Relief carving, no cut-through. The background is lowered by about 1/8 inch so an ammonite spiral stays raised, with chamber lines cut by a V-gouge.
Tools and materials: V-gouge, 3/8-inch U-gouge, clay loop tool, pencil, tracing paper, painter’s tape, petroleum jelly. Adults handle all gouges; kids can trace the spiral.
Difficulty and time: Intermediate, about 2.5 hours.
Lighting: No interior light. A 2700K LED spot aimed low from one side, about 12 inches away, makes the relief cast its own shadows.
Lifespan and preservation: Because the background shaving removes skin, it generally lasts about a week or so. Brush petroleum jelly over the shaved ground to slow drying.
Display: A dark plaster wall niche.
Standout detail: Each chamber line is a single V-gouge pass, so shadows settle inside every ridge.
Why this works: Raised relief catches directional light and casts its own shadows, so a pumpkin reads as sculpture rather than decoration.
Sculptors have used raking light for centuries because it makes shallow carving look deep. A pumpkin responds the same way. Instead of cutting a design out, you remove the background and leave the motif raised, here an ammonite spiral. Trace the spiral on an Autumn Gold pumpkin and outline it with a V-gouge. Then shave the surrounding skin down by about an eighth of an inch with a loop tool. The spiral stays orange and glossy while the lowered ground turns pale and matte, and a low side light does the rest of the work.
Ammonite chambers are easy to fake: draw a spiral that widens by about a third with each turn, then divide the coil with short, evenly spaced lines. Cut those dividing lines with a single V-gouge pass, roughly an eighth of an inch deep, so shadows settle inside each ridge. Avoid going deeper, which weakens the wall. Because the background shaving removes skin, a relief pumpkin generally lasts about a week or so; brush petroleum jelly over the shaved ground to slow drying. No interior light is needed, only a 2700K LED spot aimed low from one side.
10. Stained Glass Lancets
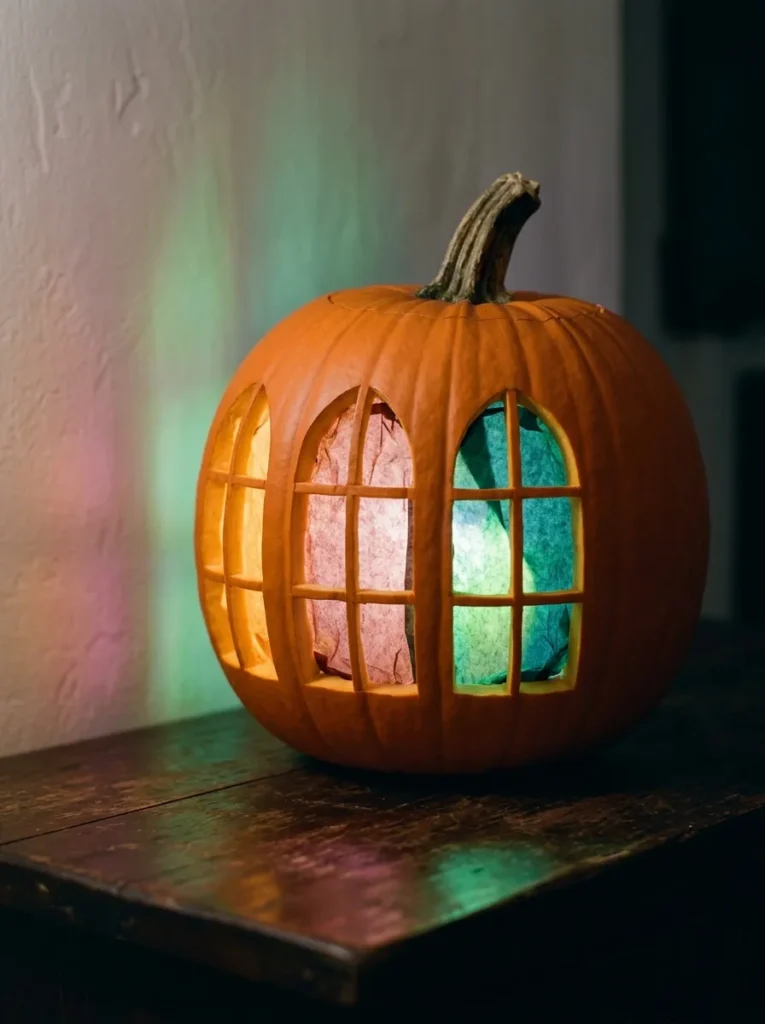
Pumpkin: Prizewinner, about 12 inches tall. Its smooth, firm wall holds the straight edges that window frames need, and the broad face fits three tall arches side by side.
Technique and design: Cut-through windows backed with tissue. Three arched lancet windows (center 7 inches tall, sides 5 inches, each about 1.5 inches wide) are cut through the face with 1-inch skin bars between them, then lined inside with amber, dusty rose, and deep teal tissue.
Tools and materials: Pumpkin saw, detail saw, pin-poke tool, paper arch templates, colored tissue paper, diluted white craft glue, soft brush, scissors, painter’s tape. Adults handle the saws; kids can tear and glue the tissue.
Difficulty and time: Intermediate, about 3 hours.
Lighting: Warm-white 2700K LED puck. Never a flame, since tissue is paper.
Lifespan and preservation: Fully cut designs generally last a few days to about a week. Keep it indoors, because moisture loosens the tissue.
Display: A dark console beside a window.
Standout detail: Where the amber and teal tissue overlap by a half inch, they blend into a soft green, just like real glass.
Why this works: Backing cut openings with tissue turns bare holes into colored glass, so a pumpkin throws stained-glass light without any paint on its skin.
The first time I held colored tissue up to a lamp, I stopped and just looked at it. Tissue glows like real glass, and a pumpkin gives it a perfect warm frame. Cut three tall arched openings, the center one slightly taller, and leave an inch of skin between them as the window bars. Tear tissue into pieces a little larger than each opening, brush diluted glue around the inner edge, and press the tissue on from inside. Amber, dusty rose, and deep teal look rich together, like afternoon light through an old chapel.
Prizewinner works because its wall is firm enough to keep straight window edges, but scrape the inner wall around each opening so the tissue sits flat. Glue only after cutting and scooping, and let it dry fully before the light goes in. Use an LED puck, never a flame, because tissue is paper. Where the amber and teal pieces overlap by a half inch, they blend into a soft green, just like real glass. Keep the pumpkin indoors, since moisture loosens the tissue, and expect a few days to about a week.
You’ll Also Love:20+ Sophisticated Halloween Decor Ideas for 2026
11. Living Succulent Vessel
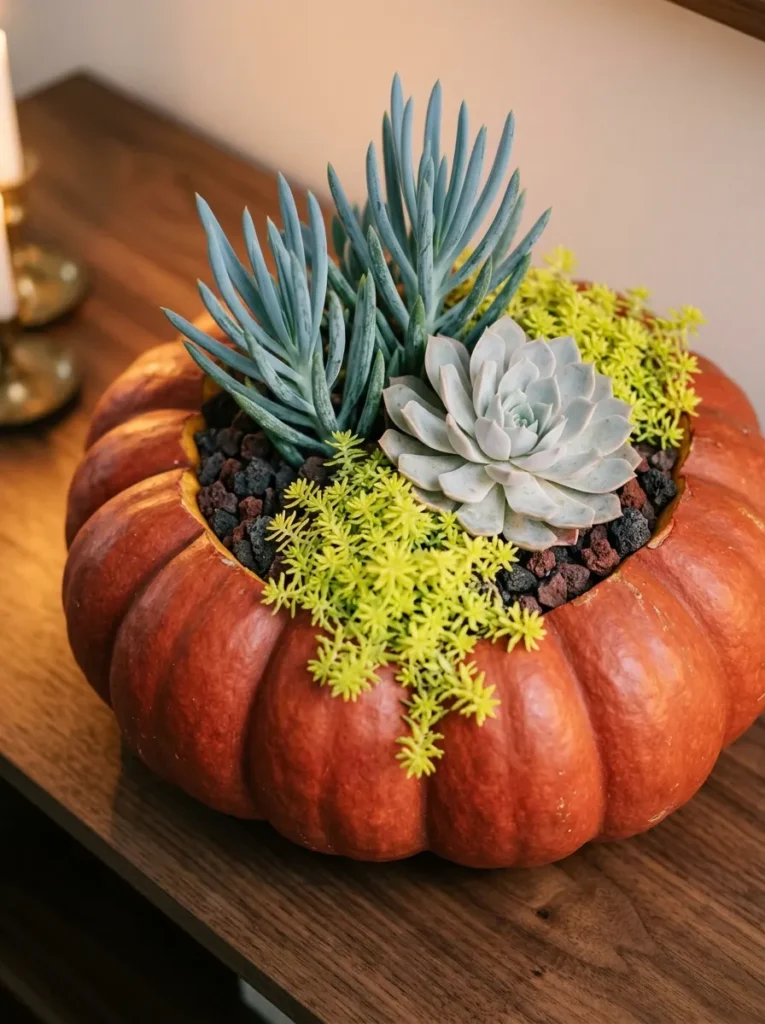
Pumpkin: Cinderella (Rouge Vif d’Etampes), about 12 inches wide. Its thick, wide-shouldered body forms a stable bowl, and its deep ribs give the planting a sculptural shape.
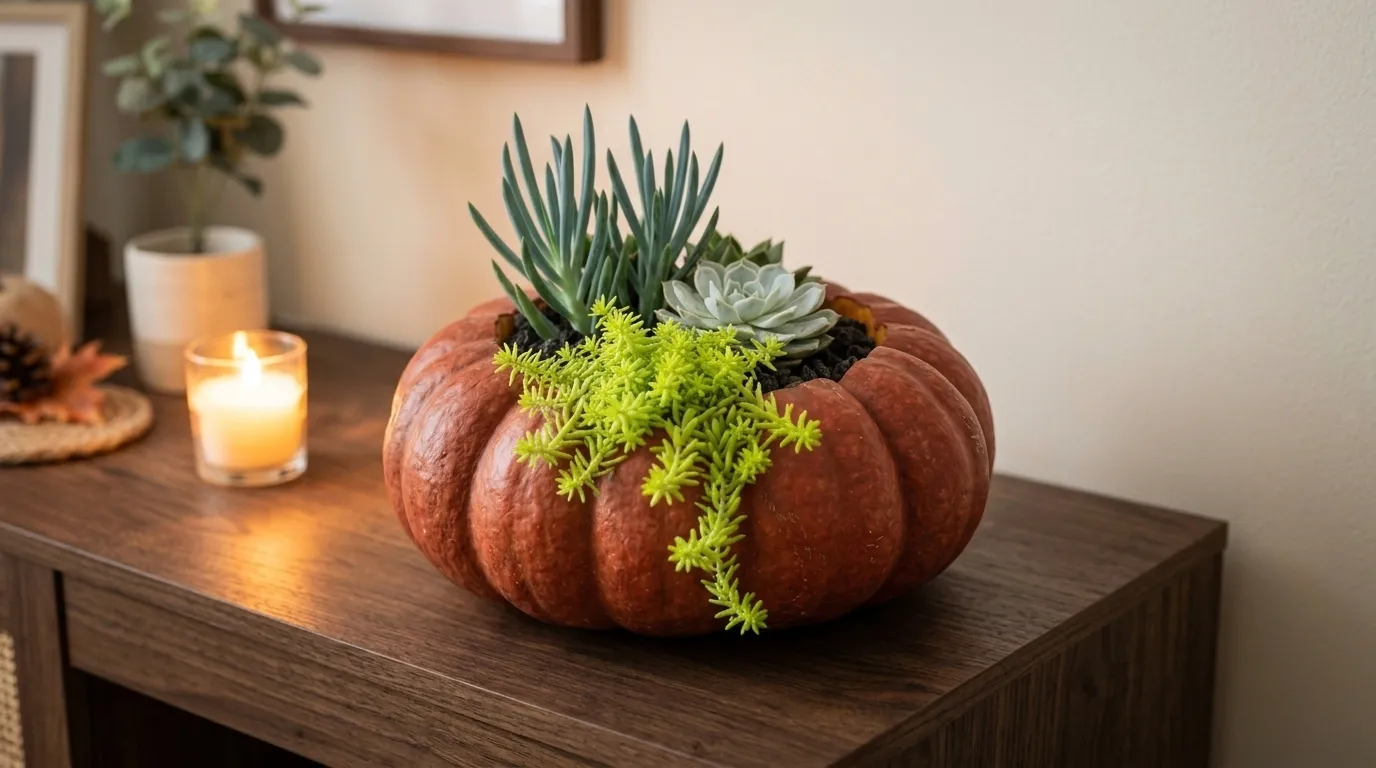
Technique and design: Hollow vessel planting, no face carving. The top is cut off, the cavity scooped clean, and three succulents in nursery pots are tucked inside: blue chalksticks (Senecio mandraliscae), Echeveria elegans, and Sedum ‘Angelina’.
Tools and materials: Pumpkin saw, metal scoop, plastic liner or saucer, three 2-inch nursery pots, crushed lava rock, tray. An adult handles the saw; kids can scoop and place the plants.
Difficulty and time: Beginner, about 1 hour.
Lighting: Two flameless LED taper candles, 2200K, set beside the pumpkin.
Lifespan and preservation: Because only the top opens, it generally outlasts fully carved designs, though the interior still softens over time. Never water inside the pumpkin.
Display: A walnut console table.
Standout detail: The plants stay in their nursery pots on a liner, so the pumpkin stays dry and the succulents can be potted up after October.
Why this works: Keeping plants in nursery pots inside the hollow pumpkin protects the flesh from moisture, so the vessel lasts longer and the succulents survive to be replanted.
A pumpkin is a ready-made planter, and the plant science explains why it works. Succulents store water in thick leaves, so they tolerate the dry, cool conditions inside a hollowed pumpkin far better than ferns or annuals would. Cut a wide opening around the stem, scoop the cavity clean, and set a plastic liner in the bottom. Slip three nursery pots inside, hiding the rims with crushed lava rock. The blue-green and silver tones against brick-red skin look like a still life painted in October light, and nothing about the face needs carving.
Choose plants with different silhouettes: blue chalksticks (Senecio mandraliscae) for spiky height, Echeveria elegans for a pale rosette, and Sedum ‘Angelina’ for a chartreuse spill over the rim. Odd numbers look natural, so stop at three. Never water inside the pumpkin; any moisture speeds rot. Keep the plants in their nursery pots so they lift out cleanly. Set the pumpkin on a tray. Because only the top is opened, this vessel generally outlasts fully carved designs, though the interior still softens over time. When October ends, pot the succulents up and compost the pumpkin.
12. Brass Pin Sunburst
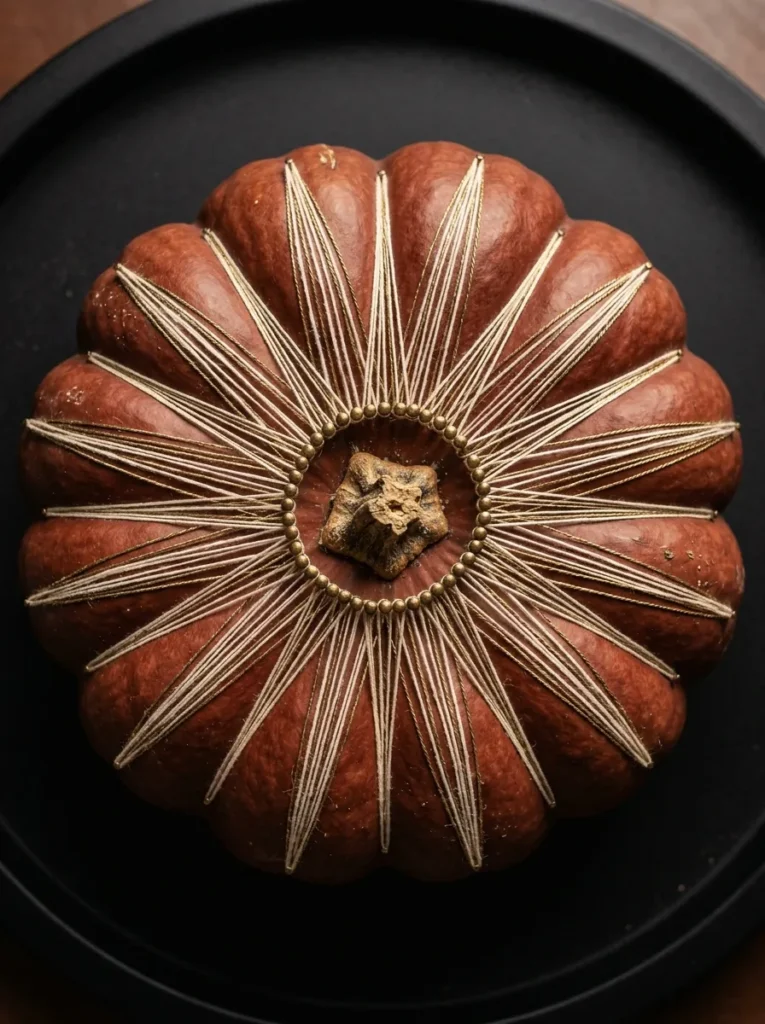
Pumpkin: Fairytale (Musquee de Provence), about 14 inches wide. It is a dense Cucurbita moschata, so its firm flesh grips pins, and its deep ribs steady the thread lines.
Technique and design: Pin-and-thread string art, no carving. Two rings of 24 brass pins, one around the stem and one 6 inches out, are joined by ivory thread in a straight-line sunburst.
Tools and materials: 48 brass escutcheon pins (about 3/4 inch), ivory cotton embroidery floss, antique-brass metallic thread, awl, pencil, scissors. Adults handle the awl and pins.
Difficulty and time: Intermediate, about 2 hours of patient winding.
Lighting: No interior light. A warm 3000K LED spot from above catches the thread sheen.
Lifespan and preservation: Uncarved and unpainted, it generally stays fresh for weeks, and the pins pull out cleanly afterward.
Display: A matte black serving tray.
Standout detail: Every fourth strand is antique-brass thread, so the sunburst carries a quiet metallic highlight.
Why this works: Straight thread lines across a curved pumpkin create a geometric pattern that looks engineered, giving a no-carve pumpkin a modern, architectural feel.
Straight lines on a round surface are always a little surprising. That is why this pumpkin stops people mid-sentence. My husband, who builds houses for a living, pointed me to brass escutcheon pins because they do not rust or stain the flesh, and he taught me to pre-start each pin hole with an awl so the rind never splits. Press 24 pins in a ring around the stem and 24 more in an outer ring. Then run ivory thread between them in a sunburst, pulling each strand taut as you go.
Fairytale pumpkins are dense Cucurbita moschata, so the flesh grips each pin firmly instead of letting threads sag. Mark the pin rings lightly in pencil, then wind ivory thread between inner and outer pins in a steady rotation, crossing the skin in straight lines. Swap in antique-brass thread for every fourth strand; it catches light and turns the sunburst into a quiet metallic highlight. Avoid pulling so hard that pins tilt. Tie off both ends around a pin. Uncarved and unpainted, the pumpkin generally stays fresh for weeks, and the pins pull out cleanly afterward.
13. Spiral Ribbon Lantern
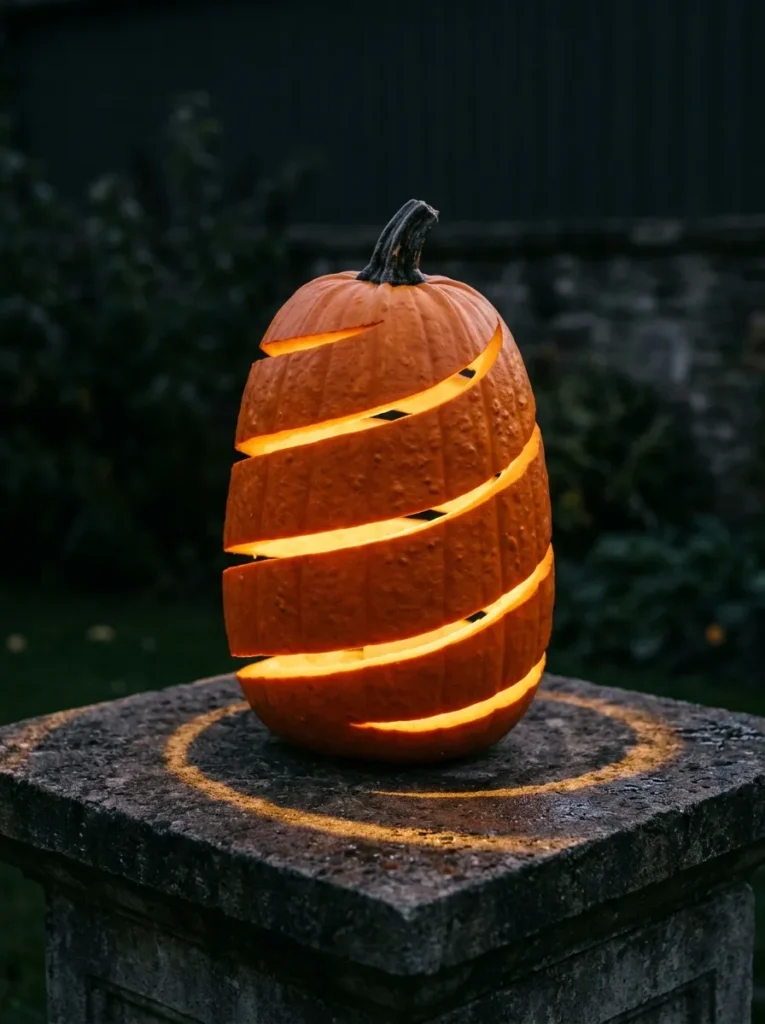
Pumpkin: Aladdin, about 15 inches tall. Its tall, thick-walled body gives four full turns of spiral room, and the firm wall braces the long slit.
Technique and design: Continuous spiral ribbon cut. A slit tapering from 3/4 inch at the base to 1/2 inch at the top winds four turns, leaving solid 2-inch collars of untouched skin at the top and base.
Tools and materials: Detail saw, pumpkin saw, 1-inch painter’s tape, marker, metal scoop, towel, petroleum jelly. Adults handle both saws; kids can wrap the tape guide.
Difficulty and time: Advanced, about 3 hours.
Lighting: One warm 2700K LED puck set in the center.
Lifespan and preservation: A long slit opens a lot of flesh, so expect the shorter end of a few days to about a week. Keep it out of the sun and brush petroleum jelly along both slit edges.
Display: A concrete plinth.
Standout detail: The tapering slit makes the spiral read as a coil seen in perspective.
Why this works: A continuous spiral lets one long slit release a lot of light while solid collars at each end keep the wall braced.
A continuous spiral is one of the sturdiest ways to remove a lot of skin, because the uncut ribbon stays connected from top to bottom. Wrap one-inch painter’s tape around a tall pumpkin in a rising spiral, four turns, and leave a two-inch collar of untouched skin at the top and the base. Trace both tape edges with a marker, peel the tape, and cut along the lines in short sections. The strip pops out in pieces, and a single ribbon of light remains, climbing the pumpkin like a staircase seen from above.
Structure matters more than skill here. Keep the slit about three-quarters of an inch wide at the base and taper it to a half inch at the top, which makes the spiral look like a coil in perspective. Use a detail saw for the curves, and rest your wrist on a towel so the blade never twists. Avoid cutting the last two inches near the base, because that solid ring keeps the pumpkin from sagging. Set one warm LED puck in the center and expect the ribbon to glow like a lit stairwell.
14. Fibonacci Seed Mosaic
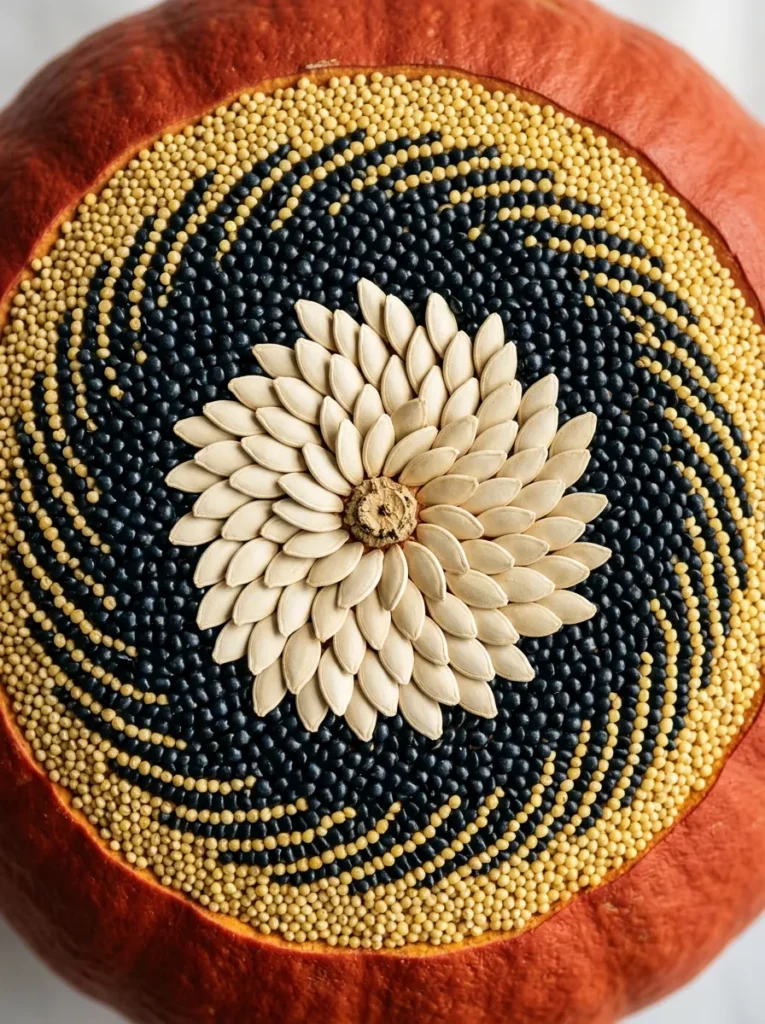
Pumpkin: Red Kuri, about 8 inches wide. Its smooth, deep brick-orange skin makes a clean backdrop, and its hard, thick rind resists denting while seeds are placed.
Technique and design: No-carve seed mosaic. A golden-angle (137.5-degree) dot spiral covers the crown, filled with ivory pumpkin seeds at the center, black beluga lentils in the middle ring, and golden millet at the edge.
Tools and materials: Printed golden-angle dot template, pin-poke tool, tweezers, clear-drying craft glue, small brush, matte clear spray sealer applied by an adult outdoors.
Difficulty and time: Intermediate, about 3 hours of patient gluing.
Lighting: No interior light. Window light from one side shows each seed’s tiny shadow.
Lifespan and preservation: Uncarved, it generally stays fresh for weeks. Keep it dry and out of rain.
Display: A round oak side table.
Standout detail: Every ivory seed points outward from the center, the way real sunflower seeds radiate.
Why this works: A golden-angle spiral packs seeds evenly with no gaps, which is why the finished crown looks natural and complete rather than crafted.
Sunflower heads taught me this one. Count the spirals in a seed head and you will find neighboring Fibonacci numbers, because seeds pack most efficiently when each sits about 137.5 degrees from the last. That angle is the whole design. Print a free golden-angle dot template, tape it over the crown of a Red Kuri pumpkin, and mark each dot with a pin tool. Then glue seeds one at a time, ivory at the center, black lentils in the middle ring, golden millet at the edge, until the crown looks like a sunflower head in miniature.
Use tweezers and a pea-size dab of clear-drying craft glue per seed, working outward in small sections so nothing slides. Let each section set for a few minutes before you start the next. Keep every ivory seed pointed away from the center, the way real seeds radiate, which gives the spiral its rhythm. Avoid glossy sealers; one light pass of matte spray, applied outdoors by an adult, protects the grain. Because the pumpkin is uncarved, it generally stays fresh for weeks, so keep it dry and out of rain, and the seeds scrape off easily when the season ends.
15. Wild Wheat Engraving
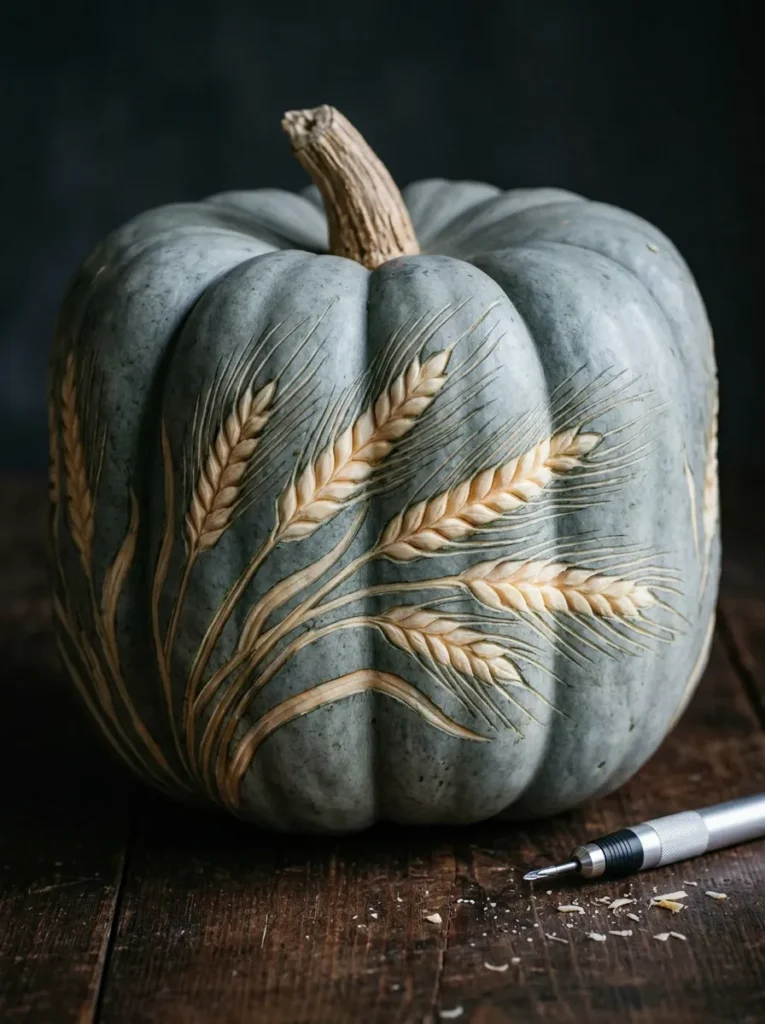
Pumpkin: Blue Doll, about 10 inches wide. Its smooth blue-gray skin lifts away cleanly, exposing pale cream flesh, so every engraved line reads bright against a cool ground.
Technique and design: Rotary-tool engraving, no cut-through. Wild wheat stalks bend across the face, engraved with a 1/16-inch ball-nose bit for stalks and grains and a 1/32-inch diamond point for the fine awns.
Tools and materials: Variable-speed rotary tool, the two bits above, pencil, tracing paper, painter’s tape, rolled towels, safety glasses, soft toothbrush, petroleum jelly. Adults handle the tool; kids can trace the wheat.
Difficulty and time: Advanced, about 3 hours.
Lighting: 2200K amber LED puck inside for a faint glow along the lines.
Lifespan and preservation: Most of the skin stays intact, so engraved pumpkins generally outlast cut-through designs. A thin smear of petroleum jelly over the lines slows drying.
Display: A pale oak bench.
Standout detail: Each awn is a single 1/32-inch stroke about 3 inches long, fanning from its grain like pencil hatching.
Why this works: Engraving removes only the skin, so a pumpkin can carry pen-fine line art while most of its protective surface stays intact.
After a season of hand gouges, I wondered if a rotary tool could draw as finely as a pen. It can, and the lines look like pencil work glowing on blue-gray skin. Wheat was my first motif because it is all strokes: a slim stalk, a row of grains, and long awns fanning out. I set the tool to its lowest speed, rested my wrist on a towel, and let the ball-nose bit float across the surface instead of pushing. The pale flesh beneath the skin showed through as clean, cream-colored lines, like frost drawn on glass.
Blue Doll is a good canvas because its blue-gray skin lifts away cleanly, exposing pale flesh. Trace the wheat in pencil, then engrave the stalks with the 1/16-inch ball-nose bit and the awns with a 1/32-inch diamond point. Wear safety glasses, cradle the pumpkin in rolled towels so it cannot roll, and let an adult handle the tool. Brush away shavings with a soft toothbrush. Because most of the skin stays intact, engraved pumpkins generally outlast cut-through designs. Set an amber LED inside for a soft glow. A thin smear of petroleum jelly over the lines slows drying.
Styling Principles: Choosing Your Technique
The best pumpkin looks designed because the technique was chosen on purpose. Use these five rules to pick the right one before you pick up a tool.
Match the technique to your skill. The most reliable cool pumpkin carving ideas for beginners avoid long saw cuts: start with Dotted Arch Sunrise, Dandelion Wish, or Pressed Fern Spiral. Save Luna Moth Lace, Spiral Ribbon Lantern, and Wild Wheat Engraving for your second or third pumpkin.
Budget your hours honestly. Ink Wash Mist and Living Succulent Vessel take about an hour. Etching, relief, and pin-and-thread work take two to three hours, and the layered Pine Ridge Trio takes about four. Choose a design that fits your evening, not your best-case Saturday.
Pick by lifespan. Cutting through the rind starts decay, so fully cut designs generally last a few days to about a week, while etched, drilled, engraved, and relief designs hold up better because more skin stays intact. No-carve pumpkins generally stay fresh for several weeks. If your display date is a long way off, go no-carve.
Let the light match the mood. Amber 2200K LEDs read as candlelight, 2700K as a warm lamp, and 4000K to 5000K as moonlight. Use LEDs over open flame, because they run cooler and do not soften the flesh from the inside.
Give adults the blades. Adults handle every saw, gouge, awl, drill, and rotary tool, and kids can design, trace, scoop, and glue. Work on a stable surface with the pumpkin cradled in rolled towels so it never rolls.
Frequently Asked Questions (FAQ)
How long do carved pumpkins last?
A fully carved pumpkin generally lasts a few days to about a week, depending on temperature. Cutting through the rind breaks the pumpkin’s protective skin and starts decay. Etched, drilled, or engraved designs usually last longer because more of the skin stays intact.
How do I keep a carved pumpkin from rotting?
Keep it cool, out of direct sun, and away from rain. Brush petroleum jelly along every cut edge to slow moisture loss. If a carved pumpkin starts to shrivel, a soak in cool water can plump it back up for a short while.
What is the best pumpkin variety for carving?
The best carving pumpkins have thick, firm walls and smooth sides, such as Howden, Connecticut Field, and Prizewinner. Small pie types like Sugar Pie suit piercing and drilling, and white or blue-gray varieties make striking canvases for etching, engraving, and no-carve finishes.
Is an LED or a candle safer in a carved pumpkin?
LEDs are safer because they produce far less heat and carry no open flame. A real flame also speeds softening, which shortens the life of the pumpkin. Battery pucks in warm white or amber give the same glow without the risk.
Can I carve a pumpkin days ahead?
Yes, with limits. Fully cut designs look best when carved a day or two before display and kept cool in between. Etched, drilled, and engraved pumpkins tolerate more lead time, and no-carve pumpkins like gold leaf, pressed ferns, and seed mosaics can be finished well ahead.
What are the easiest pumpkin carving designs for beginners?
Piercing, drilling, and no-carve finishes are the easiest. A poked dot design or a drilled pattern needs no long saw cuts, and painting, gilding, or gluing botanicals needs no cutting tools at all, which also makes them the friendliest for kids to help with.
Once your pumpkins are done, see how to style them with [Classy Halloween Decor Ideas](/classy-halloween-decor-ideas/) or bring the glow outside with [Elegant Halloween Front Porch Ideas](/elegant-halloween-front-porch-ideas/).
Conclusion
A beautiful pumpkin is never an accident. It starts with the right variety, one clear technique, and light that suits the mood. Whether you pierce a dotted arch, gild a few kintsugi cracks, or wind thread around brass pins into a sunburst, these cool pumpkin carving ideas prove that handmade can look designed. I’ve seen how one thoughtful detail can transform a doorstep pumpkin into the thing guests photograph.
So save this post on Pinterest, choose one idea that fits your skill and your weekend, and try it before Halloween. Then share it with a friend who thinks pumpkins can’t look this good.