Easy DIY Christmas Decorations 2026: 21 Handmade Ideas for a Beautiful Home
Handmade doesn’t have to look homemade. The best easy DIY Christmas decorations borrow tricks from designers: one repeated shape, a short palette, and a finished edge. This guide shows you how to make colorful, modern projects in an afternoon, from painted terracotta and thread-wrapped orbs to marbled prints and a living amaryllis trio. Each idea comes as a complete styled scene, with exact colors, lighting, and costs. In my experience, handmade pieces fail for one reason: skipped finishing steps, not missing talent. I’ve tested these projects in my own Austin home, and several came with practical tips from my husband, who builds homes for a living. Save this post, pick one idea, and start this weekend.
The best DIY Christmas projects look the most expensive when they’re the simplest. Here’s why: visual repetition reads as intention. When the eye finds the same shape three or more times in one view, the brain registers a plan, not a pile. Easy DIY Christmas decorations look designed when they repeat one shape, in one material, within a short palette. I learned this at our Austin kitchen island, making twelve identical clay ornaments in one afternoon.
A neighbor asked which boutique sold them. None did. They cost about ten dollars total. This post solves the real problem with handmade decor: how to make it fast, with beginner skills, and have it read as styled.
1. Terrazzo Clay Ornaments
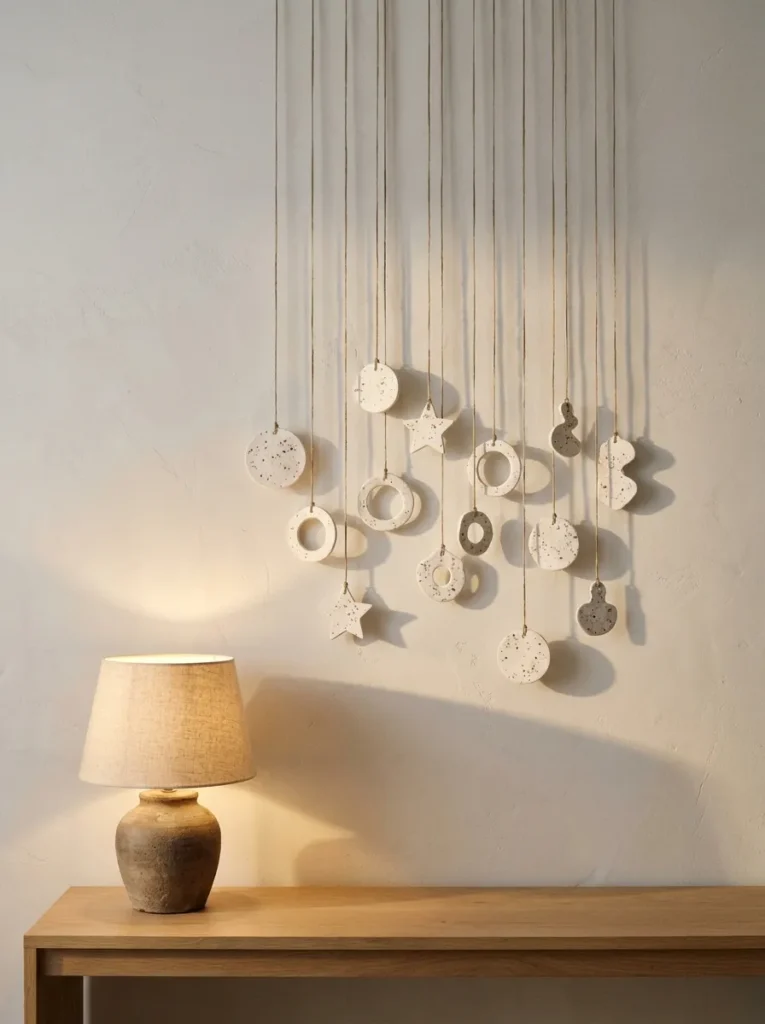
- Palette: Chalk white, terracotta, sage, charcoal
- Lighting: One 2700K lamp on the console at night; morning window light rakes across the wall
- Key pieces: Twelve three-inch clay discs, waxed linen cord, two brass cup hooks, an oak entry console
- Time and cost: About $10, one afternoon plus two days of drying (add a day in humid weather)
- Standout detail: Speckles made from shredded, paint-tinted clay, so no two discs match
Why this works: Repeating one shape in a restrained, speckled palette makes handmade ornaments read as a deliberate installation.
Terrazzo clay ornaments look like they came from a ceramics studio, yet they start with a one-pound block of white air-dry clay. Tint three small pieces with acrylic paint in terracotta, sage, and charcoal, then shred them into the white clay. Roll the slab to a quarter inch and cut with a three-inch circle cutter. Poke the hanging hole with a drinking straw first. Air-dry clay cracks most often when it’s rolled thinner than an eighth of an inch or dried near a heat vent, so let the pieces dry flat on a towel for two days.
Hang them where the eye lands first. Twelve ornaments at staggered lengths on a taut waxed linen cord, stretched between two brass cup hooks above an oak entry console, read as a deliberate installation. Sand the edges with 220-grit paper, then brush on two coats of matte water-based varnish so oils from hands don’t leave marks. Under one 2700K lamp, the speckles catch light like polished stone. The eye sees one repeated shape in four quiet tones, which reads as planned, not crafty. Total cost runs about $10, and the whole set takes one afternoon plus drying time.
2. Fringed Paper Cone Forest
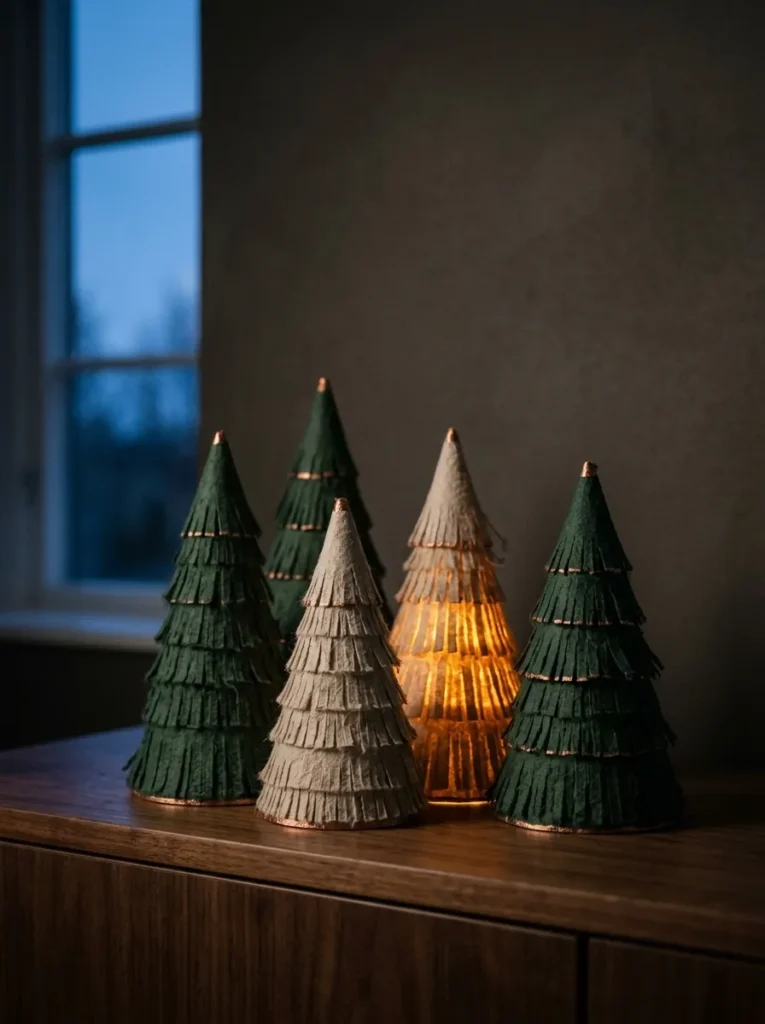
- Palette: Pine green, oatmeal, matte copper, walnut
- Lighting: A battery LED puck light (2700K) inside the largest cone; blue dusk from the window behind
- Key pieces: Five fringed cardstock cones in 5-, 8-, and 11-inch heights, a walnut sideboard
- Time and cost: About $8, under two hours
- Standout detail: The bottom inch of fringe brushed in matte copper, with the LED glowing through the paper
Why this works: A glowing paper cone grouped in odd numbers gives a sideboard the depth of a forest with almost no materials.
I made my first paper cone forest the night before a dinner party, with a stack of cardstock and no plan. By midnight I had nine cones and a surprising amount of confidence. Roll 80-lb cardstock into cones in three heights: five, eight, and eleven inches. Glue the seam with a line of hot glue. Then snip quarter-inch fringe from the base upward, and curl each strip around a pencil. Brush the bottom inch with matte copper paint. Group them in odd numbers, tallest at the back, and the fringe catches light like spruce needles.
Light is where this idea earns its keep. Slip a battery LED puck light inside the largest cone, and the paper glows like parchment. I tried a real tealight inside one cone exactly once. It scorched the rim within minutes, so flames stay out of any paper project. On our walnut sideboard, the pine green, oatmeal, and copper tones sit calmly against the dark wood. Cost is about $8 for a set of five cones, and a beginner can finish in under two hours. Odd groupings feel organic, while identical heights look like a school project.
3. Spiral Lumber Trees
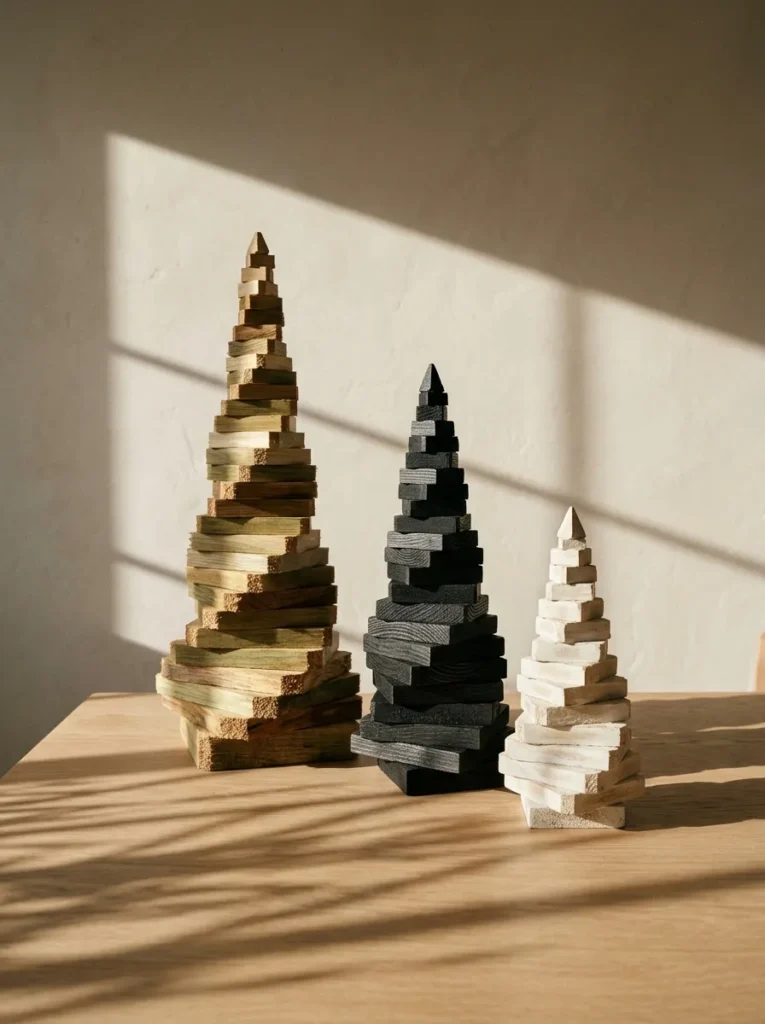
- Palette: Natural poplar, matte black, bone limewash, white oak
- Lighting: Low late-afternoon sun raking across the end grain; one 2200K lamp after dark
- Key pieces: Three spiral trees at roughly 8, 10, and 12 inches tall, a white oak coffee table
- Time and cost: About two hours with a miter saw and a drill
- Standout detail: Every course twisted ten degrees, so the stacked end grain forms a spiral
Why this works: Stacking graduated offcuts with a slight twist turns scrap lumber into a sculptural tree no craft aisle sells.
A lumberyard scrap bin is the cheapest design material most people walk past. Take poplar 1×2 offcuts, cut sixteen pieces from seven inches down to one and a half, drill a center hole through each, and stack them on a three-eighths-inch dowel, twisting every course about ten degrees. The result is a spiral tree with a sculptural silhouette no craft aisle sells. Poplar is soft, even-grained, and takes paint or limewash evenly, which makes it forgiving for beginners. Make three heights in three finishes, and the trio looks collected rather than copied.
My husband builds homes for a living, and his tip saved me an hour: drill each hole with a brad-point bit and a scrap board underneath, so the wood never splinters on the way out. Mark every center with a speed square first, and the spiral stays tight. He also insists on sanding every cut face with 120-grit, then 220, because end grain snags sweaters and skin. On a white oak coffee table, natural poplar, matte black, and bone limewash read as a calm trio. Late afternoon sun rakes across the stacked edges.
4. Stained Glass Arch Window
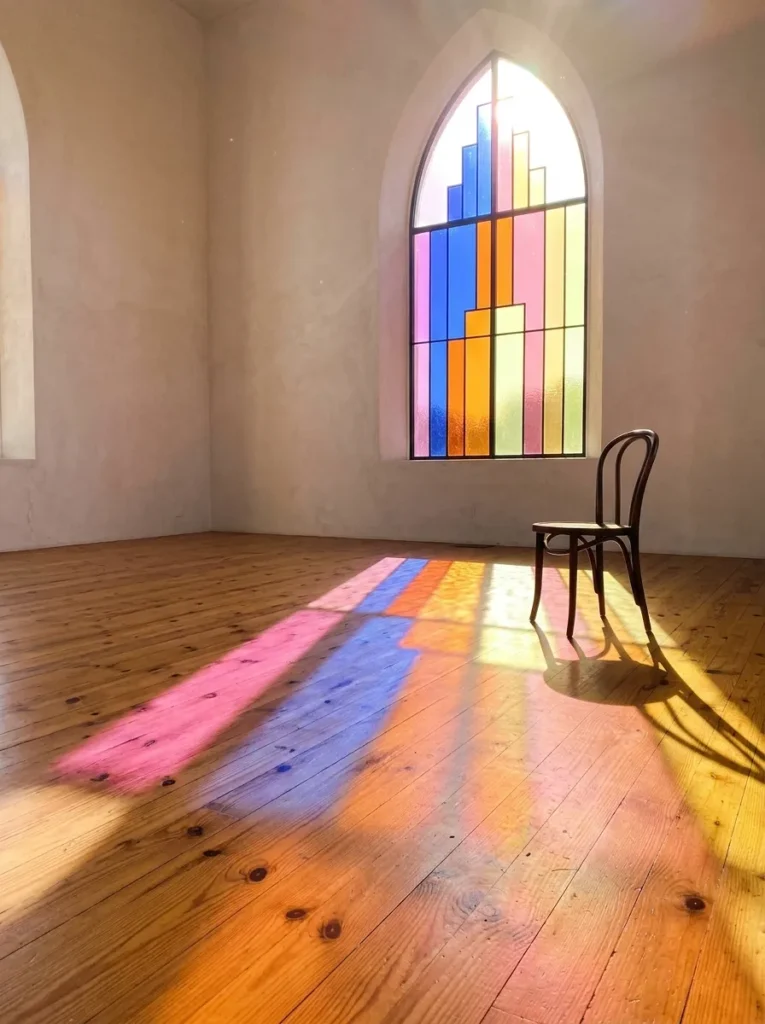
- Palette: Cobalt, tangerine, rose pink, lemon, with matte black lead lines
- Lighting: Low morning sun projects colored shapes across the floor; after dark, a 2700K lamp beside the window makes the glass glow from the street
- Key pieces: Stepped cellophane arches on one window, black adhesive vinyl strips, a bentwood chair, a honey pine floor
- Time and cost: About $12, one evening; it lifts off with warm soapy water
- Standout detail: Concentric arches cut in graduated sizes, so the colored light stacks into overlapping shapes on the floor
Why this works: Colored cellophane turns a plain window into a moving light installation, because the color lands on the floor, not just the glass.
The first time I tried this, I stood in my kitchen at eight in the morning and watched pink and orange shapes slide across the floor. I was hooked. Cut concentric arches from colored cellophane gift wrap, brush a thin coat of watered-down white glue onto the glass, and press each piece flat with a dry cloth. Add a grid of black adhesive vinyl strips, a quarter inch wide, to mimic lead lines. Colored light does the heavy lifting, because the glass projects a shifting pattern across the room. No two hours of the day look the same.
Check which way your window faces. South- and east-facing glass gives the strongest projections here in Austin, while a north window stays soft all day. Cobalt, tangerine, rose, and lemon read as a stained glass palette without feeling churchy, and the matte black lines keep it graphic and modern. It costs about $12 and fits into one evening. When January arrives, warm soapy water and a plastic scraper lift the whole design in minutes. Place a bentwood chair in the light, and the room looks styled by morning sun instead of by you.
5. Oversized Tassel Swag
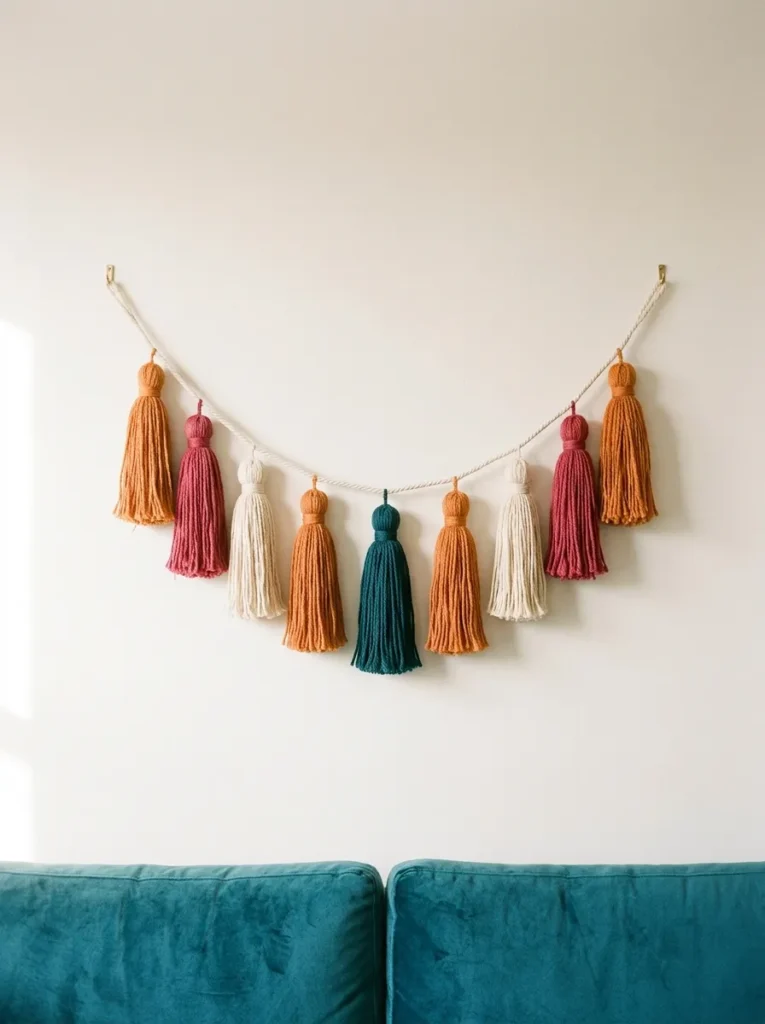
- Palette: Tangerine, raspberry, cream, deep teal
- Lighting: Side window light brings out the yarn’s sheen by day; one 2700K brass lamp beside the sofa at night
- Key pieces: Nine eight-inch cotton tassels, natural cotton cord, two brass wall hooks, a teal velvet sofa
- Time and cost: About $14, ninety minutes
- Standout detail: One deep teal tassel hidden in the middle, echoing the sofa
Why this works: Scaling tassels up to eight inches makes a craft-store project read as a custom textile.
A tassel is just yarn wrapped around cardboard, which is why it’s one of the oldest handmade ornaments. Size decides everything. Craft-store tassels run two to three inches and look like keychains, while eight-inch tassels look like custom textile. Wrap smooth cotton yarn sixty times around an eight-inch strip of cardboard, slide a length of cord under the top loops, and tie it off. Cut the bottom loops, then wrap the neck tightly with cream thread and trim the ends flat. Smooth cotton holds its shape and sheen, while fuzzy acrylic flops.
Display them as one swag. Eight tassels in tangerine, raspberry, and cream hang at even six-inch spacing along a natural cotton cord, looped between two brass wall hooks above a teal velvet sofa. Orange sits opposite teal on the color wheel, so the colors vibrate without any extra decor. Hide a ninth, deep teal tassel in the middle, echoing the sofa, and the whole swag feels resolved. Total cost lands near $14, and ninety minutes is plenty. Leave the cord slack, about a six-inch dip, so the tassels swing slightly when someone walks past.
6. Color-Block Gift Wrap
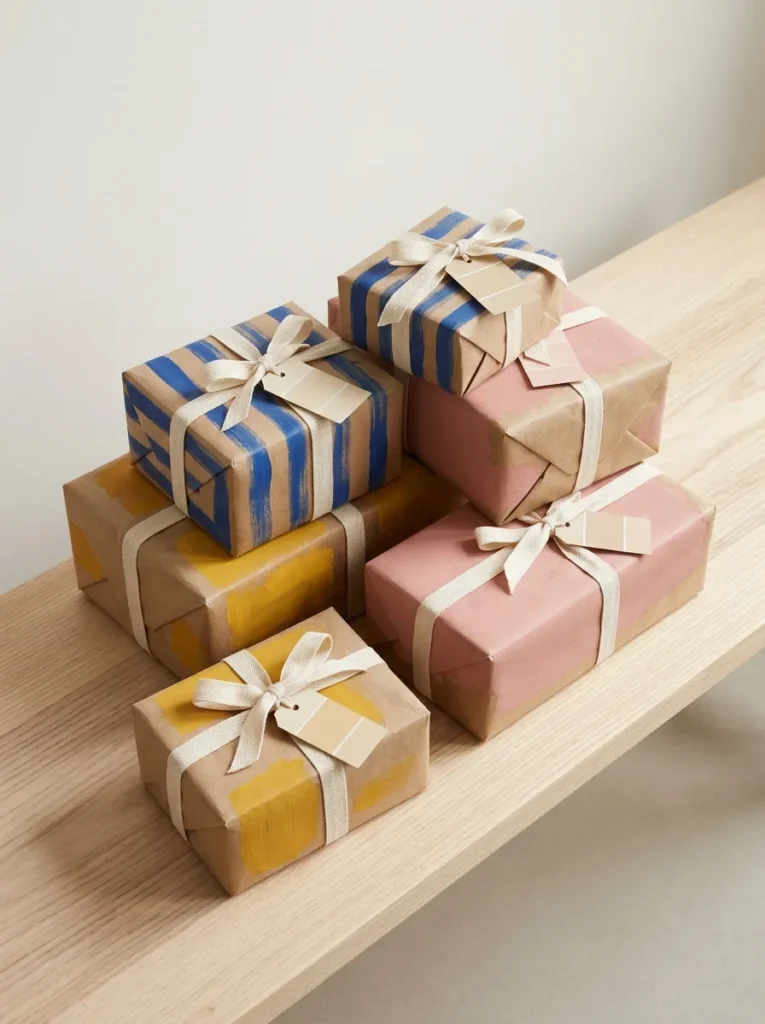
- Palette: Cobalt, saffron, blush pink, kraft brown
- Lighting: Soft north window light by day; a 2700K lamp beside the bench at night
- Key pieces: Six hand-painted gift boxes, cotton twill ribbon, a pale ash entry bench
- Time and cost: About $10 in paint, one afternoon plus an overnight flat dry
- Standout detail: Gift tags cut from leftover paint-sample cards, with the printed color names left visible
Why this works: Painting your own wrapping paper in a few flat colors turns gifts into decor, and the stack reads as a deliberate color story.
Gift wrap covers more square footage than any ornament on the tree, yet it ends up in the recycling by noon on the 25th. Paint your own instead. Unroll plain kraft paper and tape off bold bands with painter’s tape. My husband, who runs a home construction company, taught me to press the tape edge down with a putty knife so paint can’t bleed beneath it. Brush on thinned acrylic in cobalt, saffron, and blush, then pull the tape while the paint is still damp. Dry the sheets flat under books overnight so the paper doesn’t curl.
Stack the wrapped gifts on an entry bench instead of hiding them under the tree. Six boxes in cobalt stripes, saffron color blocks, and solid blush build a color story that works as decor from the first of December. Tie each with natural cotton twill ribbon, and cut the tags from leftover paint-sample cards, because the printed color names add charm for free. Paint and supplies run about $10. I’ve seen guests photograph this stack before they ever see the tree. Keep stripes bold and varied, as thin repeated lines look busy at a distance.
7. Ombré Ribbon Wall Tree
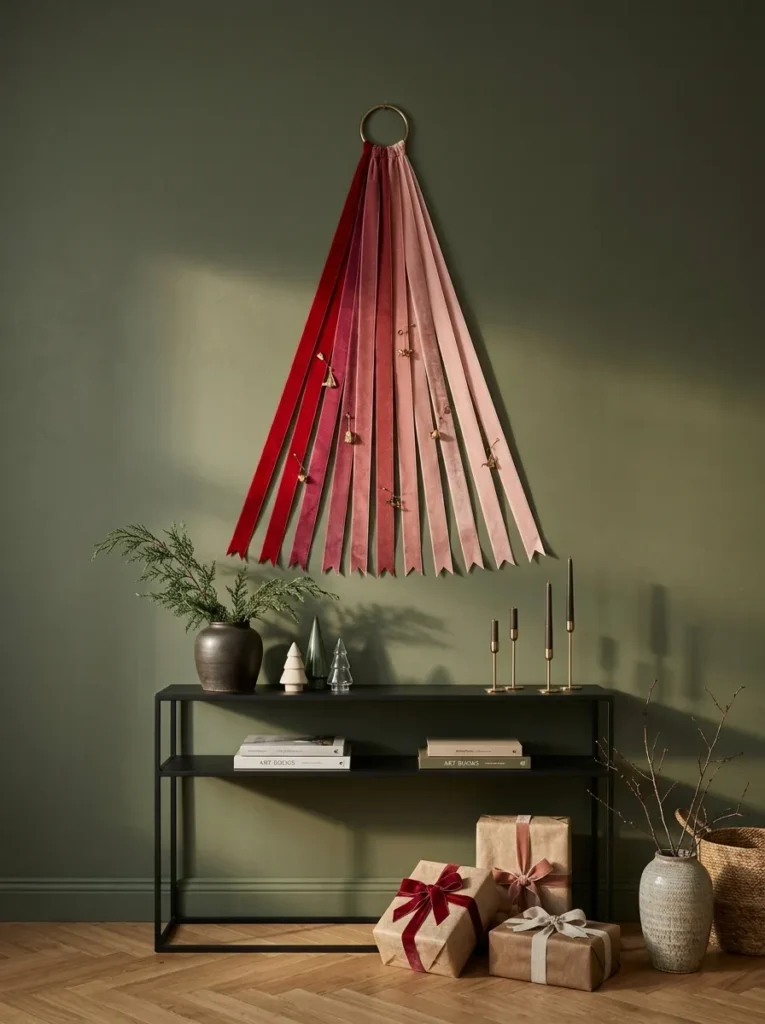
- Palette: Cherry red, raspberry, rose, blush pink on an olive wall
- Lighting: Raking afternoon light along the wall by day; a 2700K picture light above after dark
- Key pieces: Fourteen strips of 1.5-inch velvet ribbon, a small brass curtain ring, a slim black steel console
- Time and cost: About $18, one hour
- Standout detail: Every ribbon end cut in a shallow V, with the brass ring as a quiet topper
Why this works: A tonal ribbon gradient builds a wall-mounted tree with real depth, and it takes up no floor space.
Tonal gradients read as depth because the eye treats a slow shift from dark to light the way it reads shadow on a curved surface. That’s the principle behind this wall tree. Cut fourteen strips of 1.5-inch velvet ribbon, starting at four inches and adding two inches each time, up to thirty. Cut each end in a shallow V so the edges look tailored. Sort the strips from cherry red at the base to blush at the tip, with raspberry and rose between. Pin them with a quarter-inch gap, shortest on top, to form a triangle.
Mount it on an olive wall above a slim black steel console. Green and red sit across from each other on the color wheel, so the cherry strips look almost lit from within. Top the tree with a small brass curtain ring pinned flat, a quiet nod to mixed-metal styling. Use two small pins per strip, one at each end, and check each row with a level. The entire build costs about $18 and takes an hour. After January, roll the ribbons onto cardboard tubes and reuse them to wrap gifts next year.
8. Jewel Glass Candle Trio

- Palette: Amber, bottle green, smoke gray, cream wax
- Lighting: Three flames glowing through colored glass at about 2200K, plus one dim lamp behind
- Key pieces: Three thrifted thick glass tumblers, soy wax, cotton wicks, a honed marble tray, a round plaster side table
- Time and cost: About $20, one hour plus a day to set
- Standout detail: The top inch of each glass left empty, so the colored rim glows like a lantern
Why this works: Colored thrifted glass does the decorating, so each candle glows amber, green, or smoke the moment it’s lit.
I found my first set of colored glasses at an Austin thrift store for a dollar apiece, and I almost walked past them. Scrub each glass, check for chips, and secure a pre-waxed cotton wick to the bottom with a dot of hot glue. Melt soy wax in a pouring pitcher set in a pot of simmering water, then stir in fragrance oil at about six percent of the wax weight. Pour at the temperature printed on the wax label, and let the candles set for twenty-four hours before trimming the wick to a quarter inch.
Pick glass in amber, bottle green, and smoke gray, and leave the top inch of each glass empty. Lit, the colored rim glows like a small lantern and throws tinted light across the table. Set the trio on a honed marble tray atop a round plaster side table, where the cream wax picks up each color. Use only thick, heat-safe glass, since thin or cracked pieces can shatter from the heat. A fir and cardamom scent smells crisp instead of sugary. Total cost is about $20, and extra pours make easy hostess gifts.
9. Lilac Branch Sculpture
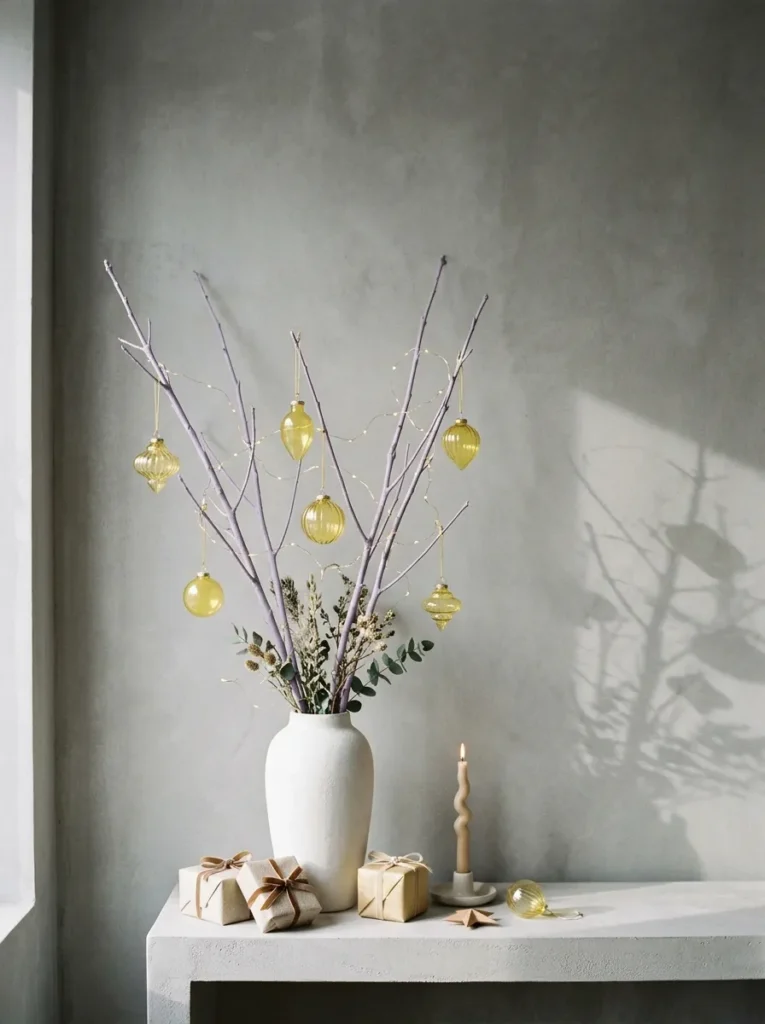
- Palette: Lilac, butter yellow, chalk white, concrete gray
- Lighting: Diffused north light from a tall window; a 2700K floor uplight aimed at the branches at night
- Key pieces: Five 5-foot bare branches, a tall chalk-white ceramic vase, six butter-yellow glass ornaments
- Time and cost: About $20 with foraged branches, one afternoon plus drying time
- Standout detail: Matte lilac paint over primer, so the branches read as sculpture rather than sticks
Why this works: Painting foraged branches one flat color turns free material into a gallery-style floor sculpture.
Painted branches look like sculpture because one flat color erases every clue that they came from a yard. Gather five fallen or pruned branches about five feet long. Crepe myrtle works well in Austin, and its smooth bark takes paint cleanly. Let them dry indoors for a week, then brush off loose bark. Outdoors, spray one coat of primer, then two light coats of matte lilac, rotating each branch between passes. Let them cure overnight. Hang six butter-yellow glass ornaments from the tips on fine thread, using one ornament per twig so the branches stay graceful.
Tall branch arrangements tip easily, and my husband won’t let me skip the ballast. Fill the bottom four inches of the vase with river rock, then wedge the branches in tightly so they lean against one another and the rim. He also screws a small eye hook into the wall stud behind the vase and loops fishing line around the group as a safety anchor, which keeps it upright around kids and pets. In a chalk-white vase, the lilac and butter yellow glow softly against concrete gray walls. Cost lands near $20.
10. Thread-Wrapped Orb Cluster
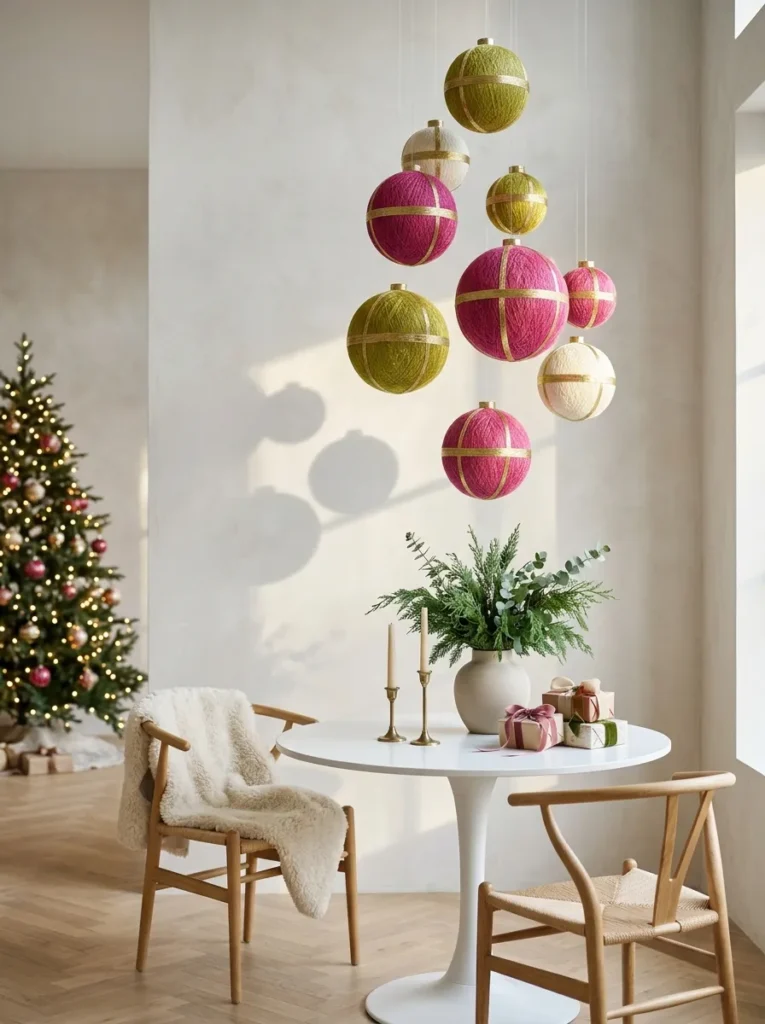
- Palette: Fuchsia, chartreuse, ivory, soft gold thread accents
- Lighting: East window daylight; a 2700K wall sconce at night casts each orb’s shadow on the wall
- Key pieces: Nine 3-inch foam spheres wrapped in cotton thread, clear fishing line, a round white pedestal table, two wishbone-style chairs
- Time and cost: About $16, three hours of wrapping
- Standout detail: A single wrap of gold thread between each color block, with every orb hung at a different height
Why this works: Wrapping foam spheres in tight color-block bands turns sixteen dollars of thread into a floating sculpture.
Cotton embroidery thread wraps flat and tight, which makes a foam sphere look glazed instead of fuzzy. Dab craft glue at the starting point, hold the tail, and wrap in even bands, rotating the sphere a quarter turn each pass. When you reach the next color, tie off with another dab of glue and continue. Keep each band about an inch wide, and separate the blocks with a single wrap of gold thread. Pin a small thread loop into the top. A three-inch orb takes roughly twenty minutes, so nine orbs fit comfortably into one movie night.
Hang the orbs at staggered heights over a round white pedestal table, using clear fishing line from lightweight ceiling hooks. Each orb weighs under two ounces, so small hooks hold them without trouble. Keep the lowest orb at least thirty inches above the tabletop so it never blocks a conversation. Fuchsia and chartreuse contrast sharply, and the ivory bands give the eye a place to rest. At night, a 2700K wall sconce throws each orb’s shadow onto the wall, which doubles the effect. Thread, foam spheres, and hooks come to about $16.
You’ll Also Love: 15 Christmas Table Centerpiece Ideas That Steal the Show
11. Block-Printed Linen Panel
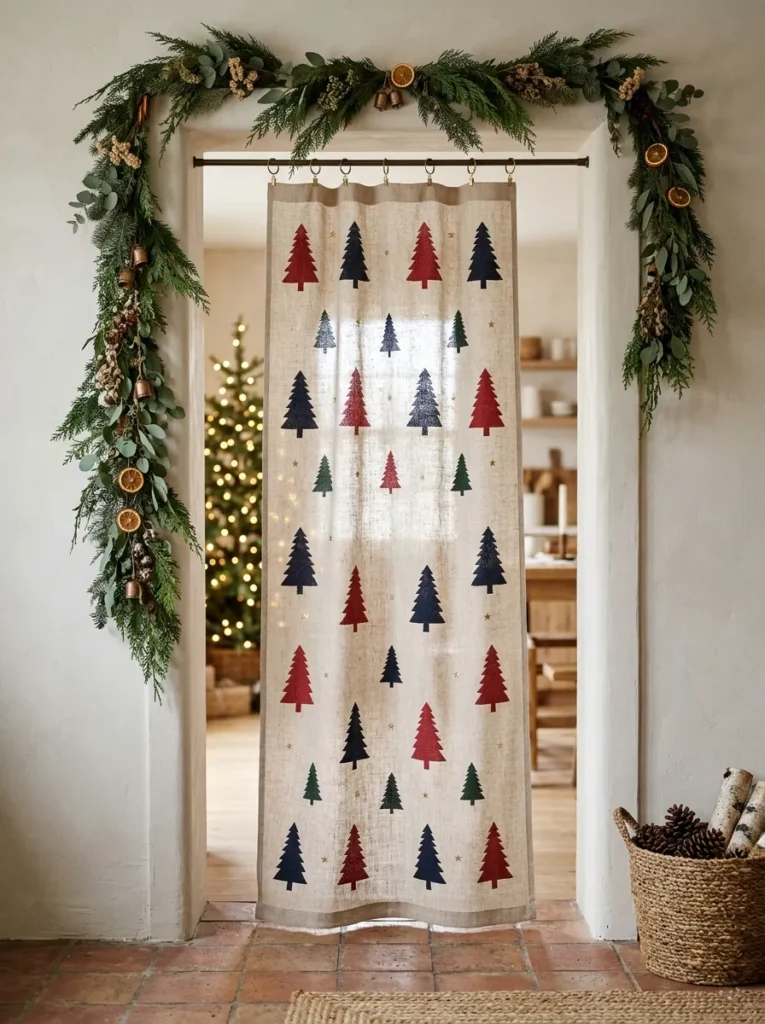
- Palette: Madder red, ink navy, natural linen, brass rings
- Lighting: Daylight from the next room backlights the linen; a 2700K pendant at night
- Key pieces: One linen panel about 52 inches wide, a 4-inch rubber carving block, fabric paint, brass clip rings on a slim tension rod
- Time and cost: About $22, one afternoon plus an overnight dry
- Standout detail: A stepped fir silhouette printed in alternating colors, with every other row offset by half a repeat
Why this works: Repeating one carved stamp in two colors turns plain linen into custom textile art at a fraction of boutique prices.
My first block print came out blotchy because I loaded the stamp with too much paint. A thin, even layer is the whole secret. Draw a stepped fir silhouette on a four-inch rubber carving block, then cut away the background with a linoleum cutter, always carving away from your hands. Roll fabric paint on with a small foam roller, press the block onto prewashed linen, and rub the back firmly with a spoon. Practice on scrap fabric first. Let the panel dry overnight, then heat-set it with an iron, following the paint label.
Hang the finished panel in the doorway between the kitchen and dining room from brass clip rings on a slim tension rod. Alternate madder red and ink navy, and offset every other row by half a repeat so the firs read as a pattern instead of a grid. Daylight from the next room backlights the linen and shows the print’s depth, while a 2700K pendant keeps the color warm at night. Total cost is about $22 for linen, block, paint, and rings. Wash the panel gently on cold, and it returns every December.
12. Marbled Paper Triptych
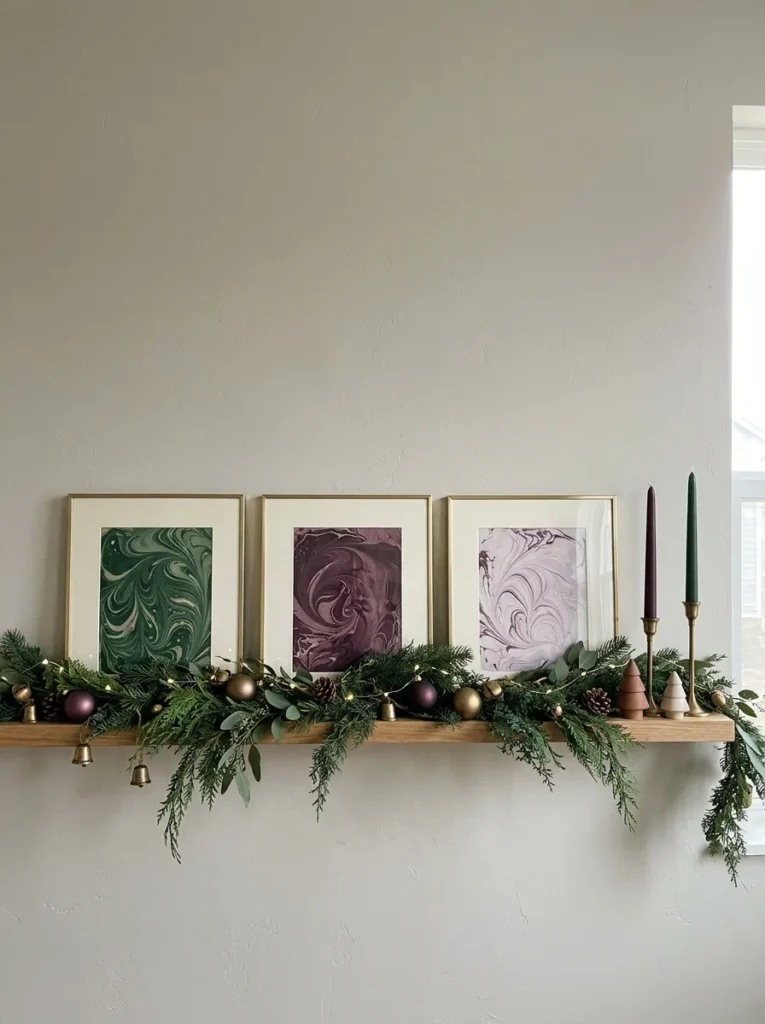
- Palette: Pine green, plum, cream mat, brass frame
- Lighting: Soft window light by day; a 2700K picture light above the ledge at night
- Key pieces: Three 8×10-inch marbled prints in thin brass frames with wide cream mats, a long picture ledge
- Time and cost: About $28 with frames, one afternoon plus an overnight dry
- Standout detail: Three consecutive pulls from one tray, fading from deep color to a pale ghost
Why this works: Pulling three consecutive prints from one marbling tray creates a fading triptych that looks like gallery art.
Shaving cream marbling is one of the fastest ways to make gallery-worthy art. Spray a thick, even layer of plain foam shaving cream into a baking sheet. Drip liquid watercolor in pine green and plum, then drag a toothpick through the color in slow S-curves. Lay a sheet of heavyweight watercolor paper on top, press gently, lift, and scrape the foam off with a ruler. The first print is the most saturated. Pull two more sheets from the same tray without adding color, and they fade, forming a natural gradient. Dry each sheet flat overnight.
My husband installs shelving on job sites, and he insists on screwing every ledge into studs rather than relying on drywall anchors. He also checks the ledge with a four-foot level, because a slight tilt is obvious across a row of three. Set the prints in thin brass frames with wide cream mats, which give the swirls room to breathe. Pine green and plum read as jewel tones without looking dated, and a 2700K picture light above brings out the depth. Total cost runs about $28, including all three frames.
13. Painted Terracotta Totem
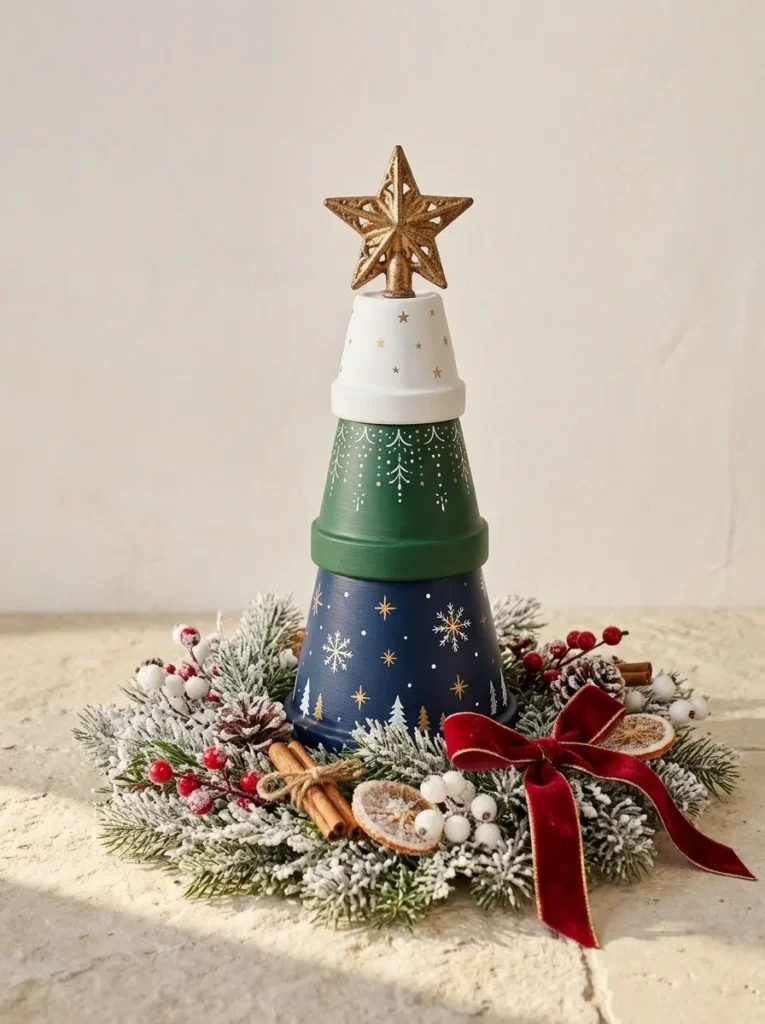
- Palette: Mulberry, apricot, pistachio, brass
- Lighting: Late-day side light throws a long diagonal shadow by day; a 2700K picture light after dark
- Key pieces: Three terracotta pots (10, 6, and 4 inches), a brass drawer knob finial, a pale limestone entry floor
- Time and cost: About $15, one afternoon with drying time between coats
- Standout detail: The pots stack rim-down, so each pot’s flat base becomes the next pot’s pedestal
Why this works: Stacked, color-blocked pots give an entry a sculptural focal point for the price of three flowerpots.
Terracotta is a porous clay, so it drinks paint unevenly and leaves blotchy, chalky color. Seal each pot with a coat of water-based primer first, then add two thin coats of matte acrylic. Stack three pots rim-down in graduated sizes of ten, six, and four inches, because each pot’s flat base is just wide enough to carry the next. Paint the bottom pot mulberry, the middle apricot, and the top pistachio. Finish with a brass drawer knob glued to the top as a finial. The whole tower stands about eighteen inches tall.
Set the totem on a pale limestone entry floor, where late-day sun stretches its shadow across the stone. The color blocks read as modern sculpture, and mulberry, apricot, and pistachio feel current rather than holiday-themed. At night, a 2700K picture light aimed from above makes the matte paint glow without glare. Expect to spend about $15, plus one afternoon, because each coat needs an hour to dry. After January, unstack the pots and plant a pothos in the largest one. The pots keep working all year, which most Christmas decor can’t claim.
14. Color-Dipped Bottle Trio
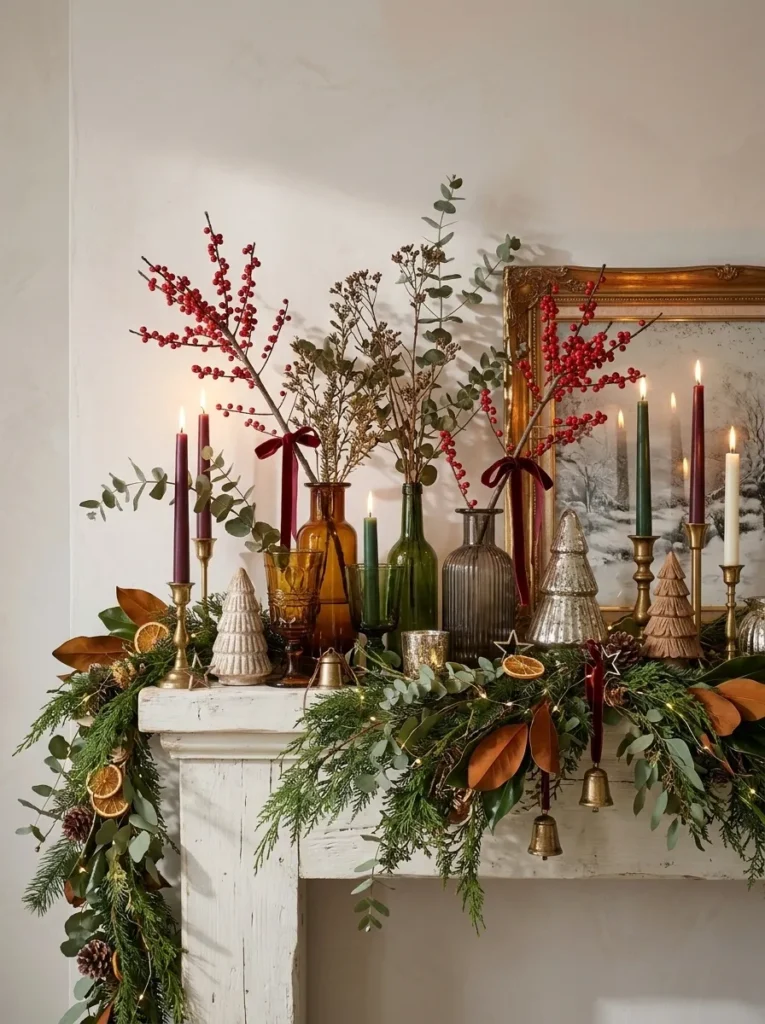
- Palette: Aubergine, jade, sky blue, winterberry red
- Lighting: Cool daylight passes through the clear glass tops; a 2200K lamp at the end of the hall after dark
- Key pieces: Three wine bottles in graduated heights, matte enamel spray paint, winterberry stems, a white floating shelf
- Time and cost: About $12, one evening plus a day of curing
- Standout detail: A razor-sharp paint line at two-thirds height, with clear glass above
Why this works: A crisp painted line on clear glass turns recycled bottles into designer bud vases.
My first dipped bottle drooped, because I sprayed one thick coat instead of two light ones. The second attempt looked like a boutique vase. Soak off the labels, wipe the glass with rubbing alcohol, and tape paper over the top third of each bottle. Spray two light coats of matte enamel paint across the exposed glass, waiting fifteen minutes between coats, outdoors or in a well-ventilated garage. Peel the tape slowly at a low angle before the paint cures, and the line stays razor sharp. Choose aubergine, jade, and sky blue for a trio that feels fresh, not themed.
Display the trio on a white floating shelf at eye level, where the winterberry reads as the one pop of Christmas red. Cut three stems, strip any leaves below the waterline, and arrange one tall stem per bottle. Winterberry (Ilex verticillata) holds its berries for about two weeks in water, and the clear glass tops let daylight pass through the water. At night, a 2200K lamp at the end of the hall warms the matte paint. Total cost is about $12. Leave generous space between bottles, since each color needs room to stand on its own.
15. Pigmented Concrete Tapers
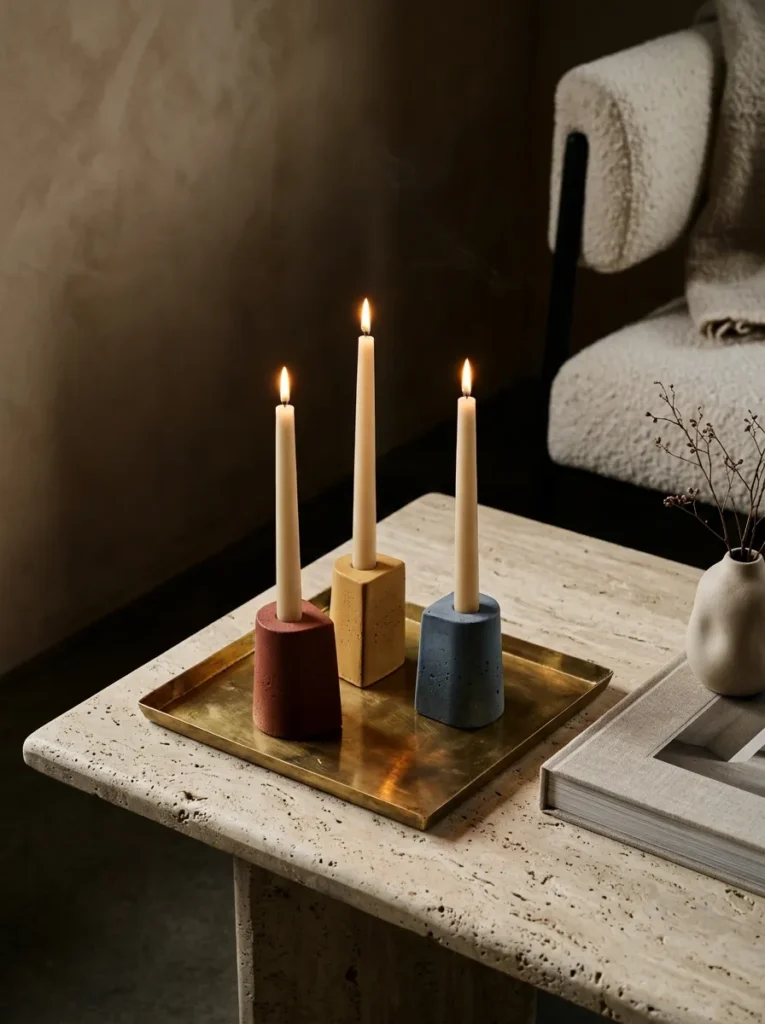
- Palette: Brick red, ochre, storm blue, cream tapers
- Lighting: Candlelight with one dim 2200K lamp behind
- Key pieces: Three cast concrete taper holders, cream tapers, an unlacquered brass tray, a travertine-topped side table
- Time and cost: About $20, one hour of work plus two days of curing
- Standout detail: Powdered iron-oxide pigment mixed into the cement, so the color runs all the way through
Why this works: Pigmented concrete gives taper holders the weight and color of designer ceramics for a few dollars of cement mix.
Concrete isn’t only gray. Powdered iron-oxide pigment, stirred into dry cement at about five percent by weight, tints the whole piece brick red, ochre, or storm blue. Mix a fine-grain cement with just enough water to reach the thickness of oatmeal. Pour it into paper cups, then push a lightly oiled seven-eighths-inch dowel into the center to shape the candle hole. Twist the dowel loose once the mix firms up, then cure for two days and peel away the paper. The result has the weight and matte surface of a ceramic studio piece.
Wear a dust mask while mixing, because dry cement dust irritates lungs. Tap each filled cup firmly on the counter for a minute to release air bubbles, which keeps the surface smooth. Set the three holders on an unlacquered brass tray atop a travertine side table, and fit cream tapers. Keep flames at least twelve inches from anything that burns, and never leave candles unattended. In low light, brick red, ochre, and storm blue warm up like glazed stoneware. Cost is about $20 for all three. I’ve seen guests ask which studio made them.
16. Amaryllis Glass Trio
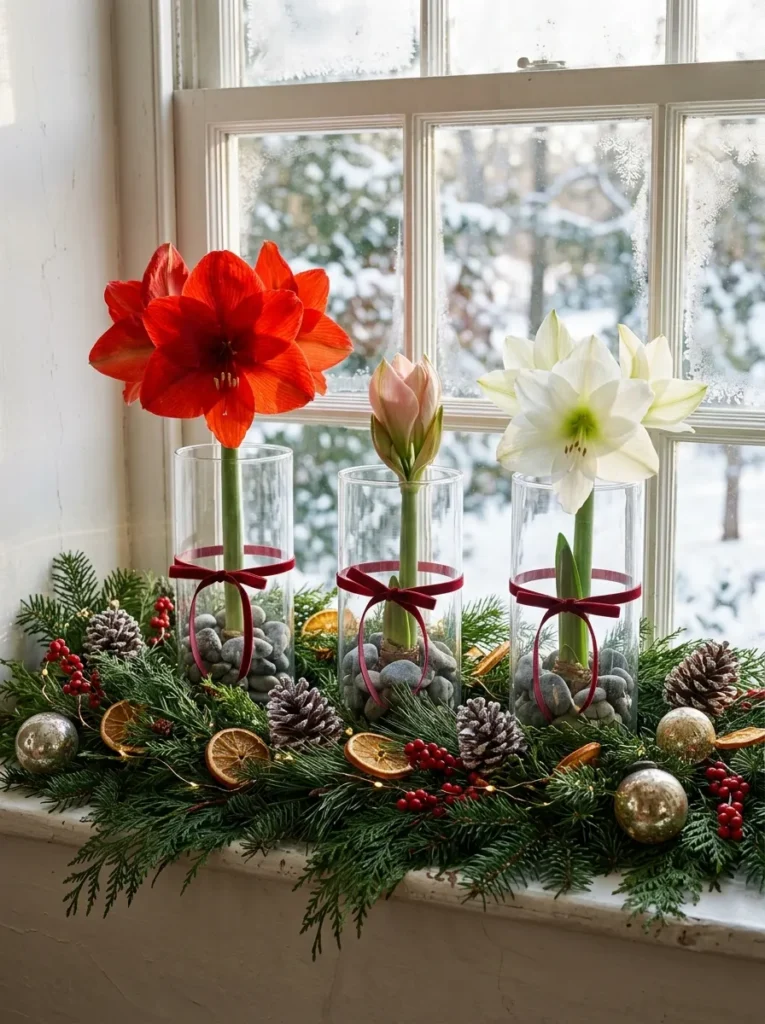
- Palette: Scarlet, soft pink, white, gray river stone
- Lighting: Bright east window by day, with early sun backlighting the petals; a 2700K lamp at night
- Key pieces: Three amaryllis bulbs, three clear glass cylinders about five inches across, river stones, a deep east-facing windowsill
- Time and cost: About $30, thirty minutes to plant, six to eight weeks to bloom
- Standout detail: Bulbs started one week apart, so the trio blooms in sequence
Why this works: Staggering three amaryllis bulbs one week apart keeps at least one vase in full bloom through the holidays.
A store-bought amaryllis bulb already holds its flower buds, which is why it’s one of the most reliable plants for holiday color. Set each bulb, roots down, on a bed of river stones inside a clear glass cylinder about five inches across. Add water to roughly an inch below the base, so only the roots drink, because a soaked base rots. Place it in a bright east window, and the stalk emerges within two to three weeks. Blooms typically open six to eight weeks after planting, so start by the first week of November.
Start the three bulbs one week apart, so the trio blooms in sequence and one vase is always at its peak through the holidays. Turn each glass a quarter turn every few days, since the stalk leans toward light, and slip in a thin bamboo stake once it passes twelve inches. Scarlet, soft pink, and white against gray river stone and clear glass look crisp and modern. Set them on a deep windowsill. Keep the bulbs away from pets, because amaryllis is toxic to cats and dogs. Three bulbs, glass, and stones run about $30.
17. Painted Plate Wall
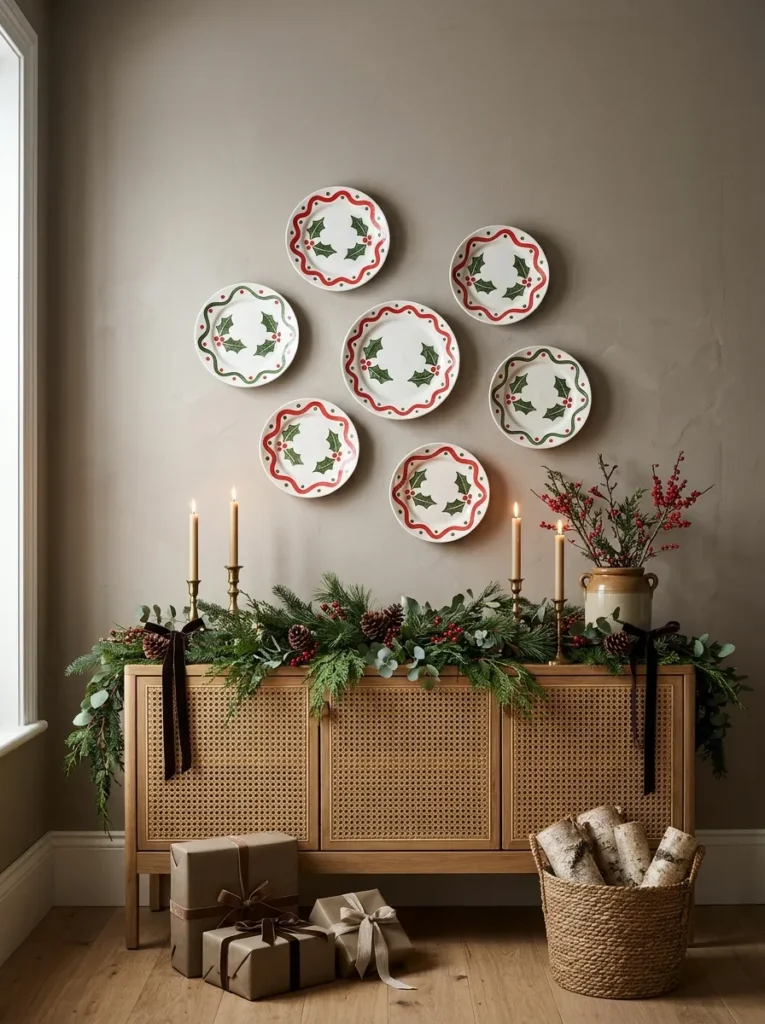
- Palette: Poppy red, forest green, cream glaze, mushroom taupe wall
- Lighting: Side window light makes the glaze gleam by day; a 2700K picture light at night
- Key pieces: Seven thrifted white plates (two 8-inch, five 10-inch), oil-based paint pens, spring-wire plate hangers, a low cane sideboard
- Time and cost: About $30, one afternoon plus a day to dry and bake
- Standout detail: One bold motif per plate, with no two plates alike
Why this works: One bold motif per plate turns thrifted porcelain into a gallery wall for about $30.
I ruined my first painted plate by sketching too carefully, and the shaky lines showed. Bold, simple shapes are the secret. Buy white glazed plates at a thrift store for a dollar or two, wipe them with rubbing alcohol, and paint one big motif per plate with an oil-based paint pen: holly leaves, berry dots, a wavy line, or a solid rim. Mistakes wipe off with a cotton swab and alcohol while the paint is wet. Let each plate dry for twenty-four hours, then bake it as the pen label directs.
Hang seven plates in a loose cluster on a mushroom taupe wall above a low cane sideboard. Poppy red and forest green pop against taupe, and the cream glaze keeps the arrangement light. Lay the plates on the floor first, trace each onto kraft paper, and tape the paper templates to the wall until the spacing feels right. Use spring-wire plate hangers and keep this as wall decor only, since the paint isn’t food safe. Seven plates, three pens, and hangers run about $30, and the display works well into January.
18. Painted Check Floorcloth
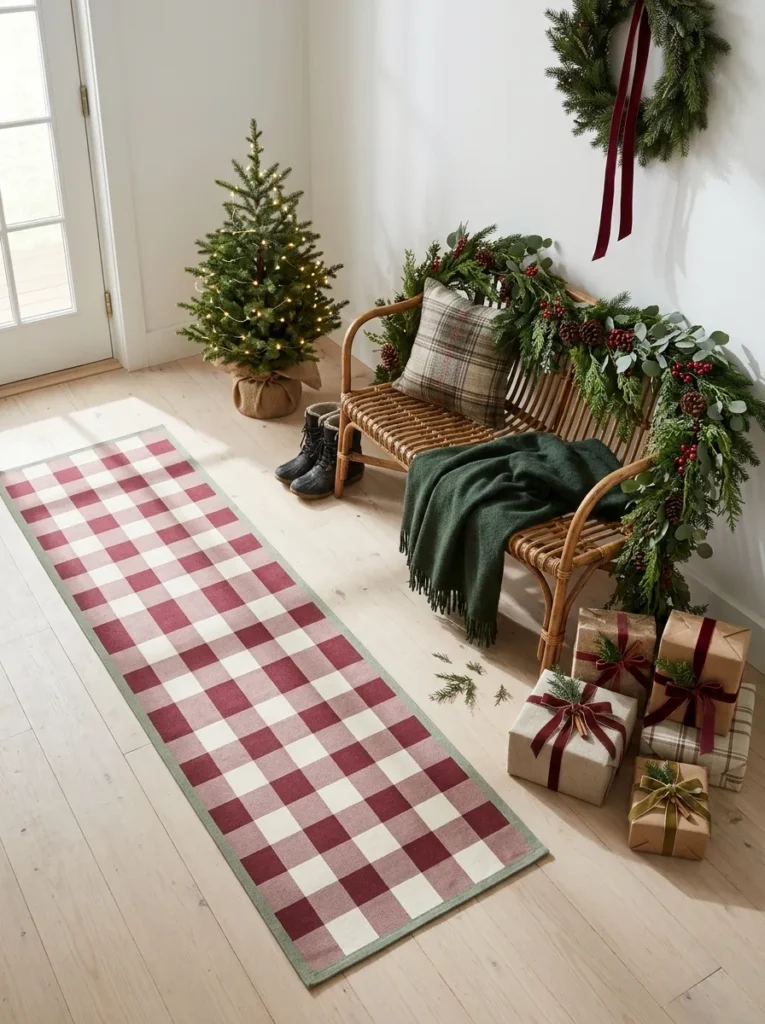
- Palette: Claret, ivory, sage border, rattan
- Lighting: Morning light through a glass entry door; a 2700K pendant overhead at night
- Key pieces: A 30-by-70-inch cotton canvas runner, floor paint, painter’s tape, water-based polyurethane, a rattan bench
- Time and cost: About $35, two days of painting plus an overnight cure
- Standout detail: A one-inch sage border painted just inside the edge, so the check looks framed
Why this works: Painted canvas gives an entry runner the look of a custom rug at a fraction of the cost.
Floorcloths are an old American craft, painted canvas from the days when carpet was a luxury. Wash and dry heavy cotton canvas first so it shrinks before you paint, cut it to thirty by seventy inches, and iron the edges under with hem tape. Prime both sides with two coats of ivory water-based primer, letting each coat dry fully. Mark a five-inch grid in chalk, tape off alternating squares, and paint the open squares claret. Pull the tape while the paint is damp. A thirty-inch width gives six squares across, so the pattern lands evenly.
Paint a one-inch sage border just inside the edge so the checks look framed. Then seal the cloth with three coats of water-based polyurethane in a matte finish, sanding lightly between coats, to resist scuffs and spills. Lay the runner over a non-slip rug pad, since smooth canvas can slide on wood floors. I painted one for our entry, and guests hesitate before stepping on it, which tells me it reads as art. Morning light through the glass door makes the claret glow. Total cost runs about $35, and it rolls up for storage.
19. Dip-Dyed Linen Throw
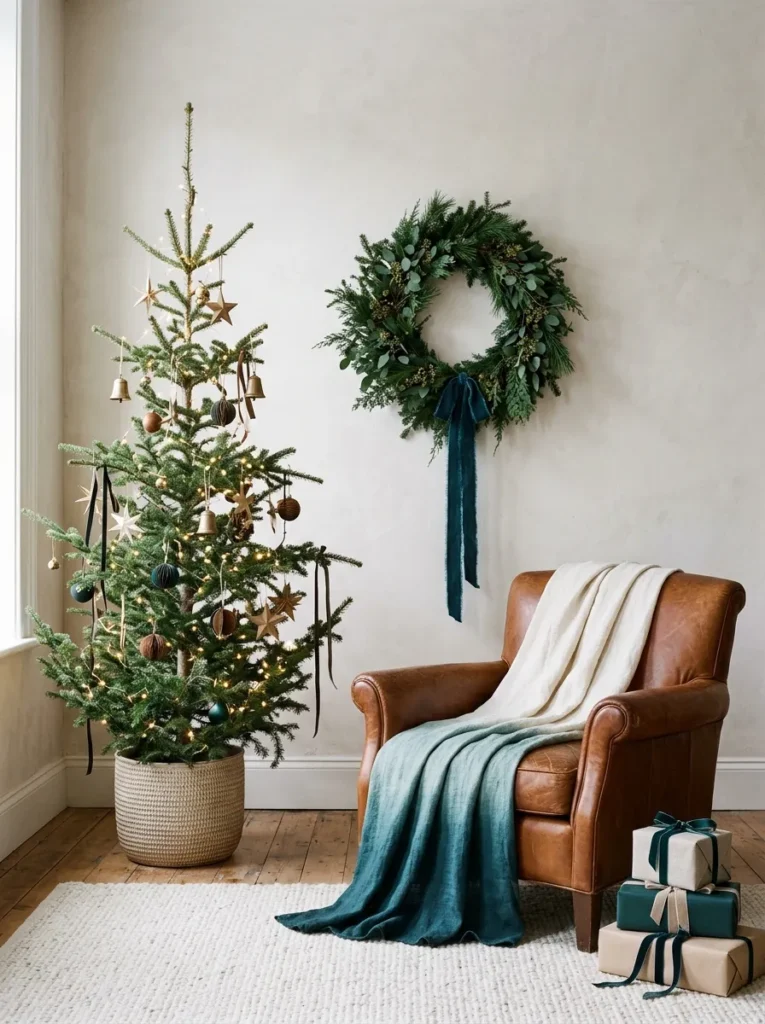
- Palette: Peacock teal, ivory, cognac leather, pale plaster wall
- Lighting: Soft north window light by day; a 2700K floor lamp behind the chair at night
- Key pieces: A thrifted ivory linen throw, fabric dye, a bucket, a cognac leather armchair
- Time and cost: About $25, two hours plus an overnight flat dry
- Standout detail: Lifting the throw two inches every five minutes builds a smooth teal-to-ivory gradient
Why this works: A dip-dyed gradient turns an ordinary throw into the one colorful, textured layer a room needs.
Linen comes from flax stems, and its cellulose fibers take dye made for cotton evenly. That’s why it’s ideal for a beginner ombré. Pre-wash an ivory linen throw, then mix peacock teal fabric dye in a bucket following the label. Submerge the bottom twelve inches, then lift the throw two inches every five minutes. The bottom soaks longest, so it ends deepest teal and fades upward to ivory. Rinse in cool water until it runs clear, then wash the throw alone and dry it flat. Wear gloves and use a bucket you won’t use for food.
Drape the finished throw over a cognac leather armchair so the teal hem pools gently near the floor and the ivory top blends with a pale plaster wall. Teal and cognac sit across the color wheel, so each warms the other. Soft north light shows the gradient best, and a 2700K floor lamp behind the chair makes the linen glow at night. A thrifted linen throw, fabric dye, and gloves cost about $25. The weave’s natural texture keeps the color from looking flat, and the wrinkles only add to the effect.
20. Pierced Can Lanterns

- Palette: Marigold, cocoa, ivory, warm LED glow
- Lighting: Battery LED candles at about 2200K; each lantern throws a constellation of light dots up the wall
- Key pieces: Three 28-ounce steel cans, a large nail and hammer, matte spray paint, a long white plaster ledge, a charcoal limewash wall
- Time and cost: About $12, one evening plus a night in the freezer
- Standout detail: Starburst patterns pierced from a paper template, each lantern with a different density
Why this works: Freezing a can before piercing it gives you crisp patterns and a wall full of light dots.
My first pierced lantern collapsed into a dented mess because I skipped the freezer. Ice is the trick. Clean three 28-ounce steel cans, fill them with water, and freeze them overnight so the ice supports the metal from inside. Wrap a paper template of dots around each can, tape it, and tap the pattern through with a large nail and a hammer, resting the can on a folded towel. Let the ice melt, dry the cans, and check the rims for sharp edges. Spray two light coats of matte paint outdoors.
Set the three lanterns on a long white plaster ledge in front of a charcoal limewash wall. Marigold, cocoa, and ivory look warm and modern, and the dark wall makes the light dots pop. Drop a battery LED candle in each, around 2200K, so every can throws a constellation of dots up the wall. Vary the pattern density, with tight starbursts on one and sparse dots on another, so the trio doesn’t look mass-produced. Use LEDs instead of flames, because spray paint can blister and scorch under a real candle. Total cost is about $12.
21. Color-Block Pouch Advent
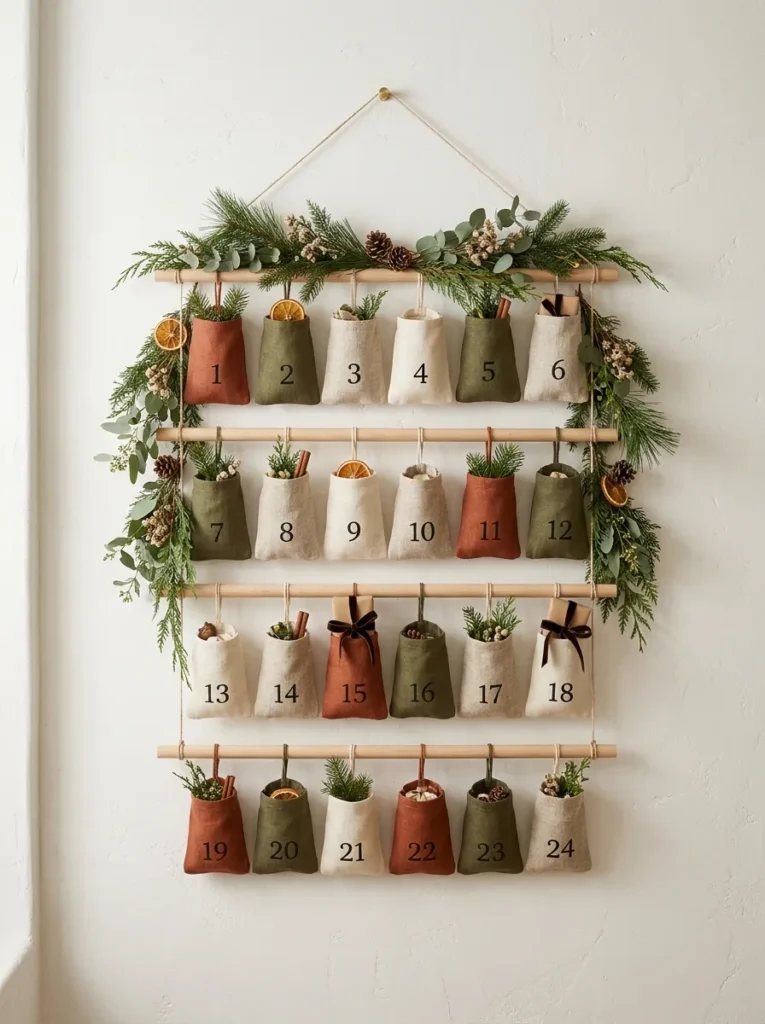
- Palette: Rust, olive, oatmeal, ivory, with black numerals
- Lighting: Side window light grazes the linen weave; a 2700K sconce at night
- Key pieces: Twenty-four linen-look pouches, iron-on numerals, fabric hem tape, four 36-inch maple dowels, leather cord, a plaster hallway wall
- Time and cost: About $35, one afternoon, no sewing
- Standout detail: Four tonal rows of six pouches, with clean black sans-serif numerals
Why this works: Tonal linen pouches turn an advent calendar into a piece of wall art you want to leave up all month.
A no-sew advent calendar takes about three hours, because hem tape fuses fabric with a household iron in seconds. Cut twenty-four rectangles of linen-look cotton, each five by nine inches, in rust, olive, oatmeal, and ivory. Fold each in half, fuse the sides with tape, and turn it right side out. Press an iron-on numeral onto each front, then fill the pouches with small treats. Choose a clean sans-serif numeral in black for a modern look. Close each with a ten-inch length of leather cord, and hang the pouches in four tonal rows, six per dowel.
Hang four 36-inch maple dowels one above the other, each on two wall hooks, with six pouches per dowel and about three inches between rows. I made mine on a rainy afternoon, and a neighbor’s kids stood in front of it for ten minutes, trying to guess which pouch held the chocolate. Rust, olive, oatmeal, and ivory read as quiet and grown-up, while the black numerals keep it graphic. A window’s side light grazes the linen weave, and a 2700K sconce keeps it warm at night. Total cost runs about $35.
Styling Principles
Handmade Christmas decor looks designed when it repeats one shape in a limited palette. These six principles apply to every idea above.
- Repeat one shape. Three or more matching forms, whether discs, cones, orbs, or tassels, read as a plan instead of a pile.
- Name your palette first. Limit each scene to three or four tones. The terrazzo discs use chalk white, terracotta, sage, and charcoal, and nothing else.
- Scale up. Eight-inch tassels look like custom textile, while two- to three-inch craft-store tassels look like keychains. Bigger pieces look more deliberate.
- Finish every edge. Sand wood to 220-grit, seal clay with matte varnish, and cut ribbon ends in a V. Finishing is what separates designed from crafty.
- Light it warm. Bulbs between 2200K and 2700K bring out the texture in paint, thread, and paper. Use battery LEDs inside anything made of paper.
- Leave space. Keep one handmade focal point per surface and leave bare wall or tabletop around it. Three competing projects on one shelf look crowded.
FAQ
What Are the Easiest DIY Christmas Decorations for Beginners?
The easiest projects need only scissors, glue, and paint. Start with the oversized tassel swag, the fringed paper cone forest, or color-block gift wrap. Each takes an afternoon or less and costs under fifteen dollars.
How Do I Make Homemade Christmas Decor Look Expensive?
Repeat one shape, limit the palette to three or four tones, scale pieces up, and finish every edge. Those four moves explain why twelve identical clay ornaments look like boutique pieces, while twelve mismatched craft-store ones look like clutter.
How Much Do DIY Christmas Decorations Cost?
Most projects in this guide cost between eight and thirty-five dollars. The paper cone forest runs about eight dollars, while the painted check floorcloth and the pouch advent calendar run about thirty-five dollars each. Reusing wine bottles, thrifted glass, and foraged branches lowers the total further.
Which Handmade Decorations Need Extra Safety Care?
Paper, ribbon, and yarn burn easily, so light them with battery LEDs instead of open flames. Keep real candle flames at least twelve inches from anything flammable, and never leave them unattended. Winterberry stems are mildly toxic if eaten, and amaryllis is toxic to cats and dogs, so keep both out of reach of small children and pets.
When Should I Start Making Christmas Decorations?
Start two to three weeks before you plan to decorate, with one exception: amaryllis bulbs need six to eight weeks to bloom, so plant them by the first week of November. The other slow steps set the schedule: air-dry clay needs about two days to dry (add a day in humid weather), concrete holders cure for two days, and spray-painted bottles need a day to cure. Quick projects like tassels and gift wrap can wait until the week before.
How Do I Store Handmade Christmas Decorations?
Wrap each piece in tissue, keep each set together in a labeled rigid box, and store it inside the house instead of a garage or attic. Air-dry clay and paper absorb moisture, so damp storage can warp them. Roll ribbon strips onto cardboard tubes so they stay flat for next year.
Conclusion
Beautiful holiday decor doesn’t need a big budget or a craft studio. It needs a plan: one repeated shape, a short palette, warm light, and edges you’ve taken the time to finish. Easy DIY Christmas decorations built that way look designed, even when each project costs under forty dollars. I’ve seen how a single handmade piece, like a row of speckled clay ornaments, changes how a whole room feels.
Save this post to your Pinterest board, choose one idea that fits your space, and make it this weekend. Then share it with a friend who thinks they aren’t crafty. They might surprise you.