Christmas Gift Wrapping Ideas 2026: 18 Modern Looks That Cost Little
A tree surrounded by mismatched packages feels chaotic before you see a single bow. Now picture the same tree with gifts that share one color story. These Christmas gift wrapping ideas show you how, using paper, tissue, floss, and thread that cost only a few dollars.
I’m Emily, and every December in Austin I wrap with a plan instead of a pile of leftover paper. My husband builds homes for a living, so I’ve borrowed his scratch awl and cabinet veneer more than once. In this post, you’ll find eighteen modern wraps, each with exact colors, simple steps, and honest prices. I’ve tested most of them myself, and I’ve seen how one repeated detail makes an entire pile look designed. Save your favorites, pick one, and wrap a single gift tonight.
The best-looking gift pile is rarely the most expensive one. It’s the most edited. Design psychology calls it the similarity principle: the eye groups objects that share a color or shape, so repeated elements read as a plan instead of a pile. Two Decembers ago I wrapped twelve gifts in four different papers, and my own tree skirt looked like a yard sale. The following year I used one paper, one ribbon, and one texture twist, and a neighbor asked who’d styled it.
A set of gifts looks designed when every package repeats one paper color, one ribbon width, and one texture contrast. This post gives you Christmas gift wrapping ideas that look modern, cost little, and follow a plan.
1. Blind Embossed Arches — A Christmas Gift Wrapping Idea with Quiet Texture
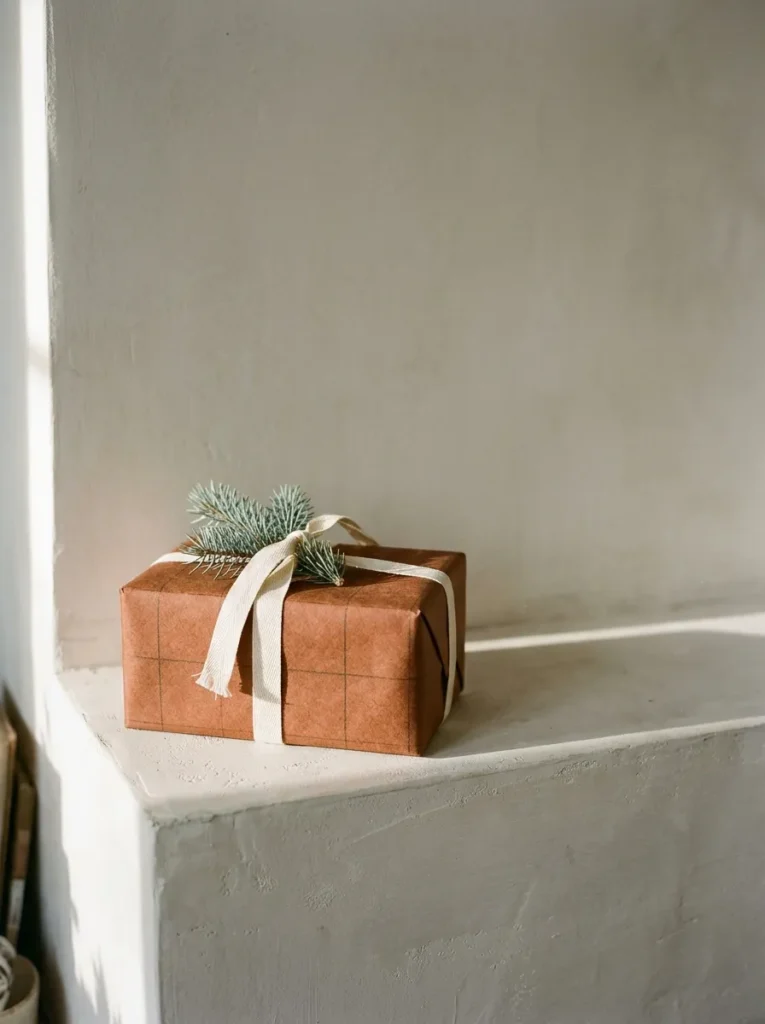
- Palette: mushroom matte paper, oyster silk ribbon, charcoal gift tag
- Lighting: morning window light skims the paper and reveals each pressed line; at night, one taper candle does the same
- Key pieces: a bone folder or dried-out ballpoint pen, a cardboard arch template, a ruler
- Standout detail: three nested arches pressed into the lid, with no ink, tape, or foil
- Unexpected touch: the pattern only appears when light hits it at an angle
Why this works: Pressing a pattern into the paper adds quiet detail you notice only up close, which is what makes a plain box look luxurious.
Embossing is the quietest way to decorate a gift. Pressing a line into matte paper creates a shallow groove, and light skimming across the surface at a low angle makes that groove appear as a soft shadow. That is why this idea looks expensive in photos and in person. Cut a small arch from cardboard, place it on the paper, and trace its edge with a bone folder or a dried-out ballpoint pen. Mushroom paper works best because its soft color lets the shadows show. A bone folder typically costs about $5 to $8.
Finish with a single oyster silk ribbon, half an inch wide, tied in a flat knot. Keep the tag small and charcoal so the embossing stays the focus. I tried this on a dozen boxes one year, and what surprised me was how often people ran a fingertip over the lid before opening it. Nested arches, each about a half inch apart, give the pattern depth without any color. Because there is no ink, glitter, or foil, the paper stays easy to recycle. Press firmly on a flat, hard surface, since a soft table cushions the line.
2. Arched Paper Loop
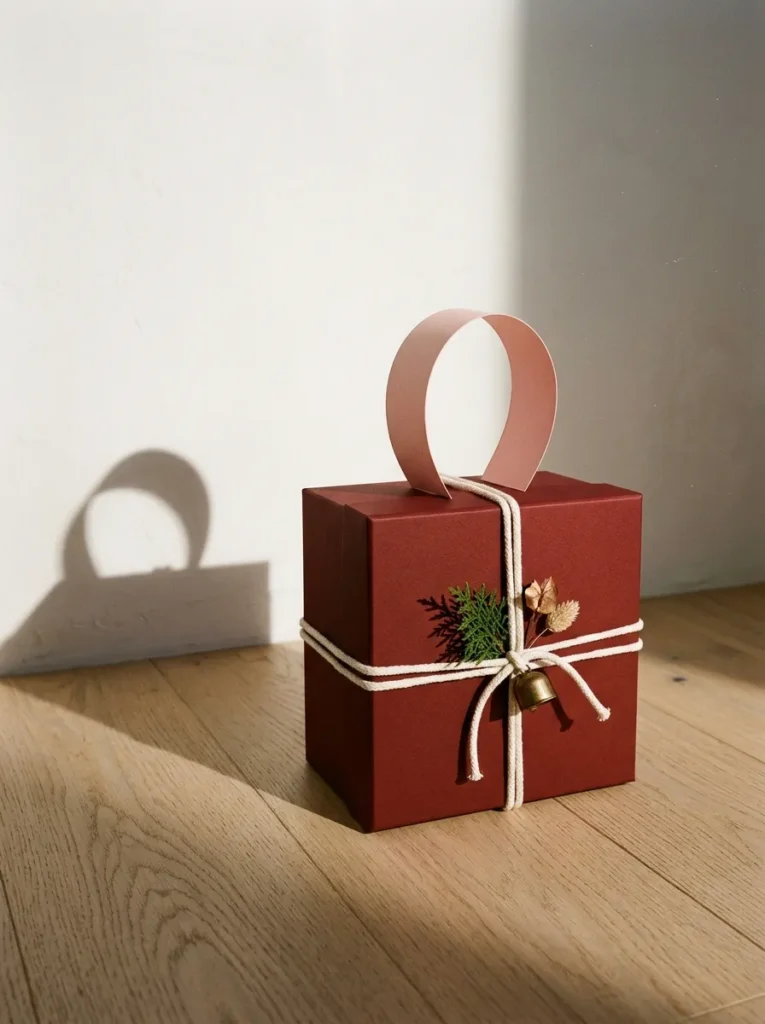
- Palette: oxblood matte paper, shell-pink cardstock, bone-colored cotton cord
- Lighting: low evening sun stretches the arch’s shadow across the floor; under a lamp, the pink glows against the oxblood
- Key pieces: one sheet of shell-pink cardstock, double-sided tape, scissors
- Standout detail: a freestanding four-inch arch in place of a bow
- Unexpected touch: the whole topper is one strip of paper, with no ribbon required
Why this works: A single curved loop adds sculptural height, which makes a flat box look designed from every angle.
The first time I made this, I was trying to fake a bow and gave up halfway. What I ended up with was a smooth arch, and I liked it more than any bow I have ever tied. Cut a strip of shell-pink cardstock two inches wide and ten inches long, curve it into a loop, and tape the ends underneath. Set it on an oxblood box so it stands like a small gateway. A sheet of cardstock costs under a dollar, and one sheet makes four loops, so a dozen gifts cost very little.
Curved forms are central to current interior design, and this loop borrows that idea at gift scale. The arch softens the hard corners of a box and echoes the rounded mirrors and vases popular right now. Pair the oxblood and pink with bone-colored cotton cord wrapped twice around the box, so the color stays rich but calm. I’ve noticed that guests often hesitate to open the gift because the arch looks like part of a display. Press the loop’s ends flat with double-sided tape, and it will stay upright until the gift is opened.
3. Fluted Cardboard Wrap
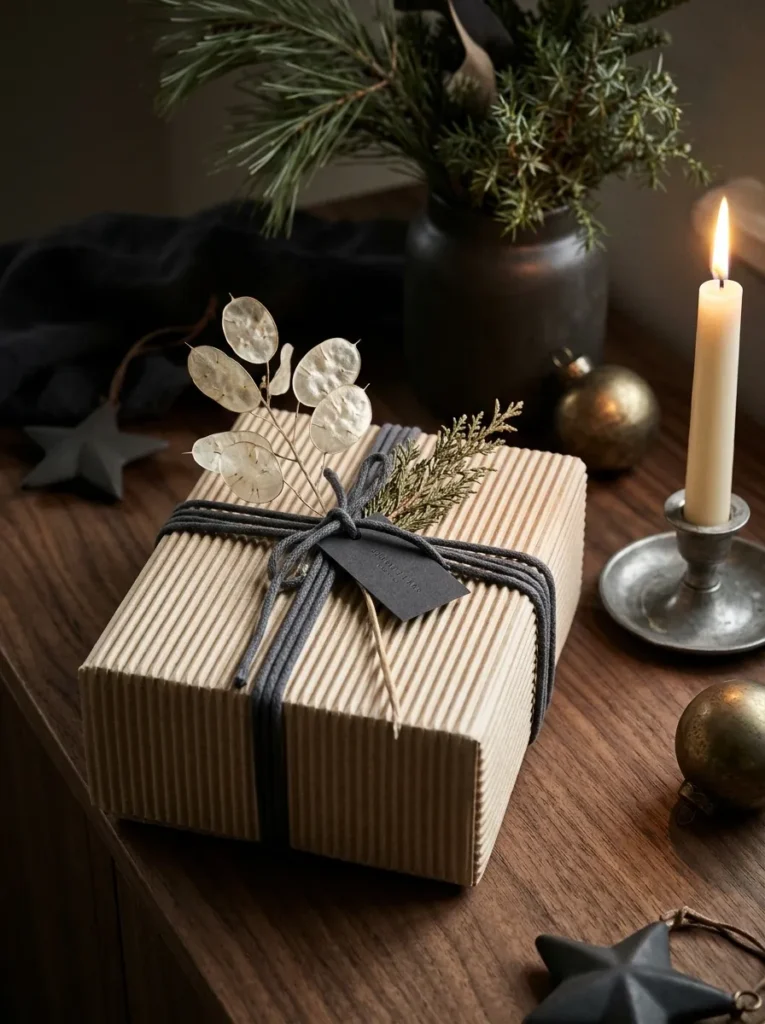
- Palette: oatmeal corrugated paper, charcoal cotton cord, silver-white dried lunaria
- Lighting: soft daylight shows the ribs; candlelight turns each flute into a thin line of shadow
- Key pieces: a roll of single-face corrugated paper, charcoal cord, one dried lunaria stem
- Standout detail: one sheet wrapped so the flutes run in a single direction around the box
- Unexpected touch: a shipping-box material used as luxury wrap
Why this works: Ribbed texture adds depth without adding color, so one material can make a whole pile of gifts feel cohesive.
Fluted corrugated paper gives gifts the same ribbed texture that designers love on cabinet doors and wall panels. My husband explained the key rule: corrugated material folds cleanly along creases that run parallel to the flutes and kinks along creases that cut across them. So wrap the box so every fold follows the ribs. Single-face corrugated rolls at craft stores typically cost about $8 to $15. Choose an oatmeal tone, and add charcoal cotton cord for a dark, graphic line. The result looks like architectural paneling you can hold in your hands.
I tested this on a stack of six gifts for my sister’s family, and the stack looked like one cohesive installation. For contrast, tuck a single dried lunaria stem under the cord, because its papery, silver-white discs catch candlelight in the evening. Wrap in a single sheet where you can, so the flutes run in one direction around the box. Plain corrugated paper is also widely recyclable, so it avoids the foil and glitter problem. Skip tape on the visible faces; fold the edges under and secure them with double-sided tape instead, so the ribbed surface stays clean.
4. Celadon Ombré Stack
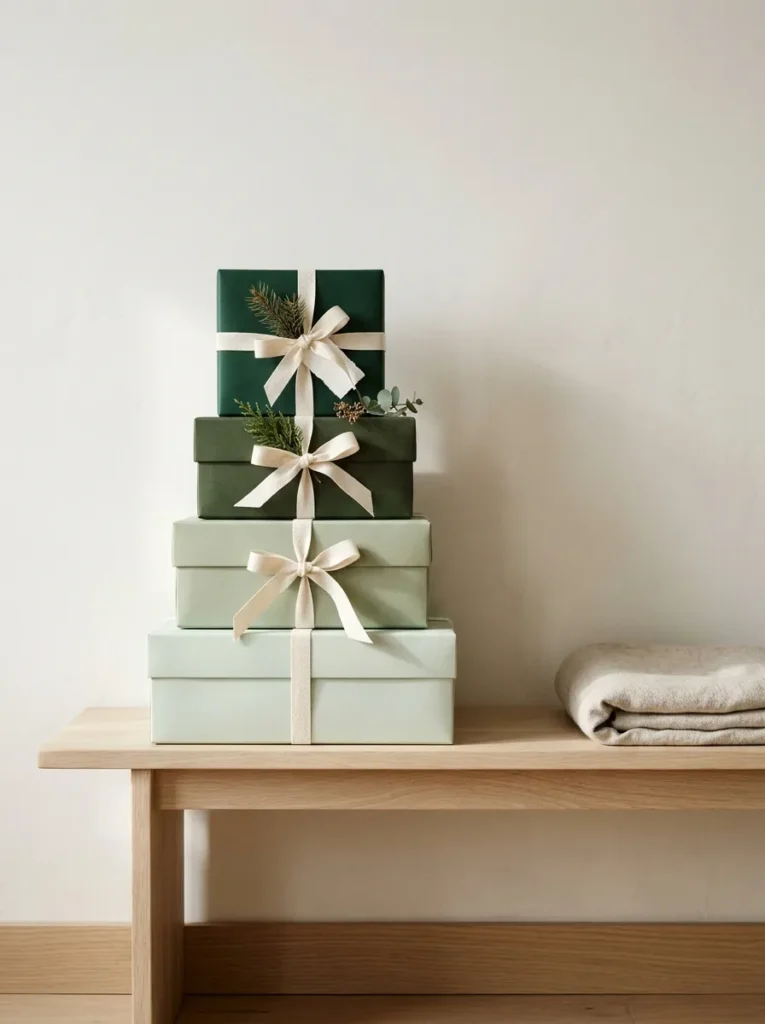
- Palette: pale celadon, sage, moss, and bottle-green matte papers with ivory cotton twill ribbon
- Lighting: late-morning side light separates each shade; lamplight at night deepens the darkest boxes
- Key pieces: four boxes in graduated sizes, a low oak bench, three-eighths-inch twill ribbon
- Standout detail: each box sits one shade darker than the one below, with the smallest on top
- Unexpected touch: one hue in four depths replaces any pattern
Why this works: Four depths of one hue read as a single deliberate color story, so the whole stack looks styled with no extra decoration.
One hue in four depths never clashes. Painters on my husband’s job sites build a room’s palette this way, because tints and shades of a single color always sit comfortably together. Gift wrap works the same. Wrap four boxes in pale celadon, sage, moss, and bottle-green matte papers, then stack them from lightest on the bottom to darkest on top. Solid matte rolls typically cost about $5 to $10 each, and you need only one of each. Keep every ribbon identical, ivory cotton twill at three-eighths of an inch, so the gradient is the only thing your eye reads.
Before you buy, run a quick test in the store if you can. Scrunch a corner of the paper in your fist; if it stays crumpled, it is usually plain paper, and if it springs back open, it likely contains plastic or foil and won’t recycle well. Plain matte papers usually pass. Set the stack on an entry bench with the smallest, darkest box on top, so the eye travels upward through the gradient. I’ve seen this arrangement stop guests in the hallway before they even take off their coats. Tie every knot on the same side.
You’ll Also Love: Oversized Christmas Bow Ideas: 15 Ways to Use Velvet and Plaid Ribbon
5. Lilac Circle Cutouts
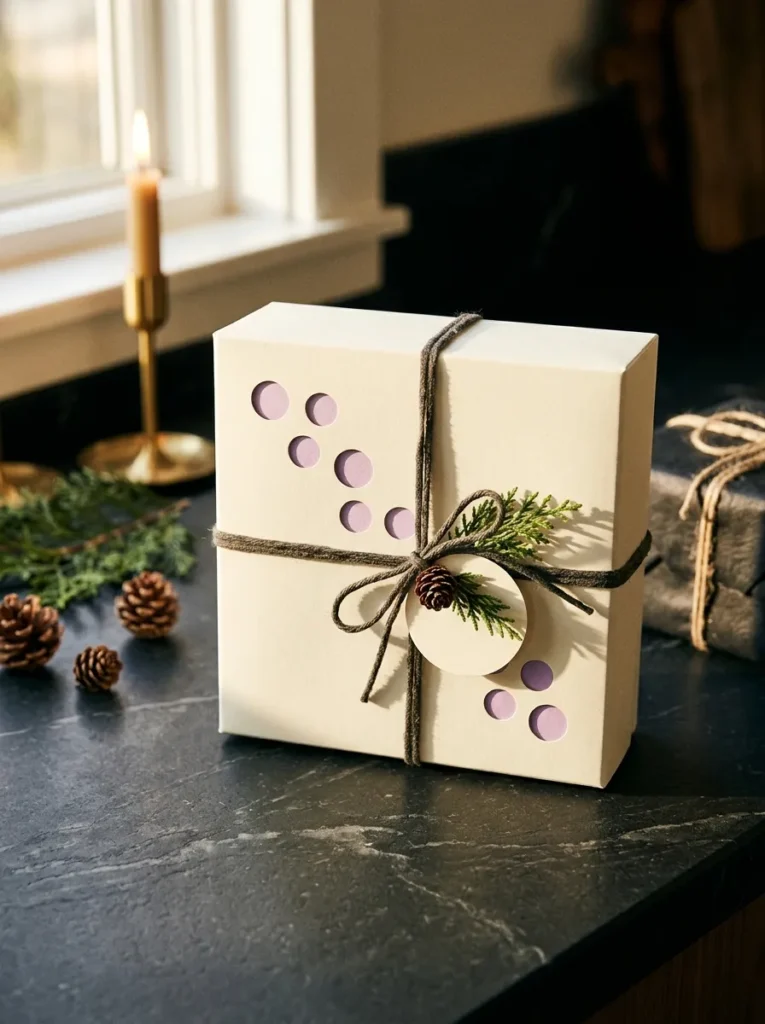
- Palette: ivory matte paper, lilac matte inner box, charcoal linen cord
- Lighting: afternoon sun deepens the lilac through each hole; lamplight at night keeps it soft
- Key pieces: a one-inch hand punch, two sheets of paper, double-sided tape
- Standout detail: nine holes clustered on a loose diagonal, with the punched circles saved for tags
- Unexpected touch: a second color hides under the first layer
Why this works: A hidden second color showing through small circles adds depth and surprise to an otherwise quiet white box.
I made my first set of these on the couch during a movie, and I almost threw away the little paper circles that fell out. Instead I glued one to each tag, and the whole set suddenly matched. Punch a loose diagonal cluster of nine one-inch holes into a sheet of ivory paper, then wrap the sheet over a box covered in lilac paper. The lilac shows through each hole like a small window. A hand punch typically costs about $6 to $10, and it works for years of wrapping.
Light makes this idea special. As afternoon sun moves across the box, each hole catches it differently, so the lilac looks pale at noon and deeper at dusk. Keep the holes at least an inch from every edge, because punches too close to a fold tear. Tie a charcoal linen cord around the box and slip a saved circle under the knot. In my experience, a single cluster looks more refined than an all-over pattern, since the empty ivory around it gives the eye somewhere to rest. Press folds with a thumbnail so edges stay crisp.
6. Cobalt Satin Sash
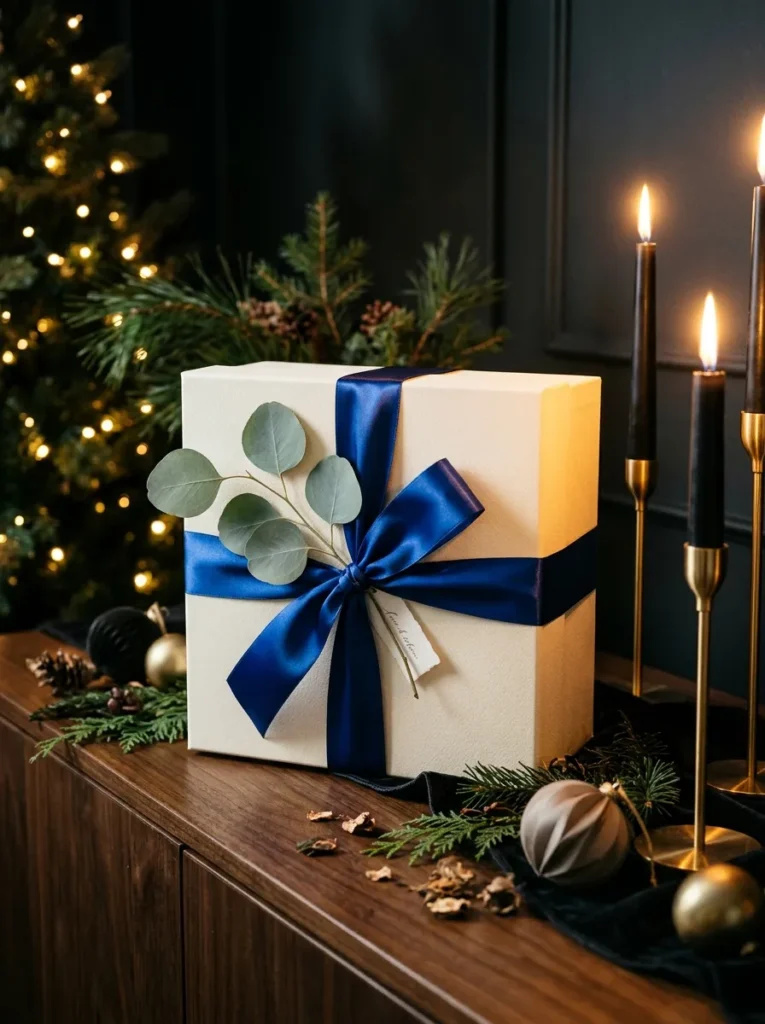
- Palette: cream matte paper, cobalt satin ribbon, silver dollar eucalyptus
- Lighting: candle glow makes the satin shift from vivid blue to deep indigo; by day, bright window light keeps the cobalt electric
- Key pieces: three-inch satin ribbon, fray sealant, sharp fabric scissors
- Standout detail: an off-center flat knot with both ends cut on a long diagonal
- Unexpected touch: one wide band replaces bow loops entirely
Why this works: One wide satin band reads as a single confident gesture, which looks more modern than a bow.
Satin catches light because its long threads float across the surface, and that is why a wide band looks so luxurious on a plain cream box. Choose a cobalt ribbon three inches wide, wrap it once around the box like an obi sash, and tie a flat knot slightly off center. Skip the loops entirely. A spool of wide satin typically costs under $12 and covers several boxes. Cut each end on a long diagonal, then dab the cut edges with fray sealant so the threads stay put through a whole season of handling.
I tested this on a pale cream box last year, and the cobalt looked almost electric against white walls. That contrast is the whole point. Hold the ribbon taut while wrapping so it sits flat, with no puckers. Add one stem of silver dollar eucalyptus under the knot for a soft, dusty green that calms the blue. In the evening, a nearby candle makes the satin shimmer and shift. Keep flames a foot from ribbon. I’ve noticed that one wide ribbon looks far more modern than several thin ones, because it reads as a single bold gesture.
7. Powder Blue Weave
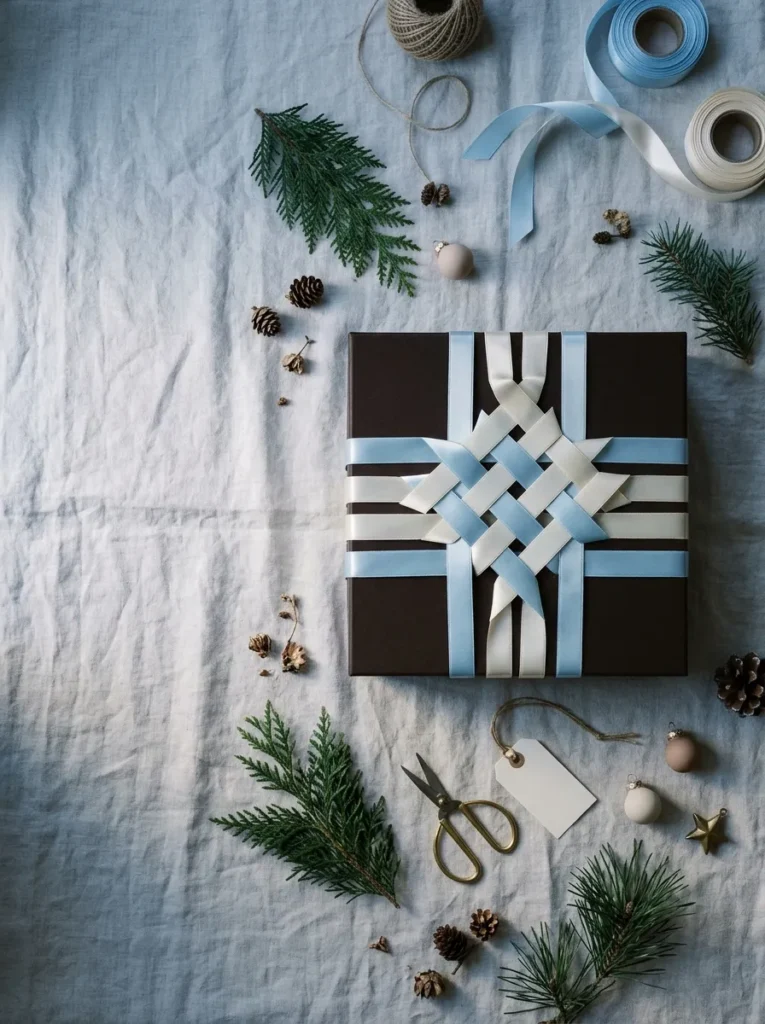
- Palette: dark chocolate matte paper, powder-blue satin ribbon, cream satin ribbon
- Lighting: cool blue-hour window light deepens the blue; a warm lamp brings out the cream
- Key pieces: two three-eighths-inch ribbons in each color, double-sided tape, sharp scissors
- Standout detail: an over-under woven lattice across the lid, with ribbons an inch apart
- Unexpected touch: a basketweave pattern made with ribbon alone
Why this works: An over-under ribbon weave creates pattern without printed paper, so a plain dark box gains texture and color at once.
I stumbled on this while trying to hide a crooked fold. A woven lattice of ribbon over the lid covered the flaw and looked better than the plain box ever had. Wrap a box in dark chocolate matte paper, then lay two powder-blue ribbons across it, three-eighths of an inch wide and an inch apart. Weave two cream ribbons through them, over and under, and tape every end underneath. A 10-yard spool of satin ribbon typically costs about $3 to $6, so two colors cost less than one fancy bow. The lattice reads as a woven basket pattern.
Weaving takes patience, but the geometry does the design work for you. Because the ribbons cross at right angles, the over-under rhythm creates a woven plaid of powder blue and cream against the dark chocolate. Cut every strip a few inches longer than the box requires, then trim after the weave is snug. Press the ribbon ends down with double-sided tape so nothing shifts when the gift is carried. I’ve seen a single woven box become the focal point of an entire tree skirt, and it takes about ten minutes to make once you’ve done two.
8. Saffron Smoke Veil
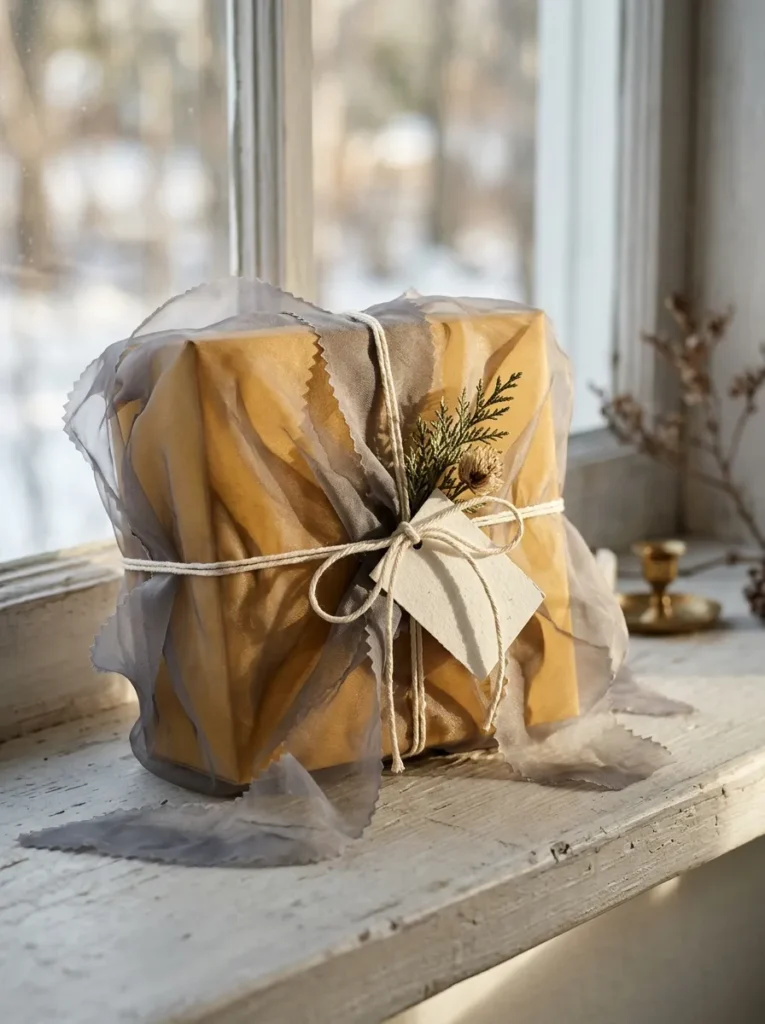
- Palette: saffron matte paper, smoke-gray polyester organza, ivory cotton string, ivory card tag
- Lighting: a sunlit window makes the layers glow; evening lamplight turns the gold smoky
- Key pieces: a 24-inch organza square, pinking shears, cotton string
- Standout detail: zigzag-cut sheer edges over a bright yellow box
- Unexpected touch: a frosted-glass effect on a paper box
Why this works: Sheer gray fabric over saffron paper softens the yellow into smoky gold, which gives a simple box real depth.
Sheer fabric filters light the way frosted glass does. Layer smoke-gray organza over a saffron box, and the yellow softens into a muted, smoky gold that looks far more expensive than plain paper. Wrap the box in saffron matte paper, then drape a 24-inch square of organza over the top, gather the corners underneath, and tie it with ivory cotton string. A yard of polyester organza typically costs about $3 to $8, yields several squares, and holds a crisp shape. Cut the fabric with pinking shears, since the zigzag edge resists fraying and looks intentional.
I tried this first with a white organza, and it just looked fussy. Smoke gray changed everything, because the cool tone calms the saffron instead of competing with it. In my experience, the veil works best on a square box, where the fabric falls in clean, soft folds. Set the gift in a sunlit window and the layers glow like stained glass. Because organza is lightweight, it travels well, and recipients often keep the square to tie around a plant pot or a jar. Press it flat with a cool iron if it creases.
9. Walnut Veneer Band
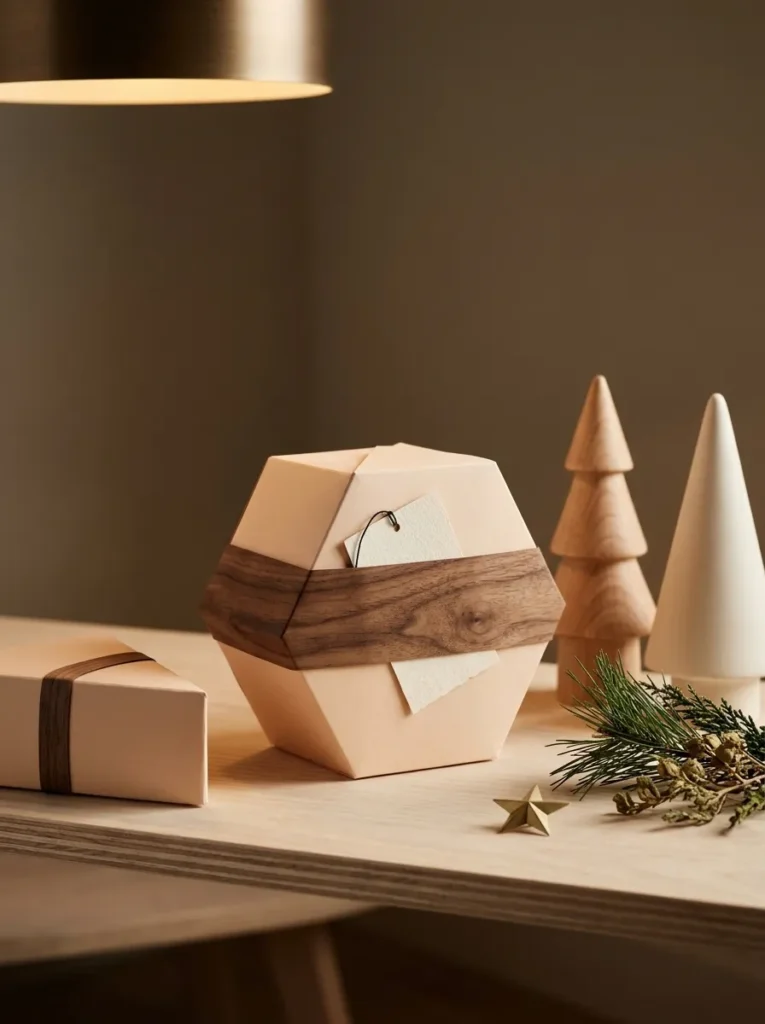
- Palette: pale peach matte paper, walnut veneer band, cream paper tag, black cotton thread
- Lighting: warm lamplight deepens the walnut grain; daylight keeps the peach soft
- Key pieces: a roll of walnut veneer edge banding, double-sided tape, sharp scissors
- Standout detail: a three-quarter-inch real-wood band with the overlapped seam hidden underneath
- Unexpected touch: a cabinetmaker’s material standing in for ribbon
Why this works: Real wood grain against soft peach paper adds warmth and texture that printed ribbon cannot match.
Wood veneer edge banding is the thin strip cabinetmakers glue onto raw plywood edges, and my husband’s crew uses it on cabinet jobs. A walnut strip three-quarters of an inch wide bends around a box like a ribbon, then adds real wood grain to a pale peach package. Wrap the box in peach matte paper, run the strip once around the middle, and secure the overlapped ends underneath with double-sided tape. Skip the iron-on glue, which can scorch paper. A roll of veneer banding typically costs about $8 to $20.
The first time I wrapped a gift this way, I worried the wood would split, so I tested a strip on a scrap box. It bent smoothly, with only a faint crackle at one sharp corner, which I fixed by easing the corner with my thumb. Tuck a cream paper tag under the band, strung on black cotton thread. Warm lamplight makes walnut grain look richer than almost any printed paper can. Veneer is thin natural wood, so store finished gifts flat and away from damp porches until you hand them over.
10. Two-Tone Floss Tassel
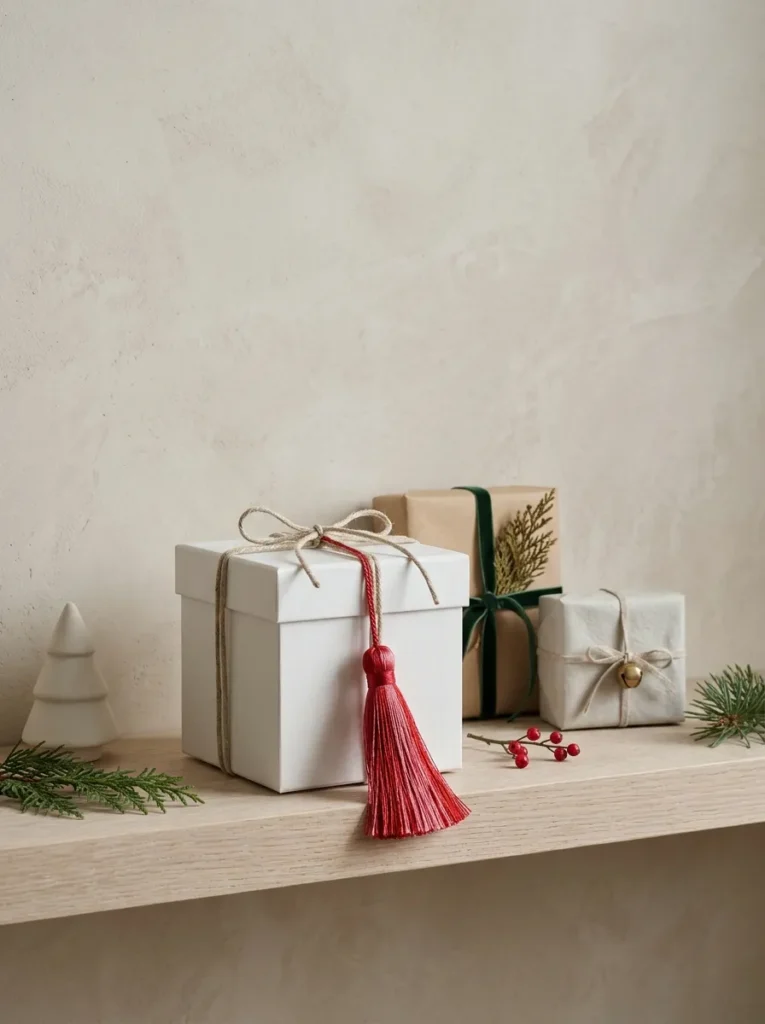
- Palette: cloud-white matte paper, chili-red and rose-pink floss, natural linen cord
- Lighting: soft daylight shows the silky sheen of the floss; lamplight deepens the red
- Key pieces: two skeins of cotton embroidery floss, a four-inch cardboard strip, sharp scissors
- Standout detail: a two-tone tassel with a tightly wrapped pink neck
- Unexpected touch: a topper made of thread instead of ribbon
Why this works: A two-tone tassel adds movement and bold color to a plain white box for about two dollars.
Tassels are made from nothing more than thread wrapped around cardboard, which makes them one of the cheapest sculptural toppers you can add to a gift. Wrap cotton embroidery floss thirty times around a four-inch strip of cardboard, mixing chili red and rose pink, then slide a loop of linen cord under the top and tie it tight. Cut the bottom loops, bind the neck with a few turns of pink floss, and trim the ends level. Floss typically costs under a dollar per skein, so a tassel costs about two dollars to make.
Place the tassel against a cloud-white box, and the red and pink read as a bold, graphic accent that feels current rather than crafty. Tie the cord around the box so the tassel hangs just below one edge, which adds movement to a still pile of gifts. In my experience, a tassel stays fuller if you hold it over a kettle’s steam for a few seconds and then comb the strands with your fingers. Recipients often hang the tassel on a doorknob or a bag after opening, so it keeps working long after the paper is gone.
11. Poppy Scallop Cuff
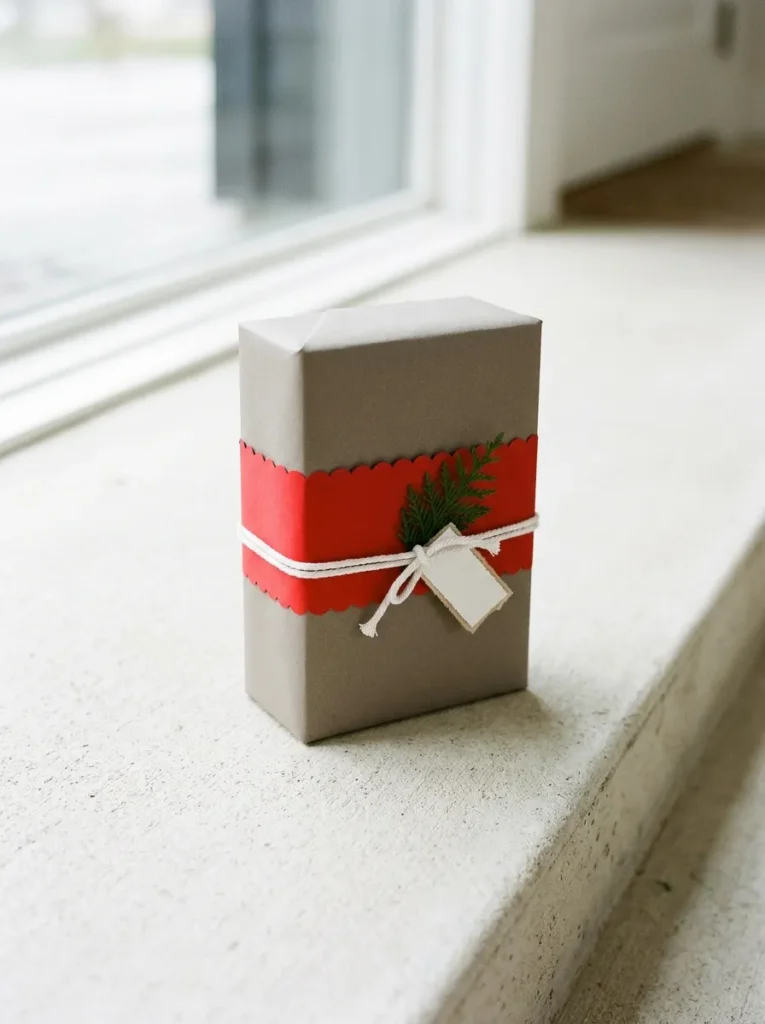
- Palette: warm gray matte paper, poppy-red cardstock, white cotton cord
- Lighting: overcast daylight keeps the red crisp; lamplight warms the gray
- Key pieces: a spice jar lid as a scallop template, a pencil, sharp scissors, double-sided tape
- Standout detail: a two-inch cuff with one scalloped edge facing up
- Unexpected touch: red appears only on the cuff, so nothing else competes
Why this works: A scalloped cuff brings a soft curve to a square box, so a quiet gray gift gains a bold, modern edge.
My first scallops looked like a row of lumpy waves, until I stopped cutting freehand. Now I trace a spice jar lid along the edge of a cardstock strip and cut each arc slowly. Wrap the box in warm gray matte paper, then wrap a two-inch strip of poppy-red cardstock around the middle with the scalloped edge facing up. Tape the ends underneath. Scalloped edges have appeared on everything from tableware to bedding recently, and this is the cheapest way to bring that rounded softness to a gift. A sheet of cardstock typically costs under a dollar.
Curves soften the hard geometry of a box, and that contrast is exactly why the scallop works. Poppy red against warm gray reads clearly even in a crowded pile, and the rounded edge catches a thin line of shadow along each arc. Cut the cardstock strip slightly longer than the box’s circumference, so the ends overlap and hide the seam. I’ve noticed that red scallops look most modern when the rest of the wrap stays quiet. Add white cord below the cuff. Repeat the cuff on three or four gifts, and the group suddenly feels like a collection.
12. Twisted Bottle Crown
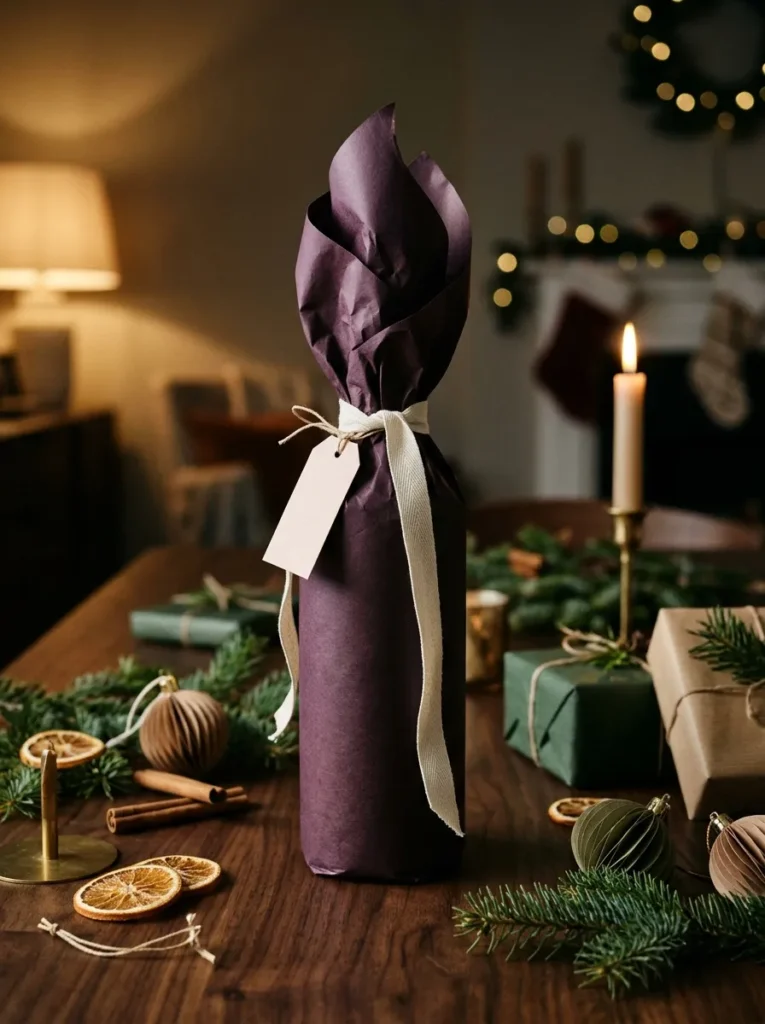
- Palette: aubergine matte paper, bone cotton twill ribbon, blush paper tag
- Lighting: warm dining-room lamplight deepens the aubergine; daylight keeps the bone ribbon crisp
- Key pieces: a 750-milliliter bottle, a 30-inch square of paper, half-inch ribbon
- Standout detail: a flame-shaped paper crown twisted above the neck, with no tape showing
- Unexpected touch: ribbon tails left slightly uneven on purpose
Why this works: A twisted paper crown gives a bottle height and shape with no tape showing, which makes a simple wrap look sculpted.
A standard 750-milliliter wine bottle stands about twelve inches tall and three inches wide, which makes it one of the easiest gifts to wrap beautifully. Stand the bottle in the center of a 30-inch square of aubergine matte paper, then gather the paper up around the neck and twist it into a loose, flame-shaped crown. Tie bone cotton twill ribbon around the twist. The paper’s own folds do the styling, so you need no tape on the outside. A roll of matte paper typically costs about $5 to $12 and wraps several bottles.
I learned to twist rather than fold after a dinner party where my taped wrap tore the moment the host lifted the bottle. A twisted crown has no seams to split, and the loose fan of paper above the neck gives the gift height that photographs beautifully. Fan the paper’s top edge out gently with your fingers, and let the ribbon tails hang uneven. Add a small blush paper tag to the ribbon. In my experience, a bottle wrapped this way sits well on a dining table, so guests often leave it standing as part of the decor.
13. Aura Wash Wrap
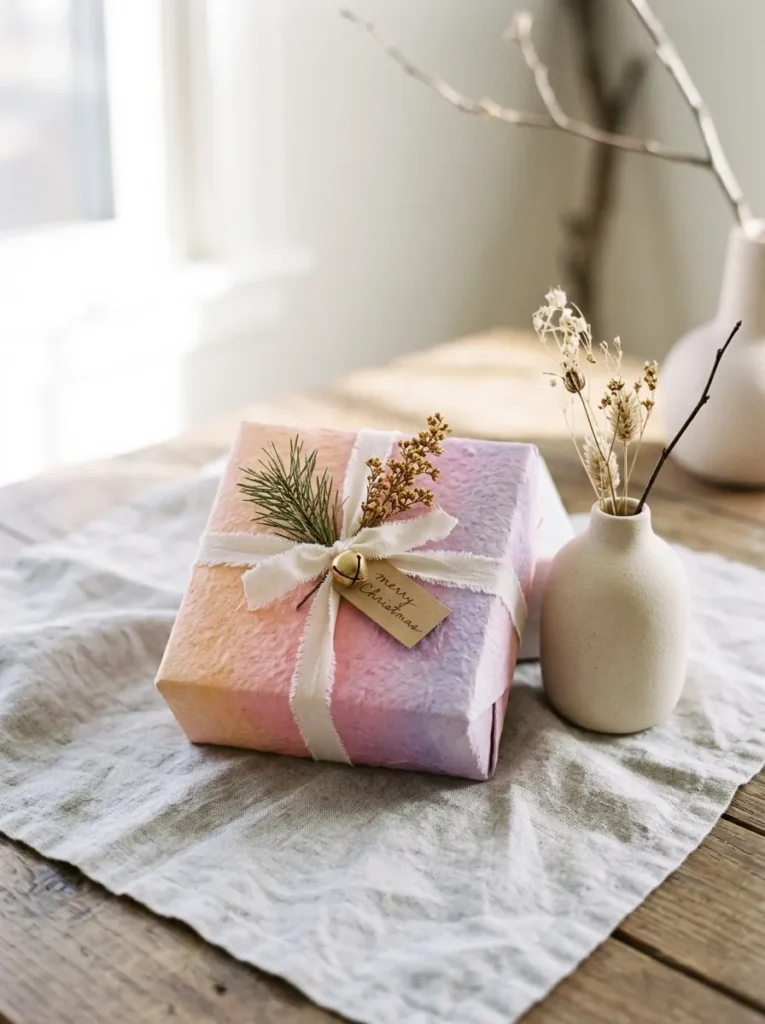
- Palette: white watercolor paper washed in apricot, rose, and lavender, with ivory cotton ribbon
- Lighting: soft morning daylight keeps the pastels luminous; at dusk the lavender deepens
- Key pieces: 90-pound watercolor paper, a student watercolor set, a sponge, a flat brush
- Standout detail: a three-color wash that bleeds from apricot to lavender across the whole sheet
- Unexpected touch: every wrap comes out one of a kind
Why this works: A soft three-color wash gives every package its own sunrise, so a plain box becomes one-of-a-kind art.
Watercolor pigment flows along wet paper and blends at its edges without hard lines, which is why a gradient wash looks soft and glowing instead of printed. Dampen a sheet of lightweight 90-pound watercolor paper with a sponge, brush apricot along one edge, rose through the middle, and lavender along the far edge, then tilt the sheet so the colors bleed together. Let it dry flat overnight, then press it under a heavy book. A pad of twelve sheets typically costs about $8 to $12, and a student watercolor set costs about the same.
The wash does the decorating, so everything else stays simple. Wrap a small box and tie it with a quarter-inch ivory cotton ribbon in a plain knot. Each sheet comes out slightly different, which gives every gift its own sunrise and keeps the set from looking mass-produced. I’ve noticed that people hesitate to tear into these. Score each fold lightly with a ruler first so the heavier paper bends where you want it. Press the folds with a bone folder or your thumbnail, because watercolor paper creases less sharply than gift wrap.
14. Hand-Stitched Frame
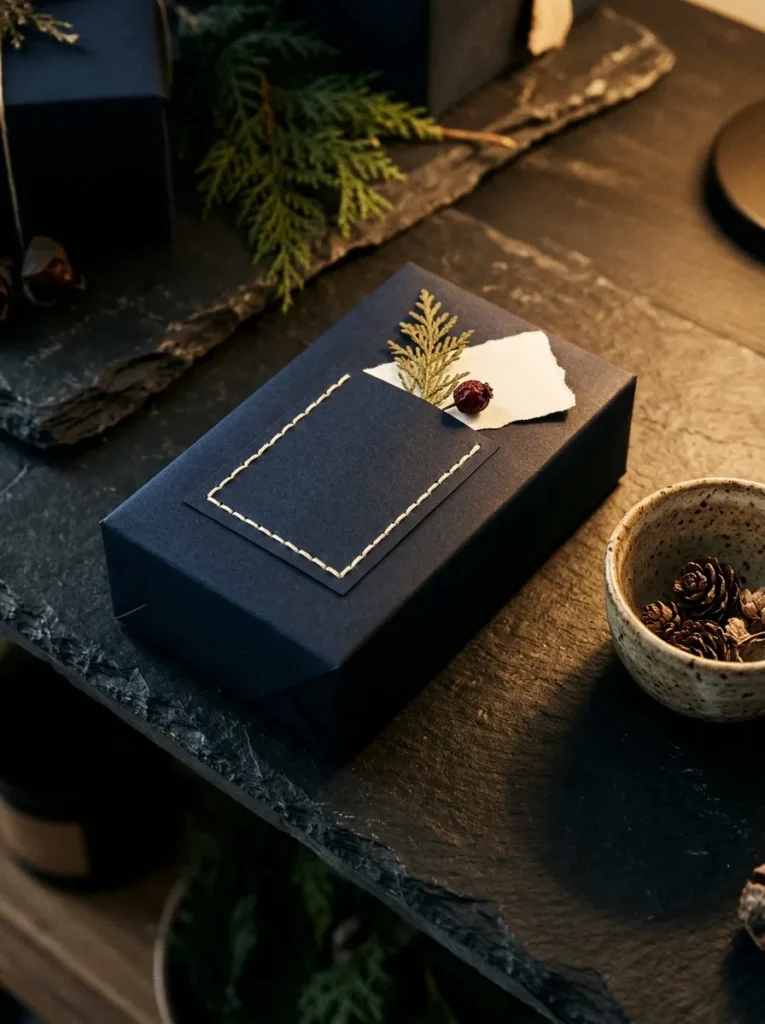
- Palette: midnight-navy matte paper, ivory waxed cotton thread, antique-white paper tag
- Lighting: warm lamplight makes the ivory stitches glow against the navy; daylight keeps them crisp
- Key pieces: a scratch awl, a hand-sewing needle, a ruler, a folded towel
- Standout detail: a quarter-inch running-stitch rectangle framing the lid
- Unexpected touch: a toolbox awl used for embroidery-style paper stitching
Why this works: Ivory running stitches on dark navy paper add a tactile, embroidered detail that makes one small panel feel like a keepsake.
I borrowed my husband’s scratch awl for this idea, and it has never gone back in his toolbox. The pointed steel tip pierces paper cleanly, which makes evenly spaced stitching possible. Cut a five-inch square of midnight-navy cardstock, dot a rectangle a half inch from the edge with a quarter-inch gap between marks, and pierce each dot. Sew a running stitch through the holes with ivory waxed cotton thread, knot it behind, and tape the panel to the lid of a navy box. A spool of waxed thread typically costs about $3 to $5.
Stitches add a handmade, tactile layer that print cannot imitate. Ivory thread against midnight navy gives the strongest contrast, so each tiny dash catches the eye even in dim evening light. Work on a folded towel so the awl has something soft to sink into, and keep your stitches the same length, about a quarter inch. In my experience, the first few gifts take about fifteen minutes each, and then the rhythm speeds up. Add a small antique-white paper tag under one corner of the panel, and the frame looks like a tiny piece of embroidery.
15. Rope Handle Tote
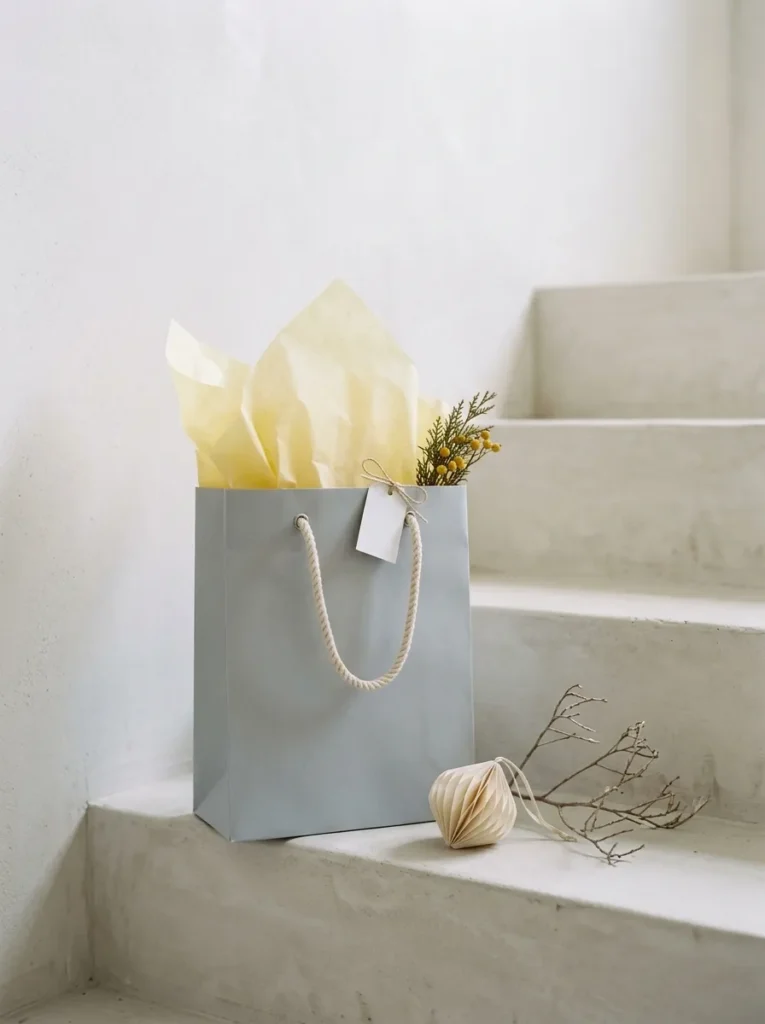
- Palette: cloud-gray matte paper bag, butter-yellow tissue, natural cotton rope, white paper tag
- Lighting: soft overcast light keeps the butter yellow gentle; evening lamplight warms the gray
- Key pieces: a plain matte paper bag, a hole punch, tape for reinforcement, three sheets of tissue
- Standout detail: rope handles knotted inside the bag, with a tissue cloud rising above the rim
- Unexpected touch: a plain shopping bag turned into wrap for bottles, sweaters, and odd shapes
Why this works: A rope-handled tote with a tissue crown wraps awkward gifts in one step and still looks styled.
Paper bags are the most forgiving wrap for awkward gifts, because they hold bottles, sweaters, and oddly shaped boxes with ease. Choose a plain matte gray bag, punch two holes in the front and two in the back an inch below the rim, and reinforce each hole with a patch of tape on the inside, since paper tears first at punched points. Thread three-eighths-inch cotton rope through each pair and knot the ends inside. A pack of ten plain bags typically costs about $8 to $15, and a 25-foot hank of rope costs about the same.
Here is the part guests remember: the tissue. I crumple three sheets of butter-yellow tissue, fan them upward, and let them rise above the rim like a soft cloud, which gives the gray bag a bright, modern crown. In my experience, tissue stays full if you fluff it with your fingers just before the gift leaves your house. Tuck a small paper tag into the cloud, and set the finished bag upright on a bench so the rope handles hang evenly. Plain paper bags are usually recyclable, and the rope handles can be reused.
16. Torn Paper Dunes
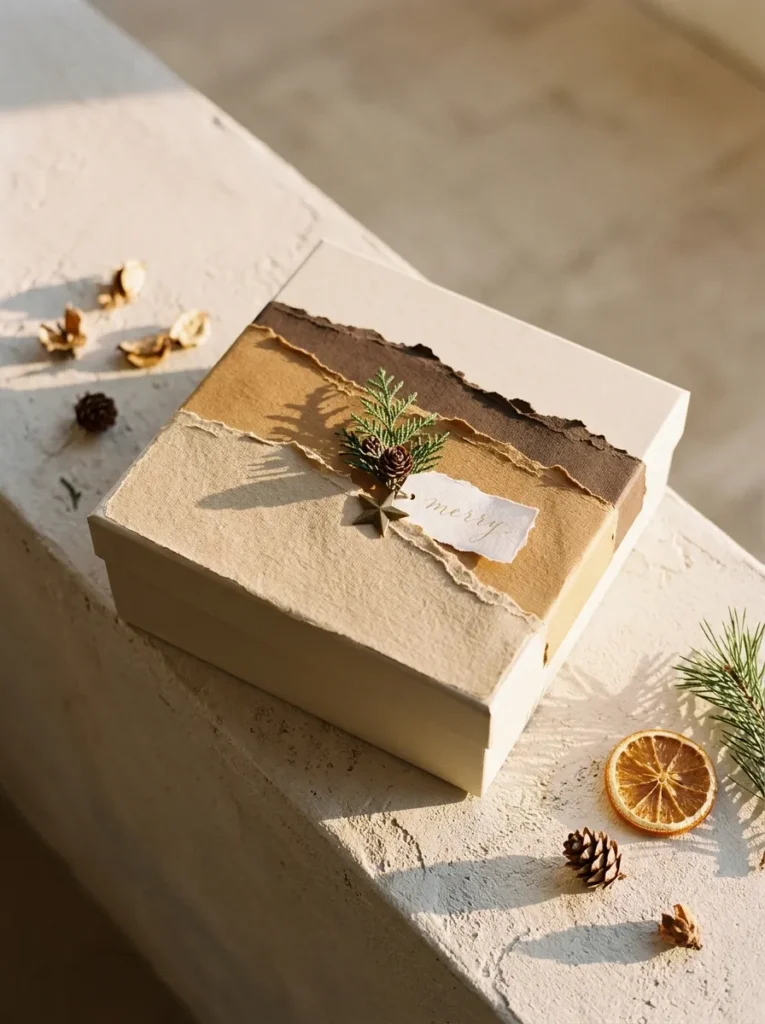
- Palette: bone matte base, sand, caramel, and espresso torn paper layers
- Lighting: late-afternoon sun rakes across the layers and throws a hairline shadow under each torn edge
- Key pieces: a ruler, four sheets of heavyweight matte paper, a glue stick
- Standout detail: three torn strips layered like rolling dunes across the lid
- Unexpected touch: the feathered torn edges stand in for any ribbon or bow
Why this works: Feathered torn edges soften a square box, and layered earth tones turn a plain lid into a quiet landscape.
Paper tears with a feathered edge because the fibers pull apart instead of cutting cleanly, and that soft fuzz is exactly what makes torn layers look like handmade art. Hold a ruler firmly on a sheet of heavyweight matte paper and pull the paper toward you along the ruler’s edge. Tear three strips in sand, caramel, and espresso, rippling each edge as you pull, then layer them across a bone-colored box so the darkest strip sits at the bottom. A glue stick holds each layer. Four sheets of heavyweight paper typically cost about $4 to $8.
I made my first dunes box while the afternoon light was sliding across my kitchen table, and the shadows under each torn edge made the layers look three-dimensional. That is the real trick: low, angled light does the styling. Press each strip down with your fingertip, working from the bottom layer upward, and trim the strip ends flush with the box edges. In my experience, three layers are the sweet spot, because a fourth starts to look busy. Leave the rest of the box plain, and the sand, caramel, and espresso tones read as quiet luxury.
17. Pearl Strand Tie
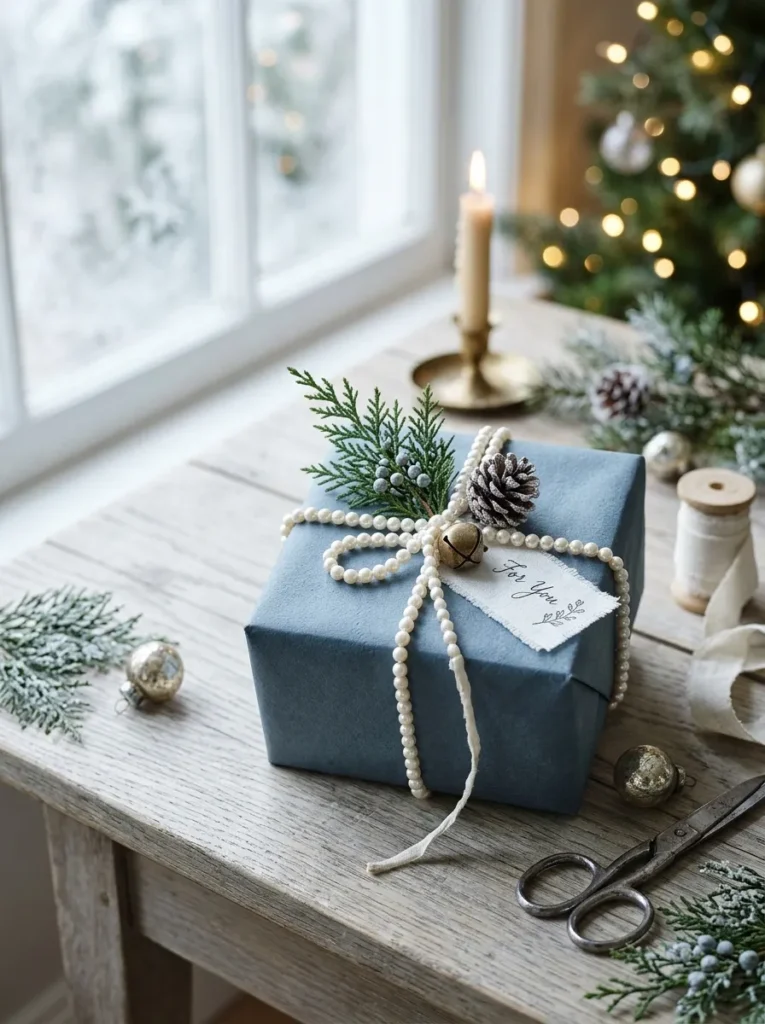
- Palette: stone-blue matte paper, ivory glass-pearl strand, white linen tag
- Lighting: window light gives each pearl a soft glow; evening lamplight turns them warm
- Key pieces: a faux pearl garland, craft glue, a small linen tag
- Standout detail: a double-wrapped strand tied in one loose, off-center knot with unequal tails
- Unexpected touch: jewelry-style styling that doubles as reusable decor
Why this works: A pearl strand reads like jewelry, so a plain stone-blue box looks collected rather than wrapped.
I found the pearl trick by accident when a faux pearl garland slipped off my tree and landed on a stone-blue gift. I stopped and stared, because it looked like a necklace on a velvet display. Now I wrap the box in stone-blue matte paper, circle an ivory pearl strand twice around the middle, and tie one loose knot slightly off center. Leave the tails unequal, one long and one short, the way a necklace hangs. A craft-store pearl garland typically costs about $5 to $10 and wraps several boxes, which beats most bows on price.
Pearls work because their soft luster reflects light instead of glaring like metallic foil. Against stone-blue paper, ivory pearls look cool and refined, and in window light each bead glows. Knot the strand over a small dot of craft glue so it cannot slide, and slip a white linen tag under the wrap. After the party, the strand lifts off in one piece and can drape over a mirror or a tree branch. Pearl beads are small, so skip this wrap for gifts going to children under three. I’ve seen guests reuse the strand on their own trees.
18. Chartreuse Bouclé Cinch — A Christmas Gift Wrapping Idea with Bold Color
- Palette: charcoal matte paper, chartreuse bouclé yarn, ivory paper tag
- Lighting: cool daylight keeps the chartreuse sharp; lamplight warms it toward lime
- Key pieces: one skein of bouclé yarn, scissors, a small piece of tape
- Standout detail: a band of eight snug yarn wraps, about an inch and a half wide
- Unexpected touch: knitwear texture on a gift box
Why this works: A single saturated yarn band against deep charcoal gives a box one clear focal point and a plush, modern texture.
Bouclé yarn is spun with looped fibers, and those tiny loops catch light and cast shadows, which gives it a plush, sculptural texture that flat ribbon cannot match. Wrap a charcoal box, then wind chartreuse bouclé yarn eight times around the middle, keeping the strands snug and side by side to form a band about an inch and a half wide. Secure the end under the box with a piece of tape. A single skein typically costs about $6 to $10 and wraps a dozen gifts, so the knitwear look stays affordable.
I first tried this with a cream yarn, and it disappeared against my pale gift pile. Chartreuse changed everything. Against charcoal paper, the acid green reads clearly from across the room, and the deep gray keeps it from feeling juvenile. Pair the band with a small ivory tag tucked under the yarn, and leave everything else bare. Wind the yarn evenly so no gaps show. In my experience, one saturated accent color looks more modern than three muted ones, because the eye has a single place to land. Keep yarn-wrapped gifts away from candles and open flames.
Styling Principles
Eighteen different wraps can still look like one collection. These principles are what hold a mixed pile together.
- Choose two or three named colors before you buy anything. Write them down, such as cobalt, cream, and silver-green, and shop only from that list. A pile of gifts looks cohesive when every package shares at least one color, one ribbon width, or one texture with its neighbors.
- Repeat one element on every gift. The same quarter-inch ribbon, the same tag shape, or the same knot placed on the same side is enough. I’ve noticed that this single repeated detail does more to unify a pile than matching paper does.
- Stay matte. Matte paper scatters light, while glossy paper bounces glare back from tree lights and ruins photos. Matte stock also hides small fold marks better.
- Add texture instead of pattern. Fluting, embossing, tassels, stitching, and woven ribbon create depth with no printed motifs, which keeps a modern look calm.
- Edit to one embellishment per gift. One tassel, one sprig, or one tag is plenty. If a box needs more than one topper, the wrap underneath is not strong enough yet.
- Group gifts in odd numbers and vary the heights. Three or five packages of different sizes look arranged, while even rows look like a shipping dock. Put the tallest gift off-center.
FAQs
1. How do you make Christmas gifts look expensive on a budget? Use one matte paper color, one ribbon width, and one texture detail, then repeat them on every gift. Plain solid-color paper rolls typically cost about $5 to $10, and details such as a floss tassel, a scalloped cardstock cuff, or an embossed arch cost only a few dollars more.
2. What is the cheapest way to wrap gifts that still looks modern? Start with plain, solid-color matte paper and add one handmade detail. A tassel from two skeins of embroidery floss costs about two dollars, and a sheet of cardstock for a scalloped cuff costs under a dollar. Skip printed paper, which makes cheap wrap look cheaper.
3. What colors look best for modern Christmas wrapping? Tonal and two-color pairings look best. Try one color in several depths, such as celadon to bottle green, or one strong contrast, such as cobalt on cream or poppy red on warm gray. Limit the whole tree to three colors so the pile reads as a plan.
4. Is wrapping paper recyclable? Plain, uncoated paper without foil, glitter, or plastic is usually accepted for curbside recycling. Use the scrunch test in the store: if the paper stays crumpled in your fist, it is usually plain paper, and if it springs back open, it likely contains plastic or foil. Pull off tape and ribbon first, and check your local program’s rules.
5. What is the best way to wrap awkward gifts like bottles or sweaters? Use a matte paper bag with reinforced rope handles for sweaters and odd shapes, and a twisted paper crown for bottles. A standard 750-milliliter wine bottle stands about twelve inches tall, so a 30-inch square of paper gathers around it with room left to twist. Both methods need no tape on the outside.
6. What are easy gift toppers that cost almost nothing? A two-tone floss tassel, a scalloped cardstock cuff, and a single stem of eucalyptus are the easiest low-cost toppers. Each takes about ten minutes and replaces a store-bought bow, so the wrap looks designed rather than decorated.
Conclusion
Beautiful wrapping does not need a big budget, just a plan. Choose two or three colors, repeat one detail, and let texture do the decorating, and even a basic box becomes something people hesitate to open. These Christmas gift wrapping ideas prove that a tassel, a stitched panel, or a twisted paper crown can change how an entire tree looks.
I’ve seen how small, intentional touches like these turn a pile of presents into a collection. Save this post on Pinterest, try one idea this week, and share it with a friend who is still rushing through wrapping.