20 Pot Painting Ideas That Actually Look Expensive
A plain terracotta pot can look like a gallery piece, and you don’t need an art degree to make it happen. These 20 pot painting ideas borrow the colors and shapes of famous artists, then turn them into simple steps anyone can follow.
Most painted pots fail for one reason: the paint and the pot don’t match. I’ve watched too many beautiful pots flake after a single season, and I’d hate for that to happen to yours. My plant science background taught me how clay, glaze, and concrete behave, and my husband, who builds homes, taught me what sticks and what peels. In this post, you’ll get exact paints, primers, sealers, plant pairings, and full styling ideas for every pot, so your finished piece looks designed, not like a craft project.
Most painted pots look like craft projects for one boring reason: the finish fails, not the artistry. Terracotta is porous, so it drinks up standard craft acrylic, then flakes and cracks within a season outdoors. My husband builds houses for a living, and he watched me repaint the same pot three summers in a row before he asked the obvious question: “What’s under the paint?” Nothing, as it turned out. No primer, no sealer. A painted terracotta pot looks expensive when the surface is prepped, the paint suits the material, and the sealer matches where the pot lives. This post gives you twenty finishes with the exact steps to get them.
1. Matisse Cut-Out Shapes — A Pot Painting Idea for Beginners
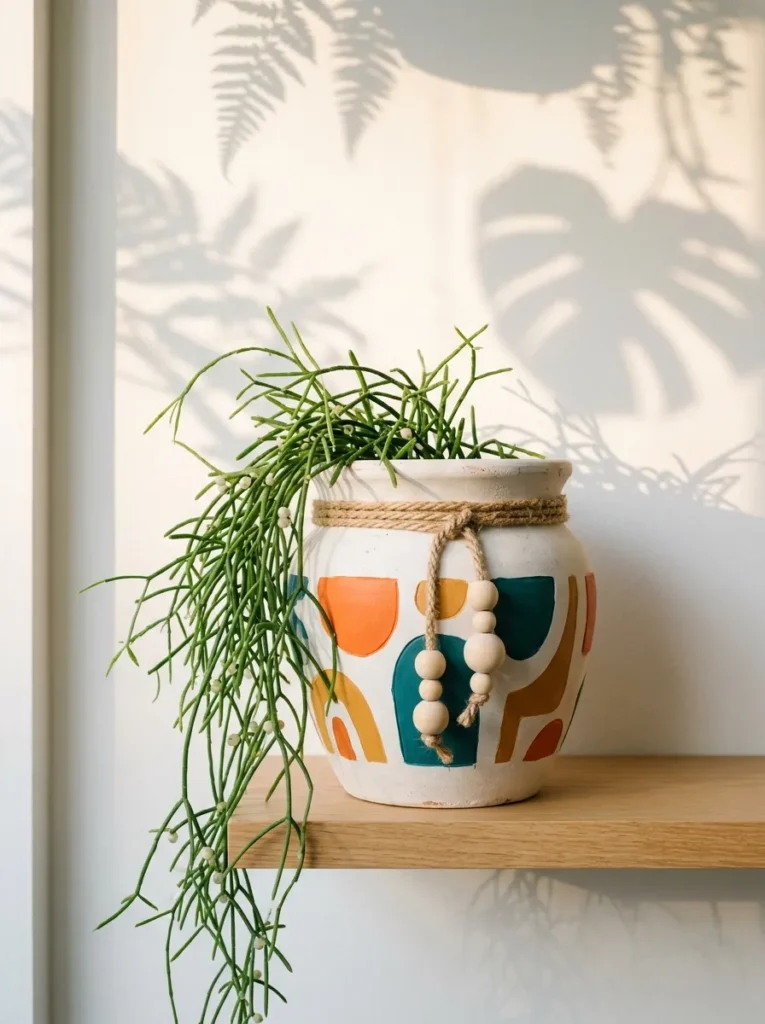
- Skill and time: Beginner. About 75 minutes, plus drying.
- Pot and prep: 8-inch terracotta. It is porous, so prime it, then paint a chalk white base.
- Painted design: Flat, organic seaweed-like shapes painted freehand with a medium round brush, inspired by Matisse’s paper cut-outs. Let some shapes run off the rim.
- Palette: Chalk white base, tangerine, deep teal, ochre.
- Paint and dry time: Two coats of chalk white, one hour apart. Each shape gets one solid coat, then a second after 30 minutes.
- Added decor: Natural jute rope wrapped twice under the rim, knotted with three raw wooden beads, added after the sealer cures.
- Sealer and durability: Two coats of matte water-based polycrylic. Indoor only, since jute rots outdoors.
- Plant and styling: Mistletoe cactus (Rhipsalis baccifera). Its thin trailing stems echo the cut-out forms. Place it on a white shelf.
Why this works: Flat shapes in three saturated colors read as gallery art, because shapes that wrap around the curve mean no single angle shows the whole design.
Henri Matisse made some of his boldest work with scissors and painted paper, and his cut-outs are secretly perfect for pots. Among all pot painting ideas, this one asks for almost no skill: no stencils, no straight lines, no realism. Sketch loose seaweed-like shapes with a pencil, then fill them in with flat tangerine, deep teal, and ochre over a chalk white base. Let some shapes run right off the rim and around the curve. I’ve noticed that overlapping just two shapes makes people assume you studied art. Then knot jute rope around the neck with three wooden beads.
The jute wrap is the detail that lifts this from a painted pot to a styled object. Cut about 30 inches of natural jute rope, wrap it twice under the rim, thread on three raw wooden beads, and secure the ends with a dab of hot glue on the back. Do this after two coats of matte polycrylic have cured, never before, or the jute will absorb sealer and darken. Jute rots outdoors, so keep this one inside. Fill it with a mistletoe cactus, whose thin trailing stems echo the cut-out shapes, and set it on a white shelf.
2. Rothko Color Fields
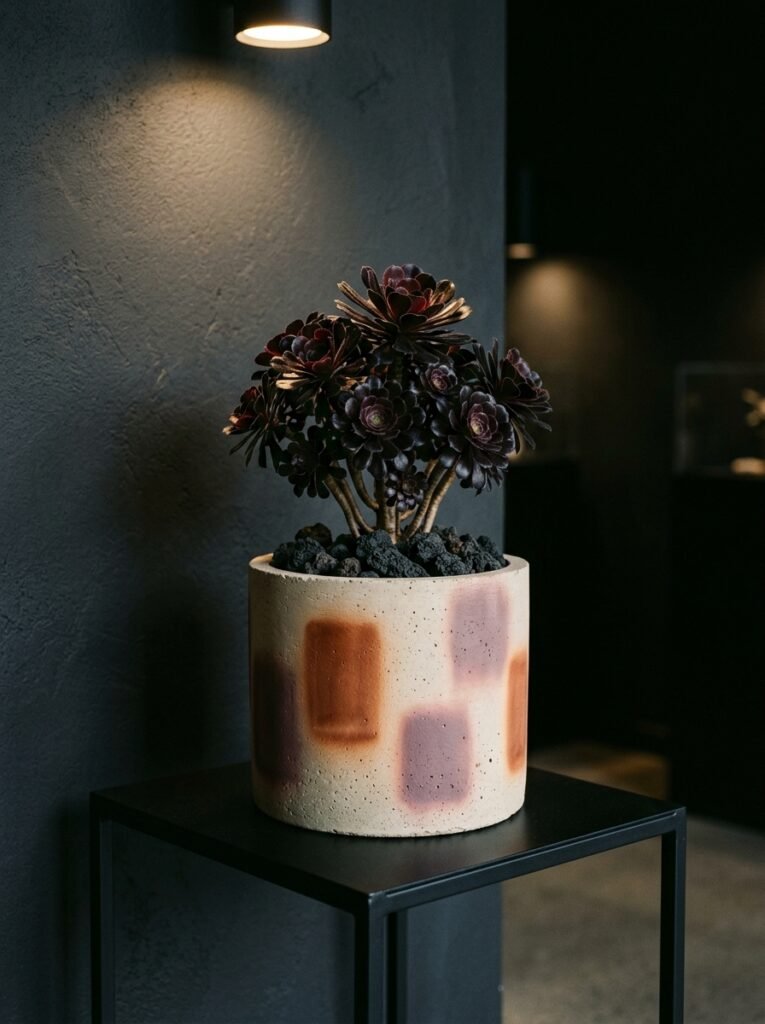
- Skill and time: Beginner. About 90 minutes, plus a full day to dry.
- Pot and prep: 10-inch concrete cylinder. Concrete is alkaline, so rinse with equal parts white vinegar and water, dry for 48 hours, and prime with an alkali-resistant masonry primer.
- Painted design: Two soft-edged rectangles stacked, inspired by Mark Rothko. Dab thin, watery layers with a damp sponge so the edges blur.
- Palette: Burnt sienna, dusty plum, oat.
- Paint and dry time: Two coats of oat as a base, then four or five thin, watered-down layers per block, 20 minutes apart.
- Added decor: Black lava rock covering the soil, so the dark texture grounds the soft color above.
- Sealer and durability: Two coats of matte water-based sealer. Indoor or sheltered spots only.
- Plant and styling: Aeonium ‘Zwartkop’. Its near-black rosettes repeat the plum. Set it in a sunny window on a black steel side table.
Why this works: Rothko’s glow comes from thin, layered washes rather than thick paint, and the same approach gives a concrete pot soft edges that appear to hover.
Mark Rothko built his glowing color fields from many thin, watery layers rather than one thick coat, and that’s the entire secret to this pot. Stack two soft-edged rectangles, burnt sienna above dusty plum, on an oat-colored base. Dab each layer on with a damp sponge, letting the edges blur into the background. Wait twenty minutes, then add another thin layer. After four or five passes, the colors seem to hover and glow. It looks like a gallery painting, yet the steps are as simple as dabbing and waiting. Patience matters more than talent here.
Concrete makes a moody canvas, but it is alkaline, so prep matters. Rinse the pot with equal parts white vinegar and water, let it dry for 48 hours, and apply an alkali-resistant masonry primer. Finish with two coats of matte water-based sealer. Then add the detail that completes the composition: cover the soil with black lava rock, whose dark texture grounds the soft color above. Plant an Aeonium ‘Zwartkop’, whose near-black rosettes repeat the plum. Set it in a sunny window on a black steel side table. This finish is for indoors or sheltered spots only.
3. Starry Night Impasto
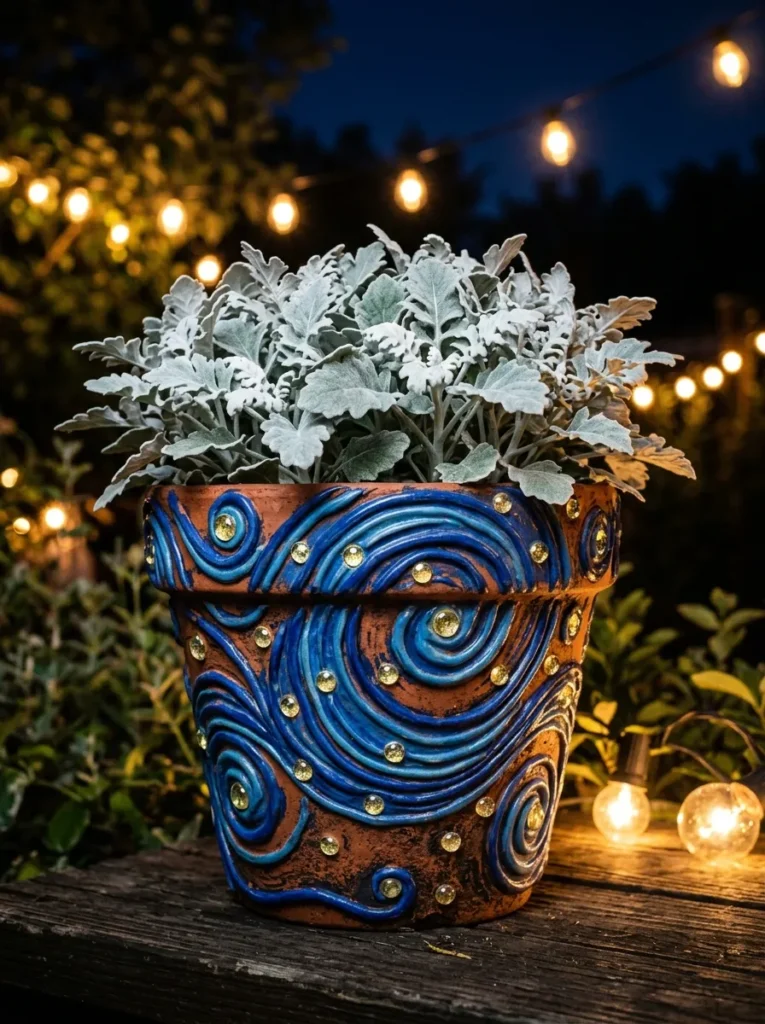
- Skill and time: Beginner to intermediate. About 2 hours, plus overnight drying.
- Pot and prep: 12-inch terracotta. Prime the outside and seal the inside so moisture can’t push the paint off from behind.
- Painted design: Van Gogh-style raised swirls. Mix outdoor acrylic with exterior patching compound, about one part compound to two parts paint, and drag swirls with a palette knife or stiff brush.
- Palette: Deep ultramarine, cerulean, pale butter yellow.
- Paint and dry time: Ultramarine base coat, two hours. Thick swirls need overnight, sometimes a full day.
- Added decor: Five flat-back pale yellow glass gems pressed into the wet paint near the top as stars, spaced unevenly.
- Sealer and durability: Two coats of clear exterior sealer over swirls and gems. Outdoor-durable in a sheltered spot. Interior spackle is indoor only.
- Plant and styling: Dusty miller (Jacobaea maritima). Its silver leaves read as moonglow. Place it on a patio table under string lights.
Why this works: Thick, raised brushstrokes catch light from different angles, so the pot’s surface looks alive from every distance.
I painted my first textured pot the night a full moon lit up our Austin patio. The secret was volume. Van Gogh’s swirls stand off the canvas, so mix paint with a little patching compound until it holds ridges when dragged. My husband uses this stuff on walls, and he warned me that interior spackle softens when wet, so for a pot outside you need an exterior-rated patching compound. Drag swirls with a palette knife or stiff brush around a deep ultramarine base, and add pale yellow strokes for a moonlit glow.
Now for the stars. While the top swirls are still wet, press five flat-back pale yellow glass gems into the paint, spacing them unevenly, like a real night sky. Let everything dry overnight, since thick paint can take a full day to harden. Seal with two coats of clear exterior sealer, working over the raised swirls and the gems. Plant dusty miller, whose silver leaves catch light like moonglow, and place the pot on a patio table under string lights. It’s sturdy enough for a sheltered spot outdoors, and it looks even better at night.
4. Kandinsky Circles
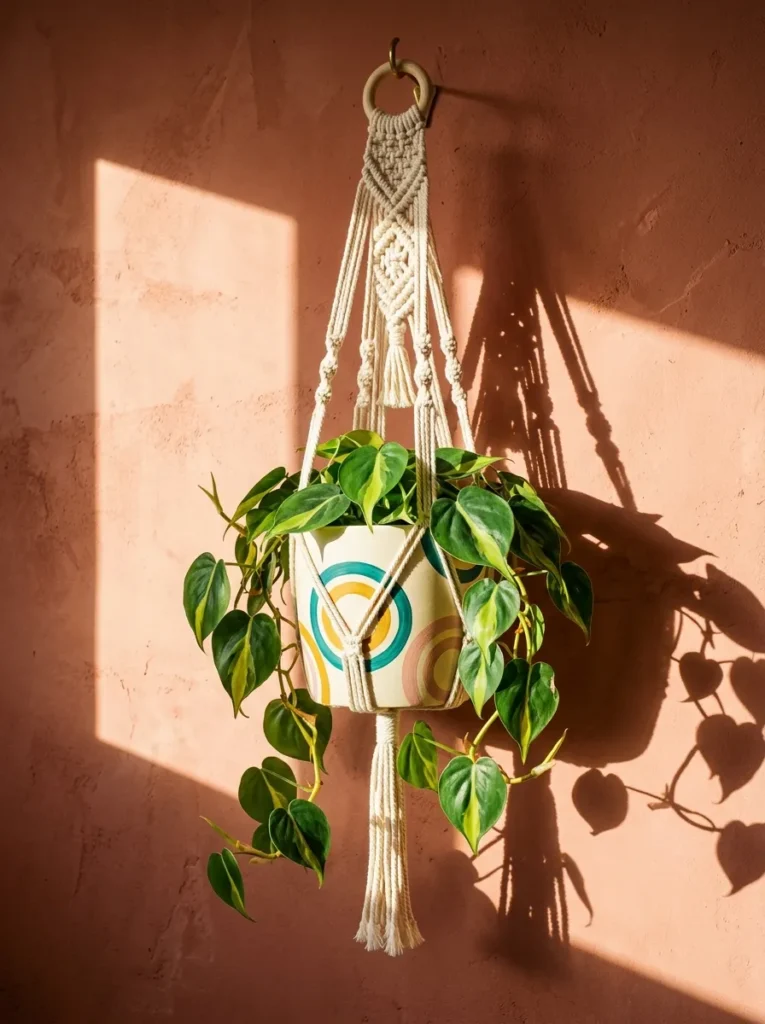
- Skill and time: Beginner. About 75 minutes, plus drying.
- Pot and prep: 8-inch plastic pot with drainage holes. It is light enough to hang but nonporous, so scuff with 320-grit sandpaper and spray with a primer made for plastic.
- Painted design: Concentric circles inspired by Wassily Kandinsky. Trace two sizes of bottle cap, overlap some, and fill outer rings first, then work inward.
- Palette: Cream base, deep teal, mustard, blush pink.
- Paint and dry time: Two coats of cream acrylic, two hours apart. Each ring gets one or two coats, 30 minutes apart.
- Added decor: A cream cotton macramé hanger finished with one wooden bead.
- Sealer and durability: Two thin coats of matte polycrylic. Indoor only, since plastic turns brittle in direct sun.
- Plant and styling: Philodendron ‘Brasil’. Its trailing lime-and-green leaves spill over the circles. Hang it by a window.
Why this works: Concentric circles create rhythm, so even a small pot reads as a composed painting, and repeating three colors ties the whole design together.
Wassily Kandinsky believed color could sing, and his concentric circles prove it. The trick for pots is that circles are far easier than they look. Trace two sizes of bottle cap onto a cream base, overlapping some, then fill each ring in a different color. I’ve tried this with a compass and with bottle caps, and caps win every time: they’re quicker and gorgeously imperfect. Paint the outer rings first, then work inward so the small centers stay crisp. Deep teal, mustard, and blush make a palette that feels vintage and modern at once.
A plastic pot is the smartest base for a hanging planter because it weighs almost nothing. Since it’s nonporous, scuff it with 320-grit sandpaper and use a spray primer made for plastic. Paint two cream coats, wait two hours, then add your circles. Seal with two thin coats of matte polycrylic. Slip the pot into a cream cotton macramé hanger with a wooden bead, and fill it with a trailing philodendron ‘Brasil’, whose lime-and-green leaves spill over the circles. Hang it by a window, water at the sink, and let it drain fully before rehanging. Indoors only.
5. Monet Water Garden Dabs
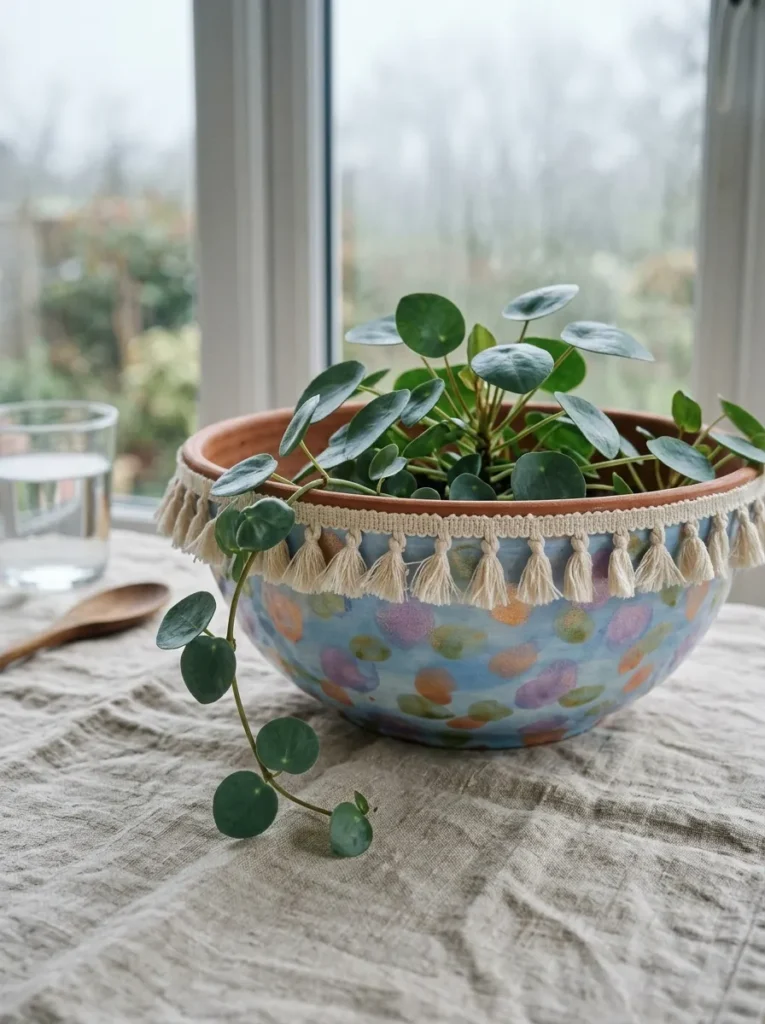
- Skill and time: Beginner. About 90 minutes, plus drying.
- Pot and prep: 12-inch shallow terracotta bowl. Prime it, and check that the bottom has a drainage hole.
- Painted design: Impressionist dabs. Press short, loose strokes side by side with a flat brush and never blend, so the eye mixes the colors from a distance.
- Palette: Pale sky blue base, moss green, lilac, apricot highlights.
- Paint and dry time: Two coats of sky blue acrylic, two hours apart. Then build the dabs in thin layers, 30 minutes each: moss green, lilac, apricot.
- Added decor: A fringe of cream cotton tassel trim glued around the outer rim with fabric glue, added after the sealer cures.
- Sealer and durability: Two coats of matte water-based polycrylic. Indoor only, because of the tassels.
- Plant and styling: Pilea glauca ‘Aquamarine’. Its blue-gray trailing stems spill over the shallow rim. Place it on a sunroom table.
Why this works: Unblended dabs of color read as shimmering light from a distance, so brushstroke mistakes disappear into the pattern.
Standing in front of Monet’s water lilies years ago, I couldn’t figure out how he made color shimmer, and then I stepped closer and saw it was just dabs. That’s the whole trick. Load a flat brush, press short strokes side by side, and never blend. Start with a pale sky blue base, add moss green dabs, then lilac, and finish with a few apricot highlights on top. From across the room, the colors mix in your eyes and the surface seems to move. Mistakes disappear into the pattern, which makes this forgiving for beginners.
A wide, shallow bowl gives you room to paint a whole garden, but check the bottom before you buy. Many decorative bowls have no drainage hole, and roots hate sitting in water. Prime the terracotta, brush on two sky blue coats two hours apart, then build the dabs in thin layers, thirty minutes each. Seal with two coats of matte water-based polycrylic. Once cured, glue a fringe of cream cotton tassel trim around the outer rim with fabric glue. Plant a trailing Pilea glauca ‘Aquamarine’ and place it on a sunroom table. The tassels make this an indoor-only piece.
6. Pollock Splatter Night
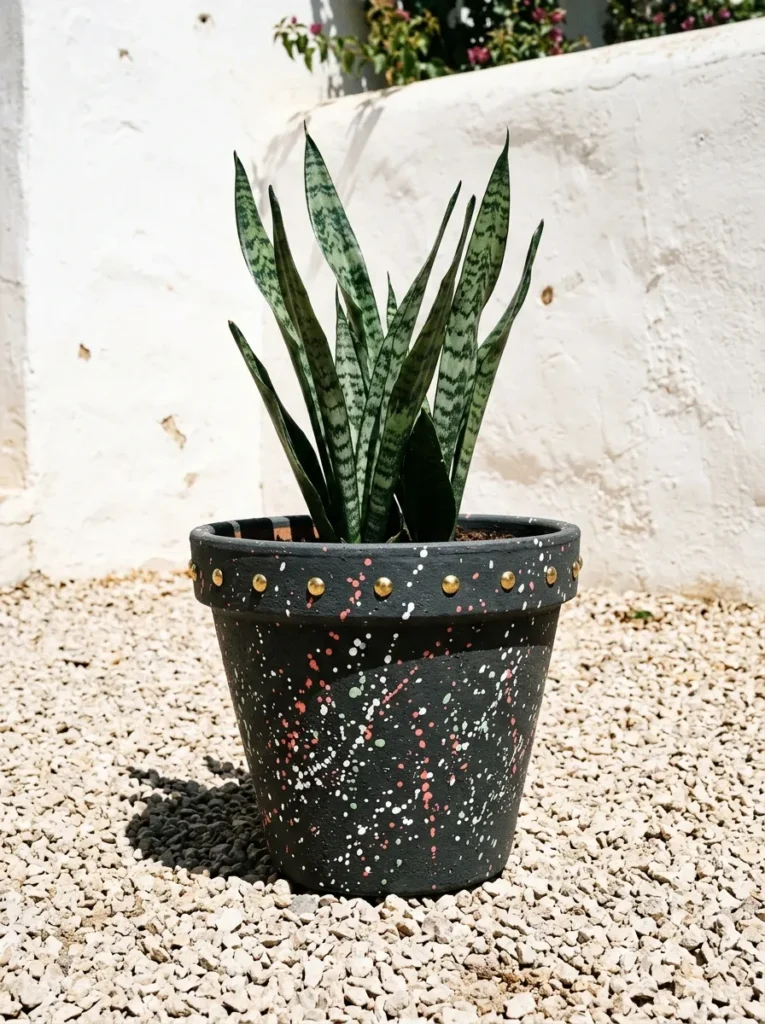
- Skill and time: Beginner. About 60 minutes, plus drying. Work outside on cardboard, because it gets messy.
- Pot and prep: 12-inch terracotta. Prime it, then paint a matte charcoal base.
- Painted design: Action splatter inspired by Jackson Pollock. Thin the paint with a little water, load a stiff brush, and flick your wrist. Keep the splatter densest near the rim, fading toward the base.
- Palette: Matte charcoal, chalk white, terracotta-coral, pale celadon.
- Paint and dry time: Two coats of charcoal outdoor acrylic, two hours apart. Splatter one color at a time, 20 minutes between colors, so they stay clean.
- Added decor: A ring of solid brass studs with flat backs, spaced about two inches apart under the rim and glued on with exterior construction adhesive after the sealer cures.
- Sealer and durability: Two coats of matte exterior sealer, since thick drips chip easily. Outdoor-durable.
- Plant and styling: Sansevieria cylindrica. Its spear-like leaves stand sculpturally above the splatter. Set it in a gravel courtyard.
Why this works: Layered splatter on a dark base reads as controlled chaos, because each flicked color pops against the charcoal without any drawing skill.
Jackson Pollock painted with sticks and gravity, and you can borrow that freedom without drawing a single line. Start with a matte charcoal base, then work outside on cardboard. Thin white paint with a little water, load a stiff brush, and flick your wrist. Let it dry, then repeat with terracotta-coral and pale celadon. Layering one color at a time keeps the colors from turning muddy. I’ve found that the pot looks best when the splatter is densest near the rim and fades toward the base, which makes it feel deliberate rather than accidental.
Seal the splatter with two coats of matte exterior sealer first, since thick drips chip easily. Once cured, add a detail that makes it feel custom: a ring of solid brass studs under the rim. My husband insists on solid brass hardware outdoors, because plated finishes flake and leave rust streaks down painted surfaces, while solid brass darkens into a warm patina. Space the studs two inches apart and glue them on with exterior construction adhesive. Plant a spear-like Sansevieria cylindrica in the center, and set the pot in a gravel courtyard where it stands out against pale stone.
7. Delaunay Color Arcs
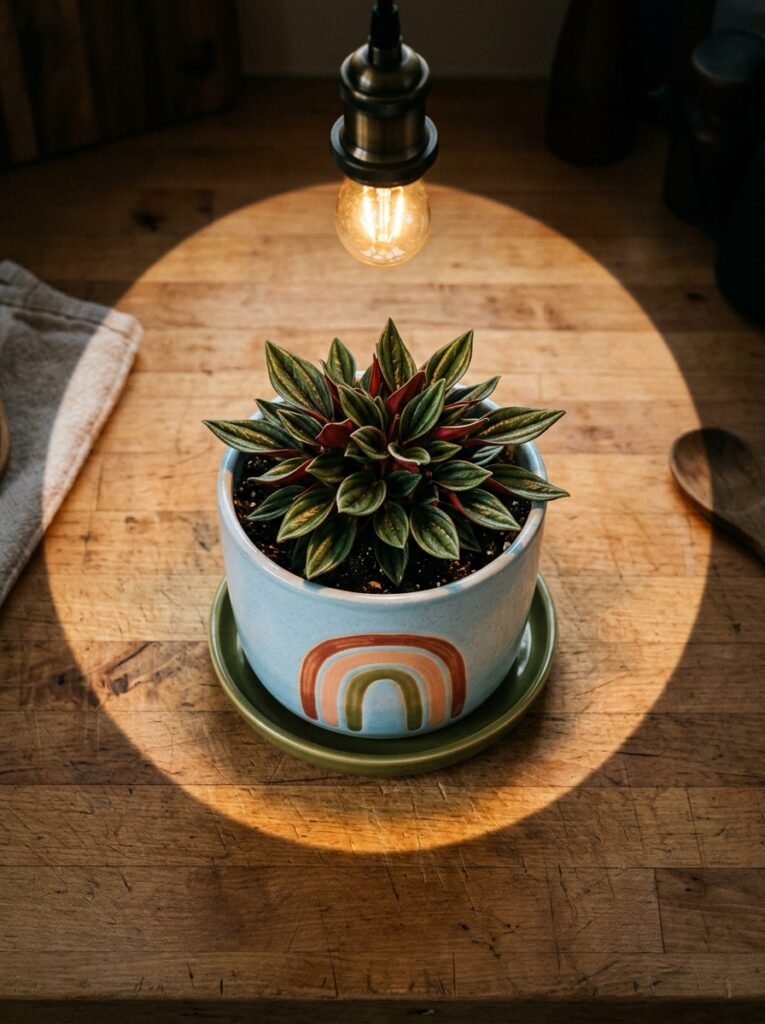
- Skill and time: Beginner. About 90 minutes, plus drying.
- Pot and prep: 10-inch glazed ceramic. The glaze is glass-smooth, so scuff it with 220-grit sandpaper, wipe with rubbing alcohol, and apply a bonding primer.
- Painted design: Nested arcs inspired by Sonia Delaunay. Trace the rim of a plate or bowl onto one side of the pot, then fill bands about an inch wide. Leave the other side plain.
- Palette: Powder blue base, brick red, peach, olive green.
- Paint and dry time: Two coats of chalk paint in powder blue, an hour apart. Let each arc color dry fully before the next.
- Added decor: A plain terracotta saucer painted olive green with a thin brick-red rim, sealed like the pot, so the pair reads as a set.
- Sealer and durability: Two coats of satin water-based polyurethane. Indoor only.
- Plant and styling: Peperomia caperata ‘Rosso’. Its burgundy leaf undersides echo the brick red. Keep it on a kitchen counter.
Why this works: Nested arcs in neighboring colors create a sense of movement, because the eye reads each band as shifting against the next.
Sonia Delaunay, the Paris painter who put color in motion, discovered that colors placed side by side seem to vibrate. Copy her trick with nested arcs. Trace the rim of a plate or bowl onto one side of a powder blue pot to make half-circles, then fill each band with brick red, peach, and olive. Keep the bands about an inch wide. Painting arcs on only one side of the pot leaves negative space that makes the design feel modern and gallery-ready rather than busy. Bands need crisp edges, so let each color dry fully before painting the next.
Glazed ceramic needs extra prep because the glaze is glass-smooth. Scuff the surface with 220-grit sandpaper until it looks dull, wipe it with rubbing alcohol, and apply a bonding primer. Paint the powder blue base in two coats, an hour apart, then add your arcs. Seal with two coats of satin water-based polyurethane. For a finishing touch, paint a plain terracotta saucer olive green with a thin brick-red rim, then seal it like the pot. Plant a Peperomia caperata ‘Rosso’, whose burgundy leaf undersides echo the brick. Keep it indoors, on a kitchen counter.
8. Kusama Polka Dot Bucket
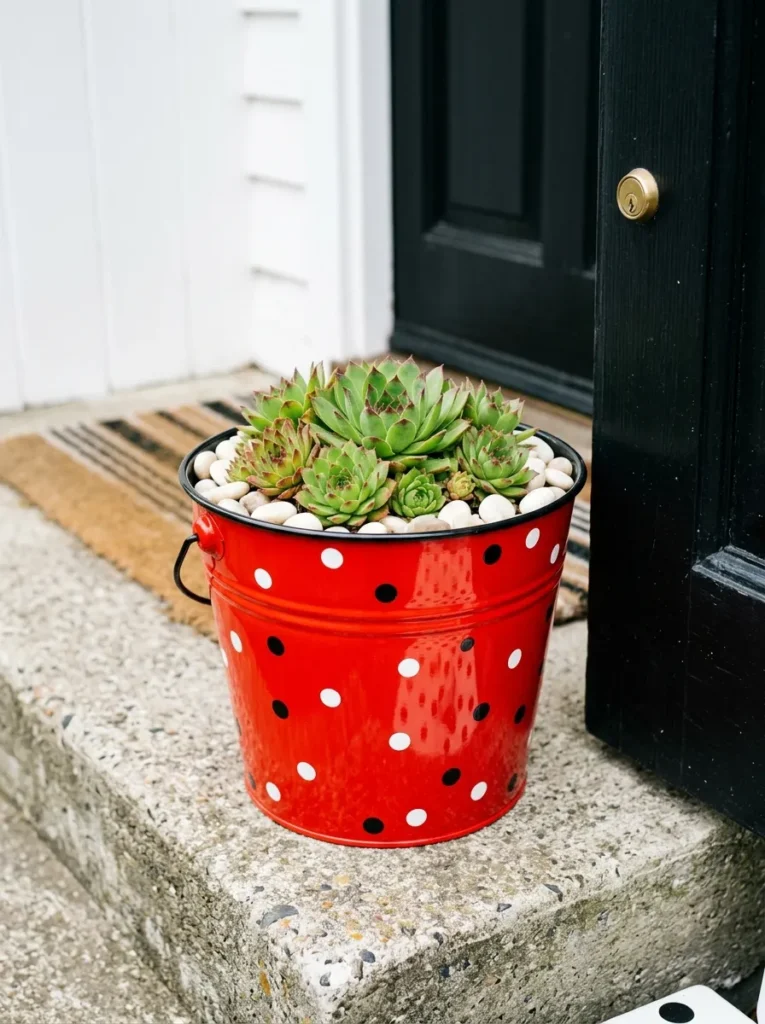
- Skill and time: Beginner. About 90 minutes, plus drying.
- Pot and prep: 10-inch galvanized steel bucket. Drill at least five drainage holes in the bottom. Zinc repels ordinary paint, so wash the surface with white vinegar and water, then apply a primer made for galvanized metal.
- Painted design: Polka dots inspired by Yayoi Kusama. Stamp small dots with a pencil eraser, medium dots with a sponge dauber, and large dots with a bottle cap. Cover the whole surface.
- Palette: Poppy red base, chalk white dots, ink black dots.
- Paint and dry time: Two coats of outdoor-rated acrylic in poppy red, an hour apart. Each dot color gets two coats, 30 minutes apart.
- Added decor: A top-dressing of white river pebbles around the plants.
- Sealer and durability: Two coats of gloss exterior sealer for a lacquered shine. Outdoor-durable.
- Plant and styling: Hen and chicks (Sempervivum ‘Pacific Blue Ice’). Its frost-hardy rosettes echo the dots and like a gritty mix. Set it on a concrete step beside a black door.
Why this works: Repeated dots on a saturated base turn any container into pop art, because the repetition is stronger than any individual dot.
The first time I painted a galvanized bucket, the paint peeled off in one week, and my husband just laughed. Galvanized steel is coated in zinc, which reacts with ordinary paint and prevents it from sticking. He handed me a bottle of white vinegar and told me to wash the surface first, then use a primer made specifically for galvanized metal. I redid the bucket that afternoon. That was three years ago, and its poppy red still hasn’t blistered. It taught me to ask what a surface is made of before choosing the paint.
Paint two coats of poppy red, an hour apart, then stamp on dots: a pencil eraser for small ones, a sponge dauber for medium, a bottle cap for large. Cover the surface generously in chalk white and ink black, since Yayoi Kusama’s dots gain their power from repetition. Seal with two coats of gloss exterior sealer for a lacquered shine. Drill at least five drainage holes before you paint, then fill the bucket with a gritty mix and plant hen and chicks. Top it with white river pebbles, and set it on a concrete step beside a black door.
9. Albers Nested Squares
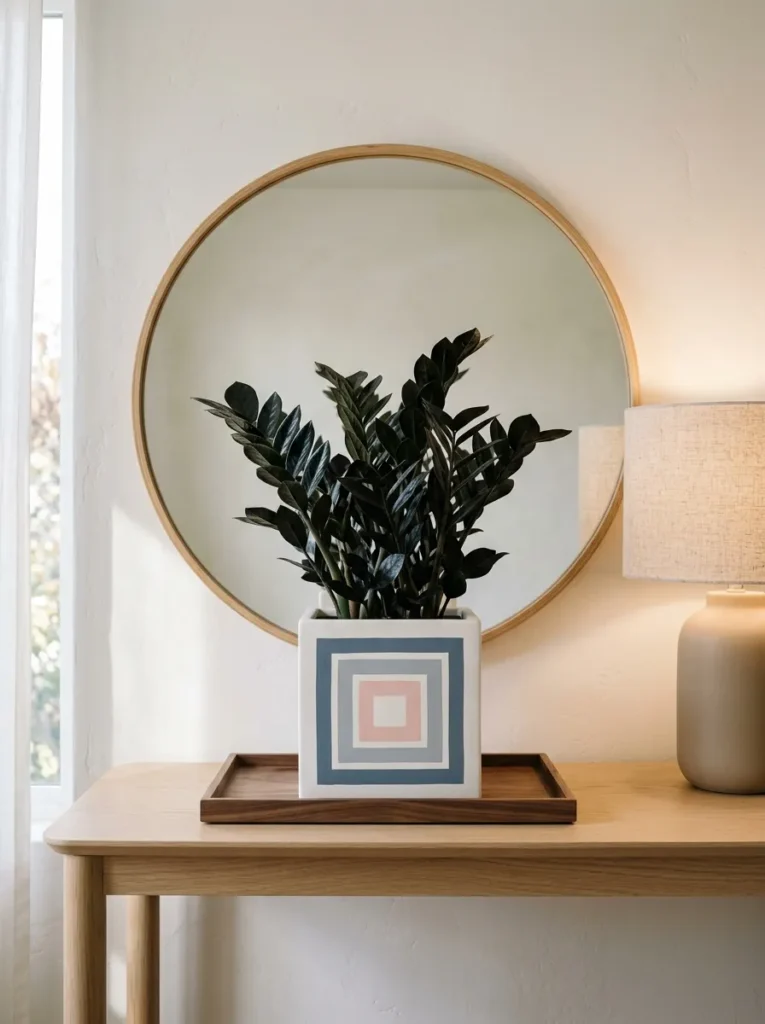
- Skill and time: Beginner. About 2 hours, plus drying.
- Pot and prep: 8-inch square unglazed ceramic cube planter. The slightly porous bisque takes paint well, so wipe it clean and prime it. If it has no drainage hole, keep the plant in a nursery pot inside.
- Painted design: Nested squares inspired by Josef Albers. Mask a five-inch square on the front face with low-tack tape, then a smaller square inside it, then a tiny one, with the inner squares sitting slightly low.
- Palette: Warm white base, slate blue, dove gray, blush pink.
- Paint and dry time: Two coats of chalk paint per square, an hour apart. Peel the tape while the last coat is tacky.
- Added decor: A slim walnut tray under the pot, so it reads as part of the vignette.
- Sealer and durability: Two coats of satin water-based polycrylic. Indoor only.
- Plant and full styling: ZZ plant ‘Raven’ (Zamioculcas zamiifolia). Its near-black leaves make the pastels look softer. Style on a pale oak console with a round mirror, a linen table lamp, a ceramic bowl, and a stack of art books.
Why this works: Nested squares in neighboring tones make each color look different depending on what sits next to it, so a simple pot appears to glow and shift as you move around the room.
Josef Albers spent decades painting nested squares, and proved that a color changes depending on the color next to it. That principle makes this pot work. Mask a five-inch square on the front of a white cube planter, paint it slate blue, then mask a smaller square inside it for dove gray and a tiny one for blush pink. Position the inner squares slightly low, not centered, as Albers did, so the composition feels weighted and calm. The colors seem to glow and shift as you move around the room. Peel tape while paint is tacky.
Bisque ceramic is slightly porous, so it accepts paint, but a primer coat keeps the colors clean. Brush on two coats of warm white chalk paint, then paint each square in two coats, an hour apart. Seal everything with two coats of satin water-based polycrylic. Plant a ZZ plant ‘Raven’, whose near-black leaves make the pastel squares look even softer. Style it on a console with a round mirror, a linen lamp, a ceramic bowl, and a stack of art books. Set the pot on a slim walnut tray so it reads as part of the vignette.
10. Agnes Martin Quiet Lines
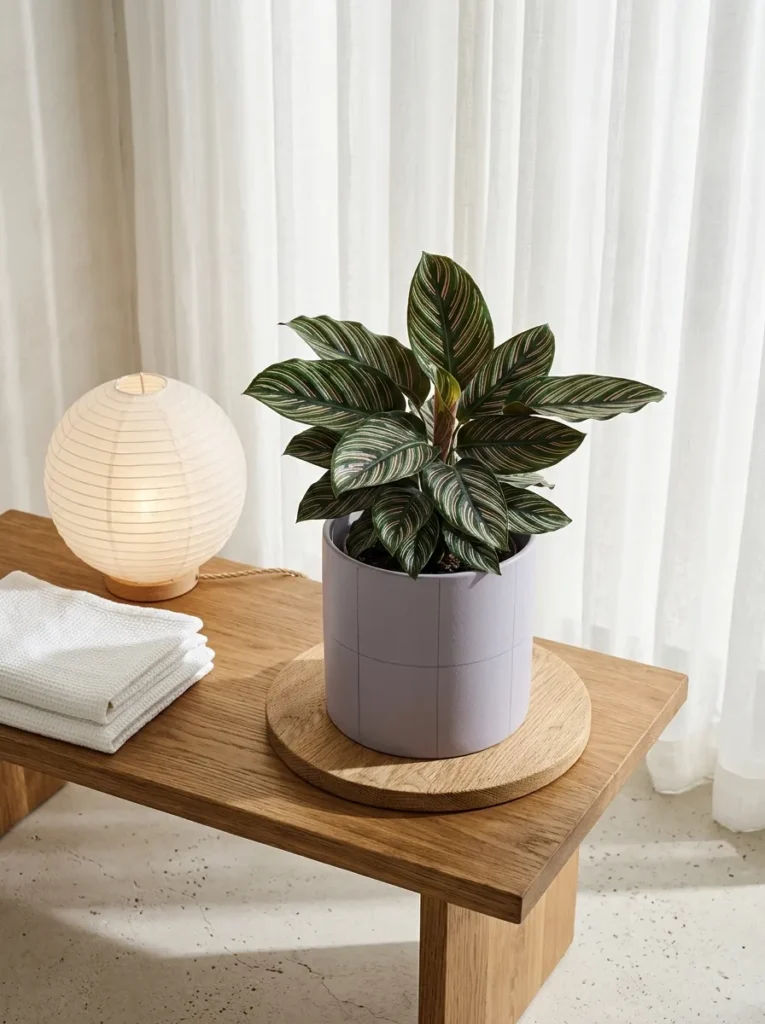
- Skill and time: Beginner. About 90 minutes, plus drying.
- Pot and prep: 10-inch unglazed white ceramic cylinder. Wipe clean and prime with one coat. Keep the plant in a nursery pot inside for drainage.
- Painted design: Faint horizontal lines inspired by Agnes Martin. Wash the pot in thinned paint, then draw graphite pencil lines a quarter inch apart, using a flexible measuring tape to keep them level.
- Palette: Washed lavender-gray, ivory, graphite.
- Paint and dry time: Two thin washes, about one part water to two parts paint, 45 minutes apart.
- Added decor: A round oak riser disc, about an inch thick, under the pot.
- Sealer and durability: Graphite smears, so mist a light coat of matte clear spray sealer from a foot away first, then add two thin brushed coats. Test on a scrap. Indoor only.
- Plant and full styling: Calathea ornata. Its pink pinstripes echo the pencil lines. Set it on a low oak bench in a bedroom beside folded white linen and a paper lantern lamp.
Why this works: Faint, hand-drawn lines make a pot look plain from the doorway and detailed up close, which is what gives quiet, modern decor its expensive feel.
Agnes Martin drew grids so faint you have to lean in to see them, and I’ve never found a quieter way to decorate a pot. I tried this on a bedroom plant last winter, mostly out of curiosity, and I keep noticing it more than the loud pieces. Wash the pot in a watered-down lavender-gray, let it dry, then draw pencil lines a quarter inch apart, using a flexible tape measure to keep them level. Hand-drawn lines wobble slightly, and that is the charm. The pot looks plain from the doorway and extraordinary up close.
The order matters because graphite smears. Prime the ceramic, brush on two thin washes of paint, one part water to two parts paint, and let each dry for 45 minutes. Draw your lines, then mist a light coat of matte clear spray sealer from a foot away before applying two thin brushed coats. Test the sealer on a scrap first. Slip a Calathea ornata in a nursery pot inside, since its pink pinstripes echo your pencil lines. Set it on an oak riser disc, on a low oak bench beside white linen and a paper lantern lamp.
11. Kelly Emerald Curve

- Skill and time: Beginner-plus. About 2.5 hours, plus drying.
- Pot and prep: 14-inch tall glazed ceramic ovoid planter. Scuff with 220-grit sandpaper, wipe with rubbing alcohol, and apply a bonding primer. Drill a drainage hole if it has none.
- Painted design: One bold sweeping curve inspired by Ellsworth Kelly. Trace an emerald curve rising up one side from a paper template, plus a thin ink-black arc near the rim.
- Palette: Warm white, emerald green, ink black.
- Paint and dry time: Two coats of warm white, an hour apart. Two or three coats of emerald for full coverage. Black arc last.
- Added decor: Black waxed cord wrapped three times around the neck and tied in a loose knot.
- Sealer and durability: Two coats of satin water-based polyurethane. Indoor only.
- Plant and full styling: Alocasia ‘Frydek’. Its velvet leaves echo the emerald. Style in a living-room corner beside an oatmeal boucle chair, an arched black floor lamp, and a walnut side table.
Why this works: One bold curve against generous white space looks intentional and expensive, because the empty area does half the design work.
Ellsworth Kelly reduced nature to a single curve, and one big curve is all this pot needs. I sketched mine with a chalk pencil and a flexible ruler bent into an arc, then cut a paper template to trace. Fill it with emerald green in two or three coats, since deep colors need extra coverage. A thin ink-black arc near the rim adds tension. In my experience, a single bold shape on a tall pot looks far more expensive than a busy pattern. The white space is doing half the design work.
Tall ceramic planters rarely come with drainage holes, so my husband taught me to drill one. Tape a small X on the bottom so the bit doesn’t skate, use a diamond-tipped bit at low speed, and drip water on it to keep it cool. Scuff the glaze with 220-grit sandpaper, wipe with rubbing alcohol, and prime with a bonding primer. After painting, wrap black waxed cord around the neck three times and tie a loose knot. Plant an Alocasia ‘Frydek’, whose velvet leaves echo the emerald, beside an oatmeal boucle chair and an arched black floor lamp.
You’ll Also Love: Indoor Plants That Match Your Decor Style
12. Turner Sunset Wash
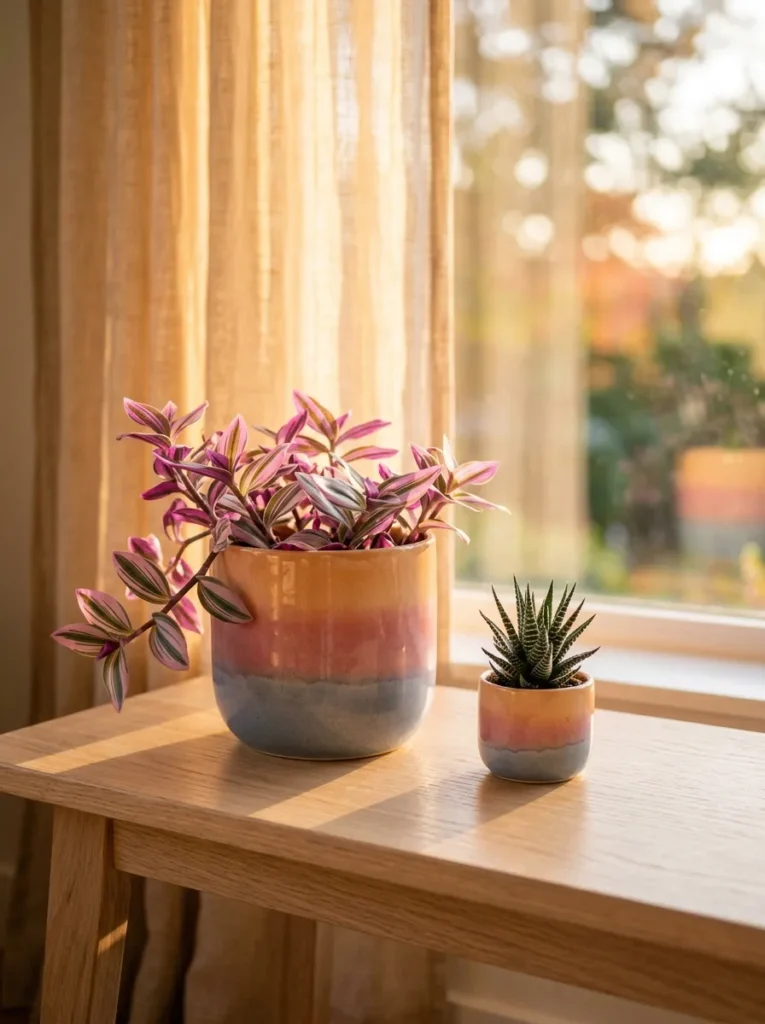
- Skill and time: Beginner. About 90 minutes, plus drying.
- Pot and prep: 12-inch glazed ceramic cylinder, plus a 4-inch mini pot. Scuff, wipe with rubbing alcohol, and apply a bonding primer.
- Painted design: A soft watercolor-style gradient inspired by J.M.W. Turner’s skies. Brush three thinned bands, then blend the seams with a damp sea sponge while wet.
- Palette: Cream base, apricot at the bottom, rose in the middle, misty blue-gray at the rim.
- Paint and dry time: Two cream coats, an hour apart. Then three gradient layers, 30 minutes apart, each blended wet.
- Added decor: A 4-inch mini companion pot painted in the reverse order, blue-gray at the bottom, set beside the big one.
- Sealer and durability: Two coats of satin water-based polyurethane. Indoor only.
- Plant and full styling: Tradescantia ‘Nanouk’ in the large pot and a small haworthia in the mini. Place them on a wide oak window bench with linen curtains and a glass carafe.
Why this works: Blending colors while they are still wet creates soft edges that read as light rather than paint.
J.M.W. Turner painted skies by letting wet colors bleed into each other, and the same wet-on-wet method gives a pot a sunset glow. Thin your paint with water, brush apricot across the lower third, rose across the middle, and misty blue-gray across the top. Then blend the seams with a damp sea sponge while everything is still wet. Work quickly, one band at a time, and resist fussing. Colors that blend in only a few passes look like light, while overworked blending looks muddy. Each pass needs thirty minutes to dry, and three layers deepen the glow.
Glazed ceramic needs a scuff sand with 220-grit paper, a wipe of rubbing alcohol, and a bonding primer, or the watery paint will bead up and slide. Start with two cream coats, an hour apart, before the gradient. Seal with two coats of satin water-based polyurethane. Paint a four-inch mini pot in the reverse order, blue-gray at the bottom, and set it beside the big one for a matched pair. Plant a Tradescantia ‘Nanouk’ in the large pot and a small haworthia in the mini. Place them on a wide window bench, where sunlight brings out the glow.
13. Moon Phase Ring
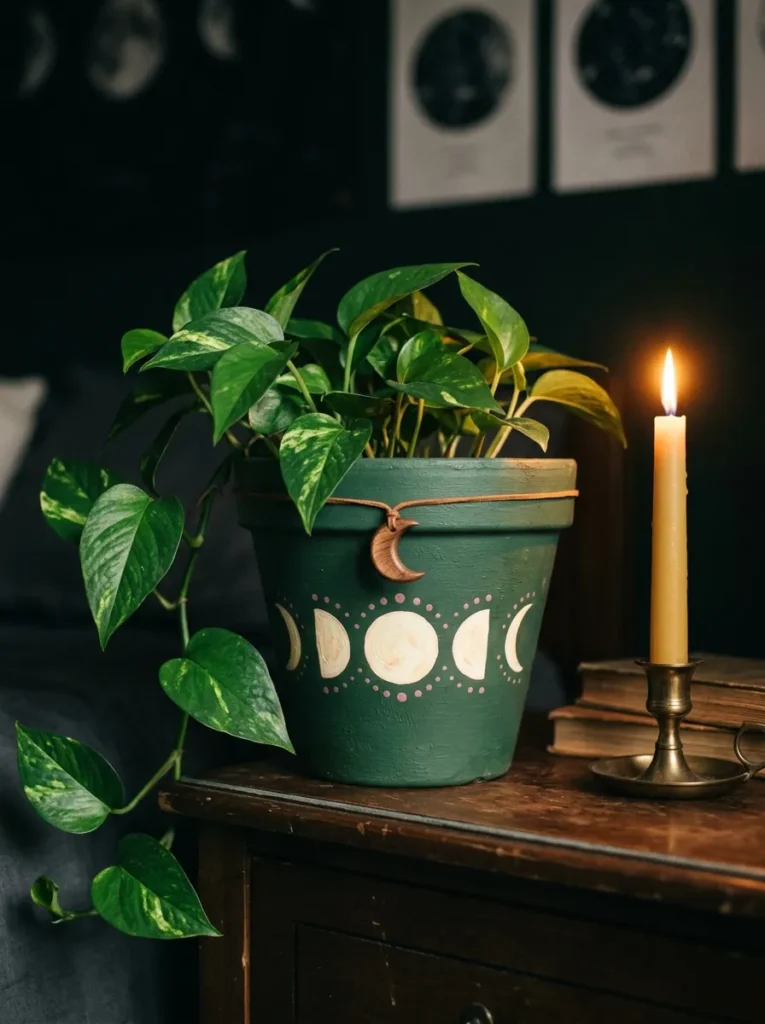
- Skill and time: Beginner. About 2 hours, plus drying.
- Pot and prep: 8-inch terracotta. Raw clay soaks up paint unevenly, so prime it first.
- Painted design: Five moon phases in a row around the pot. Trace a bottle cap in pencil, fill each circle with bone white, then paint the shadow side in the pot’s green to form a crescent, half, or gibbous. Scatter a few tiny dots between the moons.
- Palette: Pine green, bone white, dusty rose dots.
- Paint and dry time: Two coats of pine green chalk paint, an hour apart. Two coats of bone white for the moons, an hour between coats, then the green shadows.
- Added decor: A small wooden crescent charm tied to the rim with linen cord, added after the sealer cures.
- Sealer and durability: Two coats of matte water-based polycrylic. Indoor only.
- Plant and full styling: Pothos ‘Pearls and Jade’ (Epipremnum aureum). Its cream-and-green leaves echo the moons. Set it on a bedroom nightstand beside a taper candle, a linen lampshade, and a framed print.
Why this works: Painting each shadow in the exact color of the pot makes the moons look like they are emerging from the pot itself.
I painted my first moon phase pot for a friend’s nursery, and it has been the most requested pot I’ve ever made. The idea is simple: five circles, one for each phase, painted in a row. Trace a bottle cap in pencil, fill each circle with bone white, then paint the shadow side in pine green to form a crescent, half, or gibbous. Keep the green identical to the pot so the shadow disappears. A few tiny dusty rose dots scattered between the moons add a quiet glow. It feels celestial without being childish.
Prime the terracotta first, since raw clay soaks up paint unevenly, then apply two coats of pine green chalk paint, an hour apart. Paint the moons in two coats of bone white, letting each dry for an hour before adding the green shadows. Seal with two coats of matte water-based polycrylic. Once cured, tie a small wooden crescent charm to the rim with linen cord. Plant a pothos ‘Pearls and Jade’, whose cream-and-green leaves echo the moons, and set it on a bedroom nightstand beside a taper candle, a linen lampshade, and a framed print. Keep it indoors.
14. Ink Wash Mountains
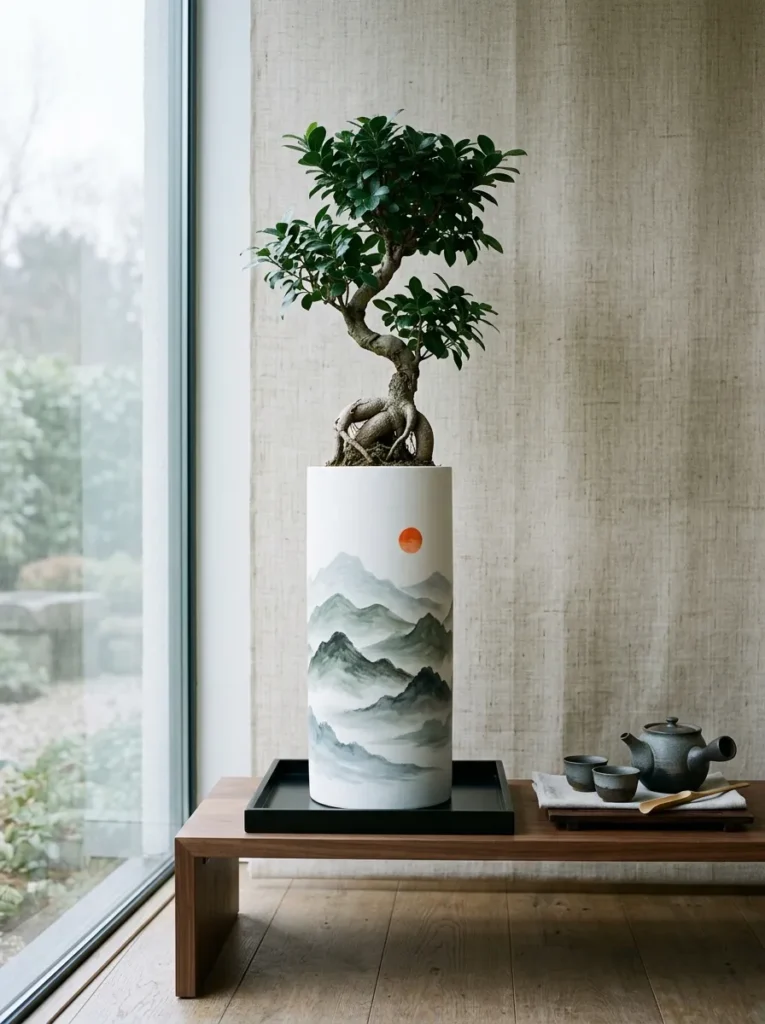
- Skill and time: Beginner. About 2 hours, plus drying.
- Pot and prep: 12-inch tall glazed ceramic cylinder. Scuff with 220-grit sandpaper, wipe with rubbing alcohol, and apply a bonding primer.
- Painted design: Layered misty mountains in the style of sumi-e ink painting. Paint the farthest ridge palest, then darker ridges in front, with a charcoal foreground. Dry-brush warm white over the bases for mist. Add one small sun with a round sponge dauber.
- Palette: Warm white, misty gray-green, charcoal, one small vermilion sun.
- Paint and dry time: Two warm white coats, an hour apart. Each thinned mountain layer needs about 30 minutes.
- Added decor: A black lacquered tray under the pot.
- Sealer and durability: Two coats of satin water-based polyurethane. Indoor only.
- Plant and full styling: Ficus microcarpa ‘Ginseng’. Its thick trunk looks like a tiny bonsai. Set it on a low walnut bench beside a stoneware tea set and a linen wall hanging.
Why this works: Layering pale ridges behind darker ones creates real depth, so a flat pot looks like a landscape scroll.
Sumi-e painters build mountains from layers of thin ink, pale ridges behind and darker ones in front, and that layering is what creates depth. Copy it with thinned acrylic on a tall cylinder. Brush the farthest ridge in the palest gray-green, let it dry, then paint a slightly darker ridge overlapping it, finishing with a charcoal foreground. Keep the mountain tops soft and the bases lost in mist by dry-brushing warm white over them. Add a small vermilion sun with a round sponge dauber. That single red dot pulls the whole composition together.
A tall cylinder is the ideal shape, because the mountains can climb the pot like a scroll. Glazed ceramic needs a scuff sand with 220-grit paper, a wipe of rubbing alcohol, and a bonding primer. Paint two warm white coats, an hour apart, then each mountain layer, thirty minutes apart. Seal with two coats of satin water-based polyurethane. Plant a Ficus microcarpa ‘Ginseng’, whose thick trunk looks like a tiny bonsai. Place it on a black lacquered tray on a low walnut bench, beside a stoneware tea set and a linen wall hanging.
15. Indigo Koi Pond
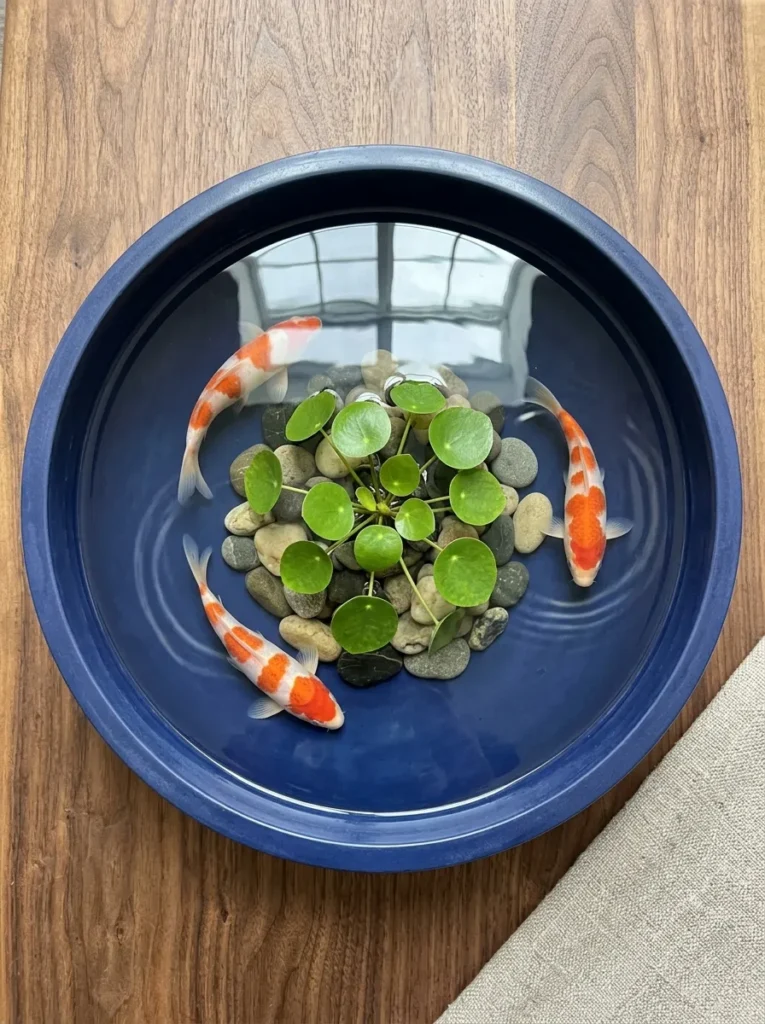
- Skill and time: Beginner-plus. About 2.5 hours, plus drying.
- Pot and prep: 10-inch wide concrete bowl planter with a drainage hole. Concrete is alkaline, so wash with white vinegar and water, dry for 48 hours, and prime with an alkali-resistant masonry primer.
- Painted design: Three koi swimming in a loose circle around the bowl. Draw each with a pencil as a teardrop body and fan tail, with a different bend each. Finish with faint ripple rings in lightened indigo.
- Palette: Deep indigo, ivory, coral-orange.
- Paint and dry time: Two coats of indigo, an hour apart. Ivory koi in two coats, then coral patches and ripples.
- Added decor: A few smooth beach stones at the base, like a pond edge.
- Sealer and durability: Two coats of gloss water-based polyurethane for a wet shimmer. Indoor only.
- Plant and full styling: Chinese money plant (Pilea peperomioides). Its round leaves look like lily pads. Style on a walnut coffee table with a linen throw.
Why this works: A deep indigo base with glossy sealer looks like night water, so the koi seem to swim instead of sit on the surface.
My favorite pot is the one that makes people stop mid-sentence, and the koi pot does exactly that. It’s just three fish painted in a loose circle, ivory bodies with coral patches, on a deep indigo bowl that looks like night water. Koi are easier than they look: draw a teardrop for the body, add a fan tail with a curved line, and give each fish a slightly different bend. I’ve found that leaving one koi mid-turn makes the whole scene feel alive. Finish with faint ripple rings in lightened indigo around each fish.
A wide concrete bowl works like a tiny pond, but concrete needs prep first. My husband always washes new concrete with a vinegar and water mix, lets it dry for 48 hours, then primes with an alkali-resistant masonry primer so the lime can’t attack the paint. Paint two indigo coats, an hour apart, then the koi. Seal with two coats of gloss water-based polyurethane for a wet shimmer. Plant a Chinese money plant, whose round leaves look like lily pads, and set smooth beach stones at its base. Style it on a walnut coffee table with a linen throw.
16. Miró Playful Constellations
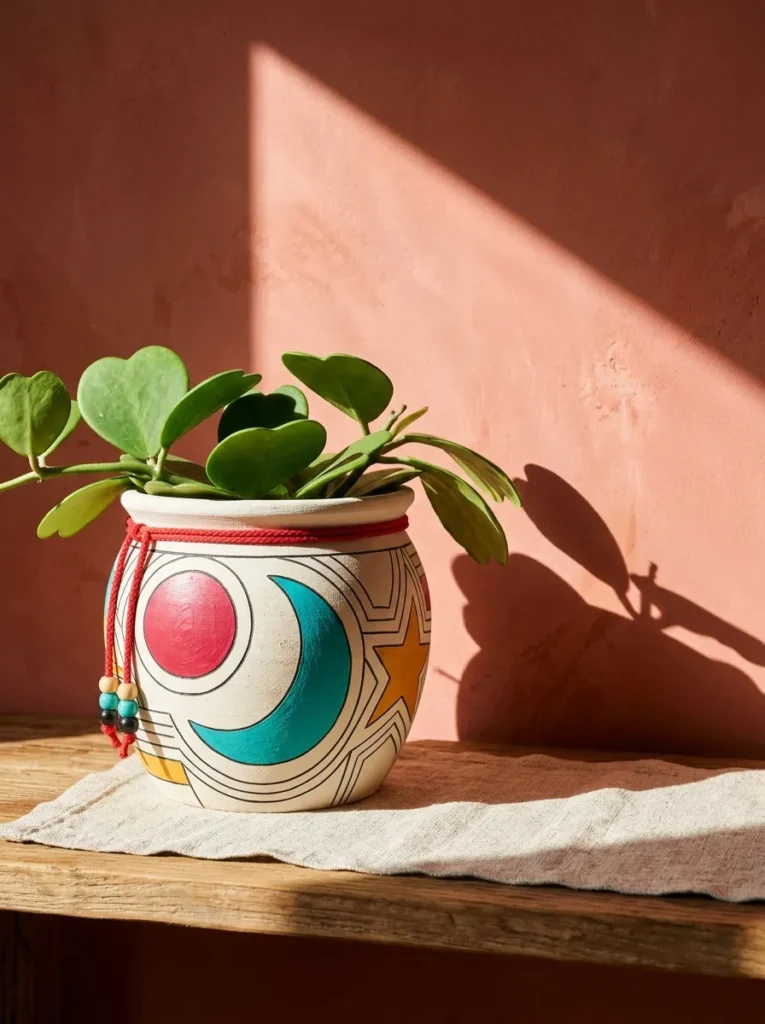
- Skill and time: Beginner. About 2 hours, plus drying.
- Pot and prep: 9-inch terracotta. Raw clay drinks paint, so prime it first.
- Painted design: Floating shapes inspired by Joan Miró: a cherry-red circle, a turquoise crescent, a saffron star, all linked by wobbly ink-black lines and tiny dots. Draw the lines with a fine liner brush.
- Palette: Warm white base, cherry red, turquoise, saffron, ink black lines.
- Paint and dry time: Two coats of warm white chalk paint, an hour apart. Each shape gets one thick coat, 30 minutes to dry, then the black lines.
- Added decor: A loop of red cotton cord around the neck with three painted wooden beads in saffron and turquoise.
- Sealer and durability: Two coats of matte water-based polycrylic. Indoor only.
- Plant and full styling: Sweetheart hoya (Hoya kerrii). Its heart-shaped leaves add one more playful shape. Style on a dining sideboard with ceramic bowls, a linen runner, and a framed abstract print.
Why this works: Floating shapes joined by thin lines read as art, because the empty space between them gives each color room to stand out.
My niece once looked at a plain pot on my sideboard and said, “It needs stars.” She was right. Joan Miró filled his canvases with floating shapes connected by thin black lines, and that’s the easiest way to paint a pot that looks like a gallery piece. Draw a cherry-red circle, a turquoise crescent, and a saffron star on a warm white base, then connect them with wobbly ink-black lines and scatter tiny dots. I’ve found that leaving big gaps between shapes keeps it airy instead of busy. The more childlike the lines, the more professional it looks.
Prime the terracotta first, since raw clay drinks paint, then brush on two coats of warm white chalk paint, an hour apart. Give each shape one thick coat and let it dry for thirty minutes before drawing the black lines with a fine liner brush. Seal with two coats of matte water-based polycrylic. Loop a red cotton cord around the neck and thread on three painted wooden beads in saffron and turquoise. Plant a sweetheart hoya, whose heart-shaped leaves add one more playful shape, and style it on a dining sideboard beside ceramic bowls and a framed abstract print.
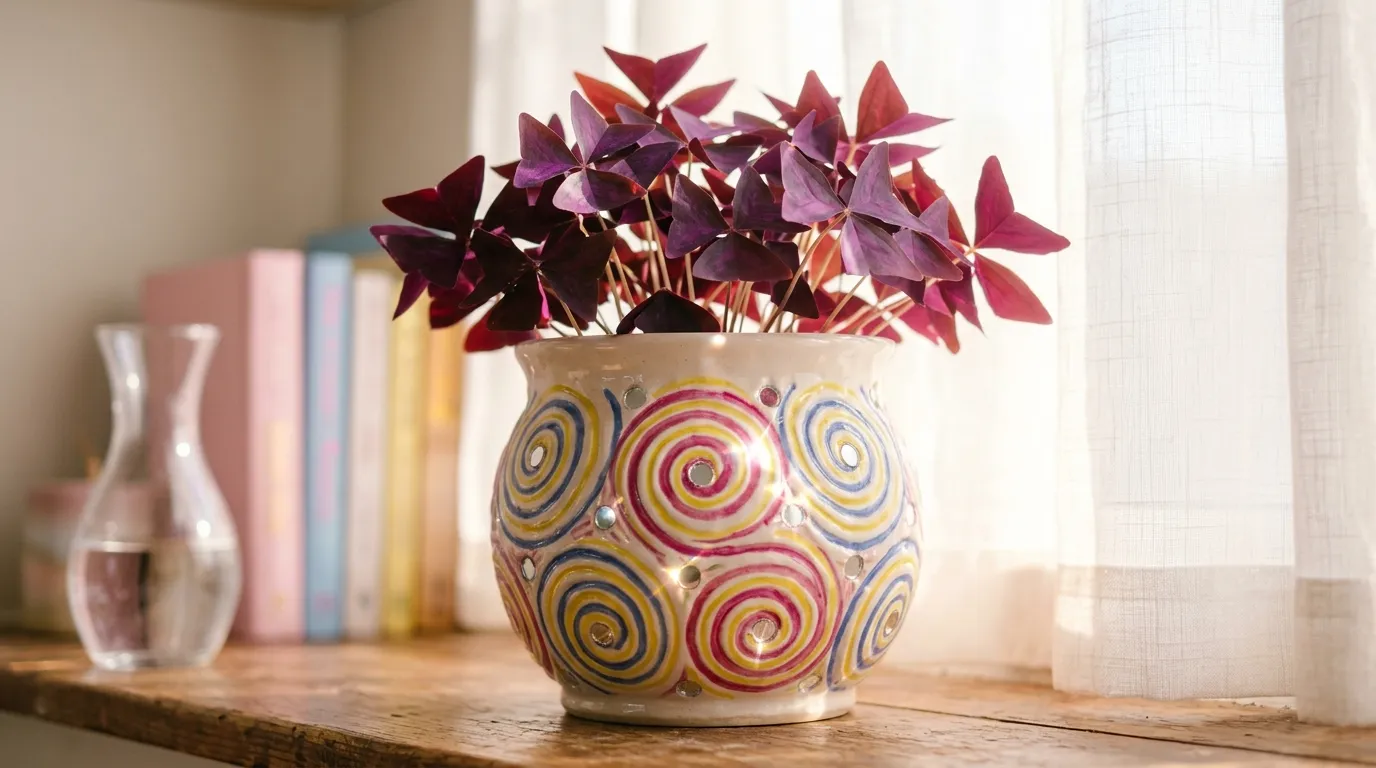
17. Af Klint Orbs and Spirals
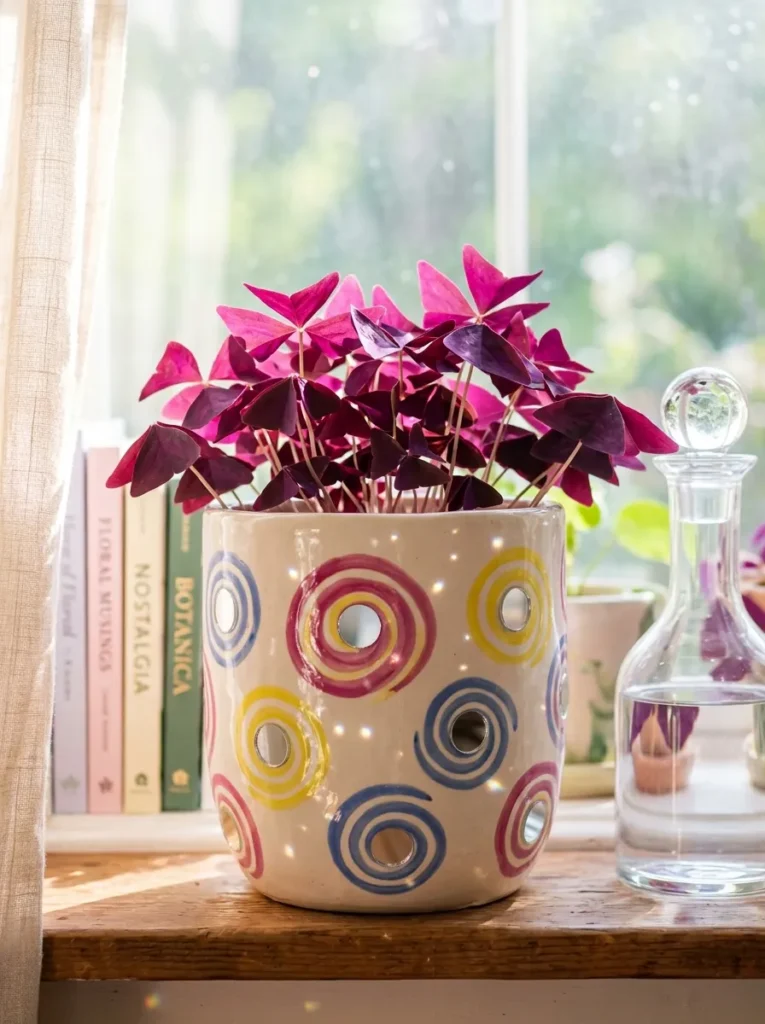
- Skill and time: Beginner. About 2 hours, plus drying.
- Pot and prep: 8-inch glazed ceramic. Scuff with 220-grit sandpaper, wipe with rubbing alcohol, and apply a bonding primer.
- Painted design: Three spirals inspired by Hilma af Klint, drawn from the center outward, with the middle of each left bare for a mirror disc.
- Palette: Warm white base, fuchsia, lemon yellow, cornflower blue.
- Paint and dry time: Two coats of warm white, an hour apart. Each spiral color gets thirty minutes to dry.
- Added decor: Three small round mirror discs glued into the spiral centers with adhesive made for mirrors, after sealing.
- Sealer and durability: Two coats of satin water-based polyurethane, kept off the mirror spots. Indoor only.
- Plant and full styling: Oxalis triangularis. Its purple shamrock leaves open and close with the light. Set it on a sunny windowsill with sheer curtains, a glass carafe, and a stack of pastel books.
Why this works: A tiny mirror at the center of each spiral catches light as you move, so the pot seems to sparkle without any glitter.
Hilma af Klint painted spirals and glowing orbs decades before abstract art was fashionable, and her colors are pure joy. Paint a warm white pot, then draw three spirals in fuchsia, lemon, and cornflower blue, starting from the center and winding outward. Leave the middle of each spiral bare. Then, when everything is sealed, press a small round mirror disc into each center. My husband warned me to use adhesive made for mirrors, because some craft glues eat away the silver backing and leave black spots. The little discs flash like jewels.
Glazed ceramic needs a scuff sand with 220-grit paper, a wipe of rubbing alcohol, and a bonding primer. Paint two warm white coats, an hour apart, then the spirals, letting each color dry for thirty minutes. Seal the paint with two coats of satin water-based polyurethane, keeping it off the spots where the mirrors will go. Glue the mirror discs in place with mirror adhesive, curing overnight. Plant an Oxalis triangularis, whose purple shamrock leaves open and close with the light, and set it on a sunny windowsill beside a glass carafe and a stack of pastel books.
18. Deco Fans in Bordeaux
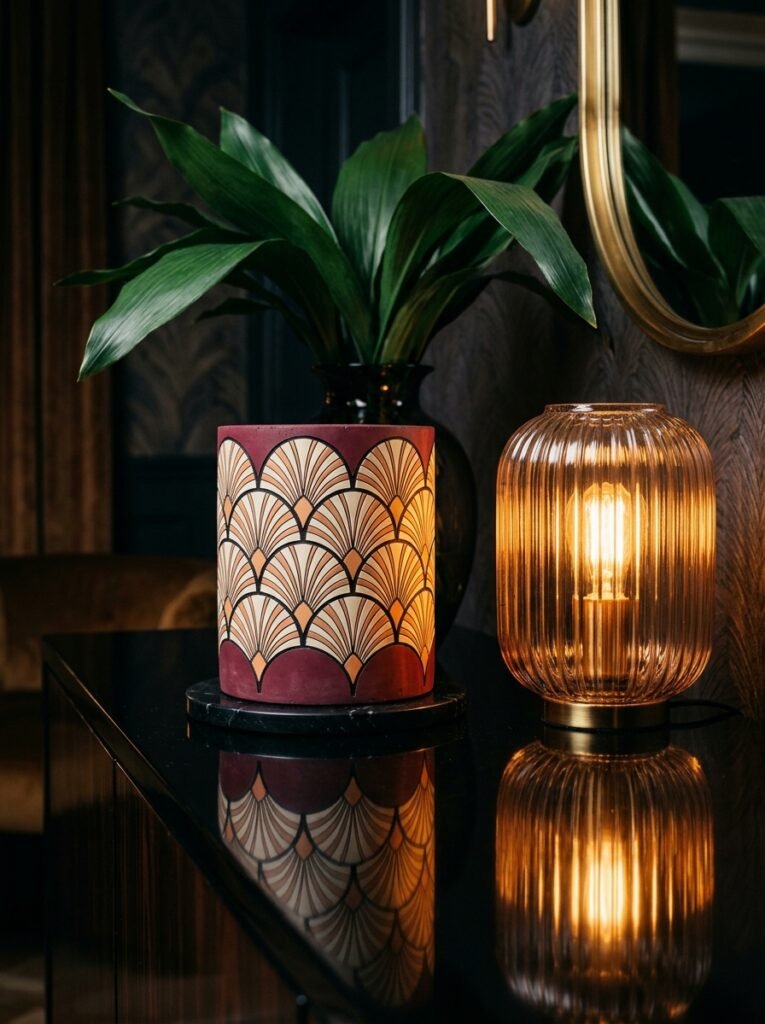
- Skill and time: Beginner-plus. About 2.5 hours, plus drying.
- Pot and prep: 12-inch smooth concrete cylinder. Concrete is alkaline, so wash with white vinegar and water, dry for 48 hours, and apply an alkali-resistant masonry primer.
- Painted design: Art Deco fans inspired by Tamara de Lempicka’s 1920s glamour. Trace a bottle cap in staggered rows like fish scales, fill each outer arc with ivory, add a smaller apricot arc inside, and outline in thin black.
- Palette: Deep bordeaux base, ivory, apricot, ink black outlines.
- Paint and dry time: Two coats of bordeaux, an hour apart. Then build the fans in 30-minute layers.
- Added decor: A round black marble coaster under the pot.
- Sealer and durability: Two coats of satin water-based polyurethane. Indoor only.
- Plant and full styling: Aspidistra elatior, the cast iron plant. Style on a lacquered black console with a fluted glass lamp and a framed Deco poster.
Why this works: Repeating one simple shape in staggered rows creates a pattern that looks professionally printed, even when painted by hand.
Art Deco was built on repeating geometry, which makes it perfect for beginners: a fan is just a semicircle with smaller semicircles inside it. Trace a bottle cap onto a bordeaux pot in staggered rows, like fish scales, and the fans interlock automatically. Fill each outer arc with ivory, add a smaller apricot arc inside, and outline everything in thin black. The Deco decorators of the 1920s used exactly this rhythm in lobbies and on lamps. Wine red with warm peach and black has an old-Hollywood glamour that still looks fresh next to modern furniture.
Concrete gives a smooth, sculptural base, but it is alkaline, so prep matters. Wash it with equal parts white vinegar and water, dry it for 48 hours, and apply an alkali-resistant masonry primer. Paint two bordeaux coats, an hour apart, then build the fans in thirty-minute layers. Seal with two coats of satin water-based polyurethane. Plant an Aspidistra elatior, the cast iron plant, a parlor classic that tolerates low light. Set the pot on a black marble coaster on a lacquered console, beside a fluted glass lamp and a framed Deco poster.
19. Calder Floating Discs
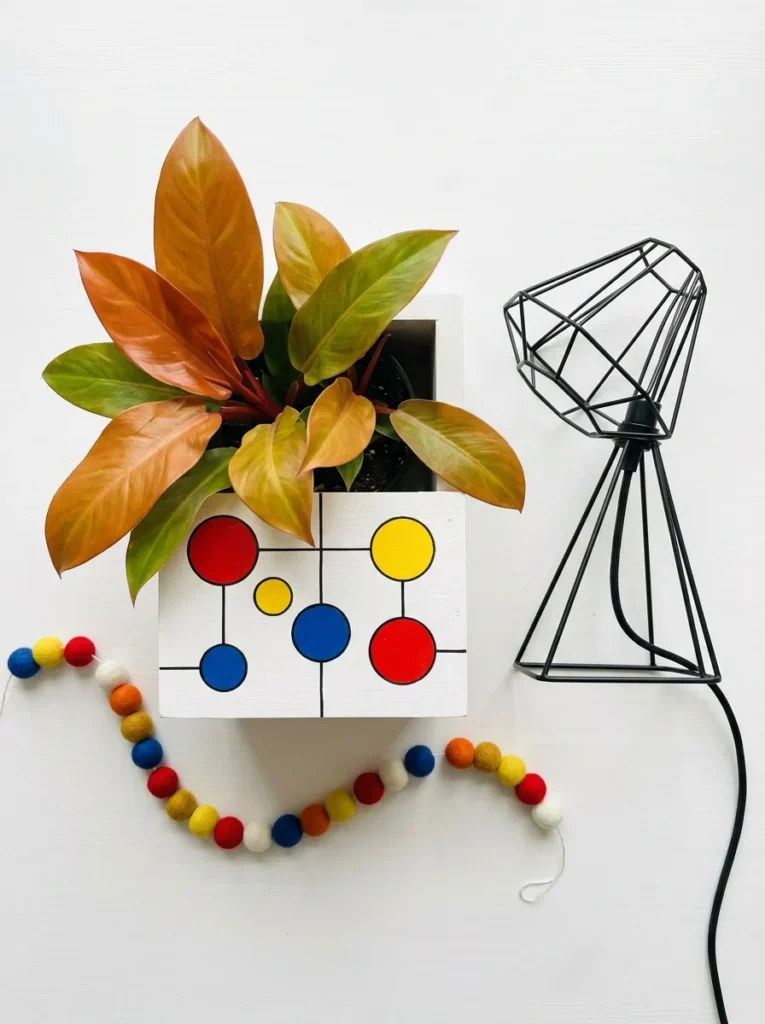
- Skill and time: Beginner. About 2 hours, plus drying.
- Pot and prep: 10-inch square pine wood planter. Sand with 120-grit, then 220, and dab a shellac-based stain-blocking primer over every knot so resin can’t bleed through the white paint.
- Painted design: Flat discs inspired by Alexander Calder’s mobiles, spaced unevenly and joined by thin black lines drawn with a paint pen like mobile wires.
- Palette: Warm white base, tomato red, sunflower yellow, cobalt blue, ink black.
- Paint and dry time: Two coats of warm white, an hour apart. Each disc gets two coats, 30 minutes apart.
- Added decor: A mini felt-ball garland in red, yellow, and cobalt draped over one edge.
- Sealer and durability: Two coats of satin water-based polyurethane, including the inside edges. Drop in a plastic liner with drainage holes. Indoor only.
- Plant and full styling: Philodendron ‘Prince of Orange’. Its warm new leaves echo the discs. Style on a white desk with a black wire task lamp and a cork board of postcards.
Why this works: Flat primary-color discs on a clean white base look graphic and modern, and the thin black lines add a sense of movement.
When I painted my first wood planter, a knot in the pine bled a yellow-brown stain straight through my white paint. My husband, who builds with lumber for a living, handed me a can of shellac-based stain-blocking primer and said, “Knots always bleed.” Sand the wood with 120-grit, then 220, and dab that primer over every knot before painting. Wood is warm, forgiving, and perfect for crisp, clean graphic shapes. Once the base is smooth and white, you can paint bold, flat Calder-style discs in tomato red, sunflower yellow, and cobalt blue.
Calder made metal mobiles that seem to float, so keep the layout loose. Space the discs unevenly on a warm white base and connect them with thin black lines drawn with a paint pen, like mobile wires. Give each disc two coats, thirty minutes apart. Seal with two coats of satin water-based polyurethane, including the inside edges. Drop a plastic liner with drainage holes inside, since raw wood and water don’t mix. Plant a Philodendron ‘Prince of Orange’ for warm new leaves, and drape a mini felt-ball garland over one edge. Style it on a white desk.
20. Hockney Patchwork Hills — A Pot Painting Idea for a Living Room Corner
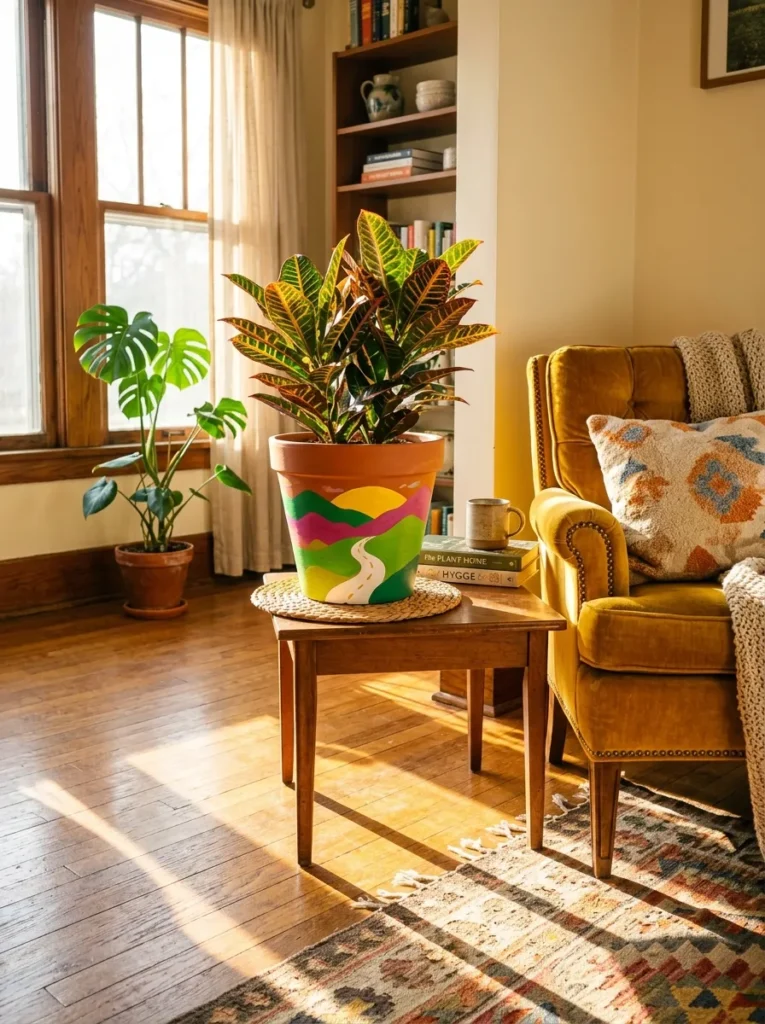
- Skill and time: Beginner. About 2.5 hours, plus drying.
- Pot and prep: 14-inch terracotta. Prime it first. The large surface gives the hills plenty of room.
- Painted design: Stacked, curved bands that roll like hills, inspired by David Hockney’s landscapes. Wind a thin warm white road from base to rim with a flat brush.
- Palette: Grass green, magenta, sunflower yellow, warm white road.
- Paint and dry time: Two coats per band, 30 minutes apart, letting the colors meet in soft curves.
- Added decor: A round rattan trivet under the pot.
- Sealer and durability: Two coats of matte water-based polycrylic. Indoor only.
- Plant and full styling: Croton ‘Petra’ (Codiaeum variegatum). Its boldly veined leaves echo the palette. Style in a sunny living room corner beside a mustard velvet armchair and a striped wool throw.
Why this works: Stacked curved bands in saturated colors read as a landscape from across the room, so one pot becomes a small painting.
On a long drive through hill country outside Austin, I noticed how the late sun turns every field a slightly different color, and I wanted to paint exactly that. Hockney did the same with Yorkshire, painting fields as bold patchwork. Stack curved bands on a pot: grass green at the base, magenta in the middle, sunflower yellow near the rim. Each band should roll like a hill. Then wind a thin warm white road from the base to the top. Use a flat brush and curve it as you go. It’s surprisingly easy, and the road ties everything together.
A 14-inch terracotta pot gives the hills plenty of room. Prime it first, since raw clay soaks up paint, then brush on each band in two coats, thirty minutes apart, letting the colors meet in soft curves. Seal with two coats of matte water-based polycrylic. Plant a croton ‘Petra’, whose boldly veined yellow and green leaves echo your palette, and set the pot on a round rattan trivet. Style it in a sunny living room corner beside a mustard velvet armchair and a striped wool throw. Keep it indoors, where crotons love bright, warm light.
Styling Principles for Painted Pots
Every pot in this post follows the same plan: pick where the pot will live, match the paint to the material, then choose the design. Skip the first two steps and even the most beautiful design peels.
Decide indoor or outdoor first. An indoor pot can wear delicate finishes like chalk paint, graphite lines, mirror discs, and fabric trims. An outdoor pot needs outdoor-rated acrylic, a primer, and a UV-resistant exterior sealer. Any pot that sees freezing weather should also be sealed inside the rim.
Match the prep to the material. The surface decides what holds paint, and this is where most painted pots fail.
| Pot material | Why it behaves this way | Prep and paint that hold |
|---|---|---|
| Terracotta | Porous, absorbs paint and moisture | Prime, then outdoor acrylic, chalk paint, or mineral paint |
| Glazed ceramic | Glass-smooth, paint slides off | Scuff with 220-grit sandpaper, wipe with rubbing alcohol, bonding primer |
| Concrete | Alkaline and chalky | Vinegar and water wash, 48-hour dry, alkali-resistant masonry primer |
| Plastic | Nonporous and flexible | Scuff with 320-grit sandpaper, spray primer made for plastic |
| Galvanized metal | Zinc repels ordinary paint | Vinegar wash, primer made for galvanized metal |
| Raw wood | Knots bleed through light paint | Sand, dab knots with stain-blocking primer, use a liner inside |
Keep the palette to three or four named tones. Then let the plant or one nearby object repeat one of them. A burgundy-backed peperomia beside a brick-red arc looks planned, and that is the difference between a decorated pot and a styled one.
Choose the sealer finish to match the look. Matte suits plaster, stone, and chalky finishes. Gloss suits lacquer and water effects. Satin works for everyday painted pots.
FAQs
1. What paint lasts longest on outdoor pots? Outdoor-rated acrylic over a primer and under a UV-resistant clear sealer lasts longest on outdoor pots. Standard craft acrylic soaks into porous clay and flakes within a season. Seal the inside rim too, so freeze-thaw moisture can’t push the paint off from behind.
2. Do you need to prime terracotta before painting? Yes, priming terracotta gives you even color and a longer-lasting finish. Terracotta is porous and absorbs paint unevenly, so unprimed pots look patchy and need extra coats. Indoors, thick chalk paint can sometimes work without primer, but outdoors the primer step is worth it.
3. What is the best sealer for painted pots? Water-based polyurethane or polycrylic is the best sealer for indoor painted pots, because it dries clear and wipes clean. For outdoor pots, use a clear exterior sealer with UV inhibitors. Apply two thin coats and wait about a week before planting.
4. How can I paint pots on a budget? A starter kit of a few brushes, a sea sponge, painter’s tape, sandpaper, primer, acrylic paint, and sealer usually costs well under $50 and covers several pots. Plain terracotta pots often cost just a few dollars. Mix extra colors from three tubes plus white, and use bottle caps, pencil erasers, and toothbrushes as stamps and splatter tools.
5. Can you paint plastic pots? Yes, plastic pots take paint well if you prep them first. Wash the pot, scuff it with 320-grit sandpaper, apply a spray primer made for plastic, then paint and seal with a flexible matte sealer. Keep painted plastic indoors or on a covered porch, because direct sun makes plastic brittle.
6. Will painting a terracotta pot hurt my plant? No, not if you paint only the outside, but the pot will behave differently. Bare terracotta wicks moisture out of the soil through its walls, and paint blocks part of that, so soil stays wet longer. From my plant science background, I’d say water less often, check the soil with your finger, and make sure the pot has a drainage hole. Slower drying suits ferns and calatheas, but succulents need extra care.
Conclusion
Great pot painting ideas aren’t about perfect brushstrokes. They’re about choosing the right prep, a color story you love, and one detail that makes the pot feel personal. Whether you try the ink mountains, the mirror spirals, or the bold hills, remember that nothing in a home should be random, and a painted pot is no exception. I’ve seen how one hand-painted piece can change the feel of a whole corner. Save this post on Pinterest so it’s ready for your next free afternoon, try one idea this week, and share it with a friend who loves plants. Your first masterpiece is waiting.
Excerpt: Twenty pot painting ideas inspired by famous artists, with exact paints, primers, and sealers for a finish that actually lasts.