15 Modern Coffee Bar Ideas That Get Used Daily
Here’s the thing nobody tells you before you build a home coffee bar: the styling isn’t what makes it work. Most coffee bars look incredible for about a week, and then the cords start showing, the counter gets crowded, and the whole setup quietly gets abandoned for the same old spot by the sink. If you’ve ever pinned a gorgeous coffee nook and wondered why yours never turns out that way, it usually comes down to planning the pretty part before the practical part.
These 15 modern coffee bar ideas are different — each one is a fully styled scene with the equipment, storage, and outlets planned in from the start, so what you build is something you’ll actually use every single morning, not just admire once.
Why Most Coffee Bars Stop Getting Used
Most home coffee bars fail for one boring reason: nobody planned for outlets before they planned for style. Coffee equipment isn’t decor — it’s small appliances, and small appliances need real infrastructure. An espresso machine or a good grinder typically needs 14 to 18 inches of usable counter depth plus an outlet within reach, and when a bar is designed around looks first, the cords end up trailing across a shelf or the machine gets shoved sideways to make room. A coffee bar that isn’t built around its equipment’s depth and power needs will always end up either non-functional or visually cluttered, no matter how good it looks on day one.
My husband has rewired more “pretty” coffee nooks than he can count — usually after the fact. This post fixes that: 15 modern coffee bar ideas that are gorgeous and built to actually get used every morning.
1. Reclaimed Oak Built-In Nook
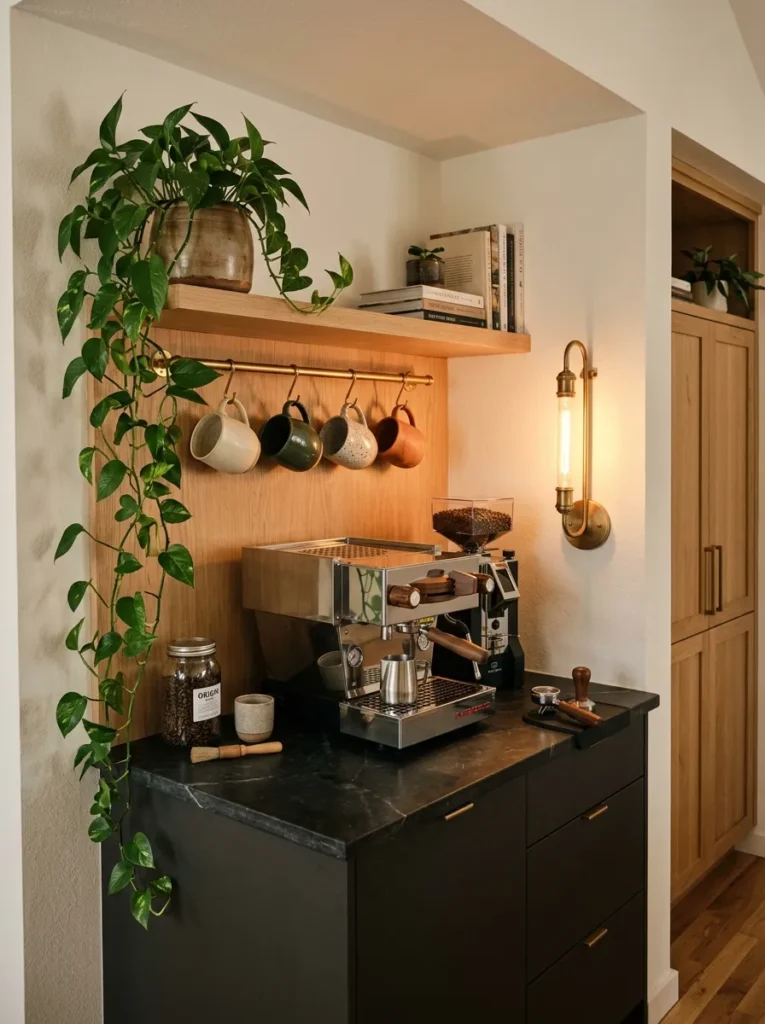
- Cabinetry/Surface: A built-in recess using reclaimed white oak upper cabinetry over lower cabinets painted in a deep charcoal (Benjamin Moore’s “Kendall Charcoal” — verify before ordering paint)
- Countertop: Honed soapstone, chosen for heat resistance and a matte finish that hides water spots
- Equipment zone: Full 18-inch depth built around a semi-automatic espresso machine and a separate grinder, side by side
- Storage: Closed lower cabinets for bean bags and syrups, open upper shelf for daily-use mugs
- Backsplash/wall: Unlacquered brass tile that’s meant to tarnish and darken with age
- Lighting: A single brass wall sconce with a warm 2700K bulb, angled down onto the counter
- Plants: A trailing pothos in a raw terracotta pot on the open shelf
- Electrical/standout detail: Outlet relocated mid-cabinet-run behind the backsplash tile, plus a brass rail mounted under the upper cabinet for hanging four mugs by their handles
Why this works: A built-in nook only earns its “built-in” status when the outlet and the depth are planned before the cabinetry goes in, not after.
My husband gets called back to more coffee nooks than any other kitchen feature, and it’s almost always the same issue — someone built the shelving first and figured out the outlet later, which means an extension cord running along the baseboard. When the electrical is planned into the wall before the cabinetry goes up, the whole nook reads as intentional instead of retrofitted. That’s the difference between a coffee bar that looks staged for one photo and one that survives daily use. Soapstone here isn’t decorative, either — it’s one of the few countertop materials that shrugs off both heat and coffee stains without babying.
This nook works because every material was chosen to be lived on, not just looked at. Charcoal lower cabinets ground the space visually, so the reclaimed oak above feels warm instead of busy. The brass backsplash is the real surprise — most people default to white subway tile here, and unlacquered brass does something subway tile never will: it ages into the space instead of staying frozen in time. Add the mug rail, and suddenly the whole nook functions like a tiny dedicated station, not a countertop appliance parked in a corner waiting to be styled around.
2. Vintage Buffet Bar Conversion
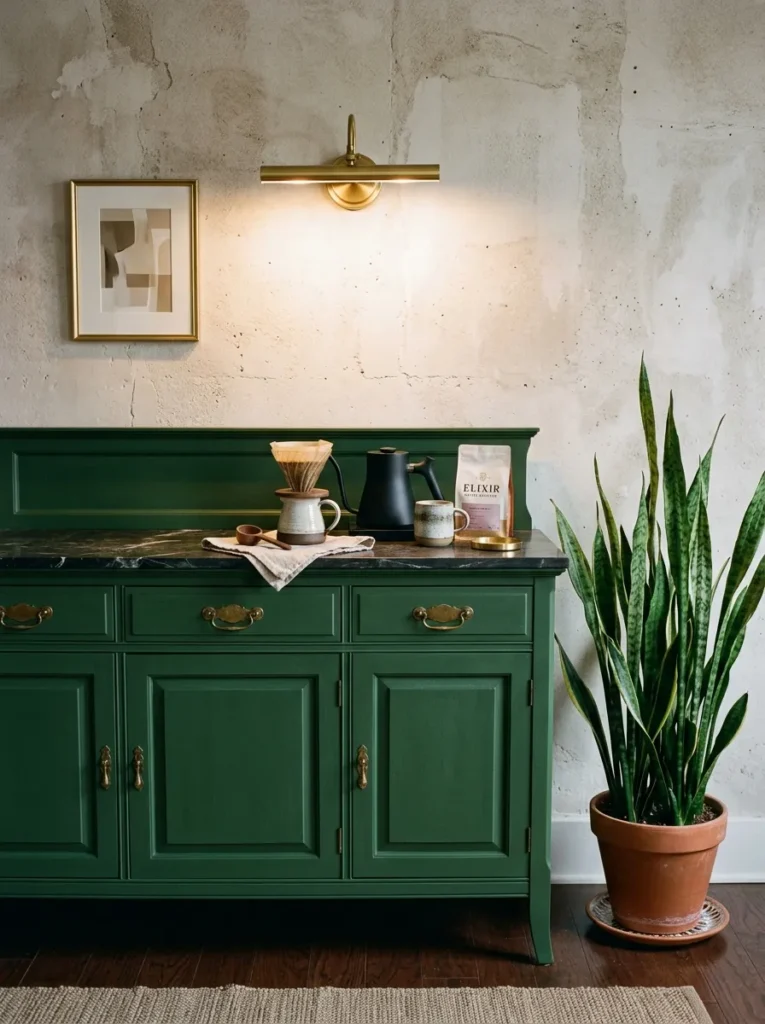
- Cabinetry/Surface: A 1960s wood buffet cabinet, stripped and repainted in a deep forest green (Farrow & Ball’s “Studio Green” — verify before purchase), original brass hardware kept
- Countertop: A cut piece of Calacatta marble set into the top as an inlay, not a full slab
- Equipment zone: Sized for a manual pour-over setup and an electric gooseneck kettle, no built-in appliances
- Storage: Interior cabinet holds glass canisters of beans; drawer holds filters and a scale
- Backsplash/wall: No backsplash — the wall behind is left as painted plaster, deliberately bare
- Lighting: A pair of small picture lights mounted above, aimed down at the marble inlay
- Plants: A mature snake plant in a fluted ceramic pot beside the buffet
- Electrical/standout detail: A single outlet fished through the buffet’s original cutout for a radio, now powering the kettle with zero visible cord
Why this works: Repurposing a piece of furniture’s original hardware cutout for a cord solves the power problem without a single visible wire, which is exactly what keeps a vintage conversion from looking retrofitted.
I found this buffet at an estate sale for $180, and it sat in our garage for two years before I trusted myself to cut into it. That hesitation was the mistake — the original radio cutout in the back panel was already a perfect, hidden channel for a cord, and I almost drilled a new hole instead of noticing what was already there. Old furniture like this often has built-in solutions nobody thinks to use anymore. The marble inlay was my husband’s idea, actually — a full slab would have cracked the old wood top, but a smaller inset piece distributes weight without stressing the frame.
A vintage piece like this earns its spot because it doesn’t try to look like a coffee bar — it just becomes one. The forest green paint makes the buffet feel like furniture that belongs in the room year-round, not a single-purpose station. Skipping a backsplash was intentional: bare plaster keeps the focus on the marble and the brass hardware instead of competing with tile. This setup won’t work for anyone who wants an espresso machine, but for pour-over lovers, it turns a five-minute ritual into something that actually feels worth slowing down for.
3. Brass and Glass Bar Cart
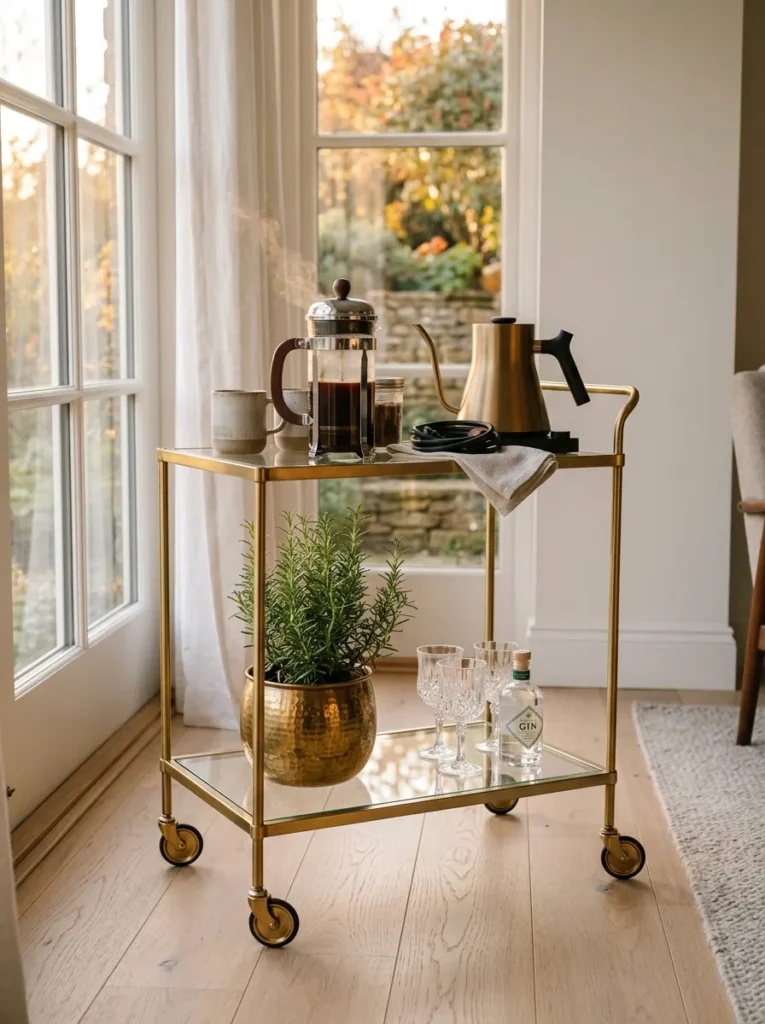
- Cabinetry/Surface: A two-tier brass-frame cart with smoked glass shelves, fully mobile on locking casters
- Countertop: The glass shelf itself doubles as the work surface — no separate counter
- Equipment zone: Built around a manual French press and a small electric kettle, sized for one to two servings
- Storage: Bottom shelf holds a woven rattan tray with mugs; a hanging brass basket on the side holds filters
- Backsplash/wall: None needed — the cart’s mobility is the point, it isn’t fixed to one wall
- Lighting: Positioned under an existing window for daylight use; a small battery-powered puck light for evening
- Plants: A small rosemary plant in a brass pot, chosen for scent near a coffee station rather than just looks
- Electrical/standout detail: A cord-wrap clip mounted on the cart’s frame keeps the kettle cord coiled and hidden between uses
Why this works: A cart-based setup solves the one problem fixed coffee bars can’t — it moves to wherever the morning light or the extra counter space actually is.
A rolling cart isn’t a compromise, it’s a strategy for anyone renting, working with a small kitchen, or just not ready to commit counter space permanently. Smoked glass shelves keep the whole thing visually light instead of bulky, which matters more than people expect on a cart this size. The rosemary is a small but real upgrade — plant science backs this up, since scent and taste perception are closely linked, and having something aromatic near where you make coffee actually changes how the whole ritual feels each morning.
What makes this idea distinct from a built-in is honesty about scale — nobody’s steaming milk for four people off a bar cart, and that’s fine. It’s designed for a slower, smaller ritual: one press, one cup, minimal cleanup. The brass frame and glass shelves keep it from reading as a random appliance cart, and the cord-wrap detail solves the ugliest part of any small-appliance setup, which is a kettle cord dangling off the edge. Move it near a window in the morning, tuck it against a wall the rest of the day.
4. Floating Shelf Wall Above a Console
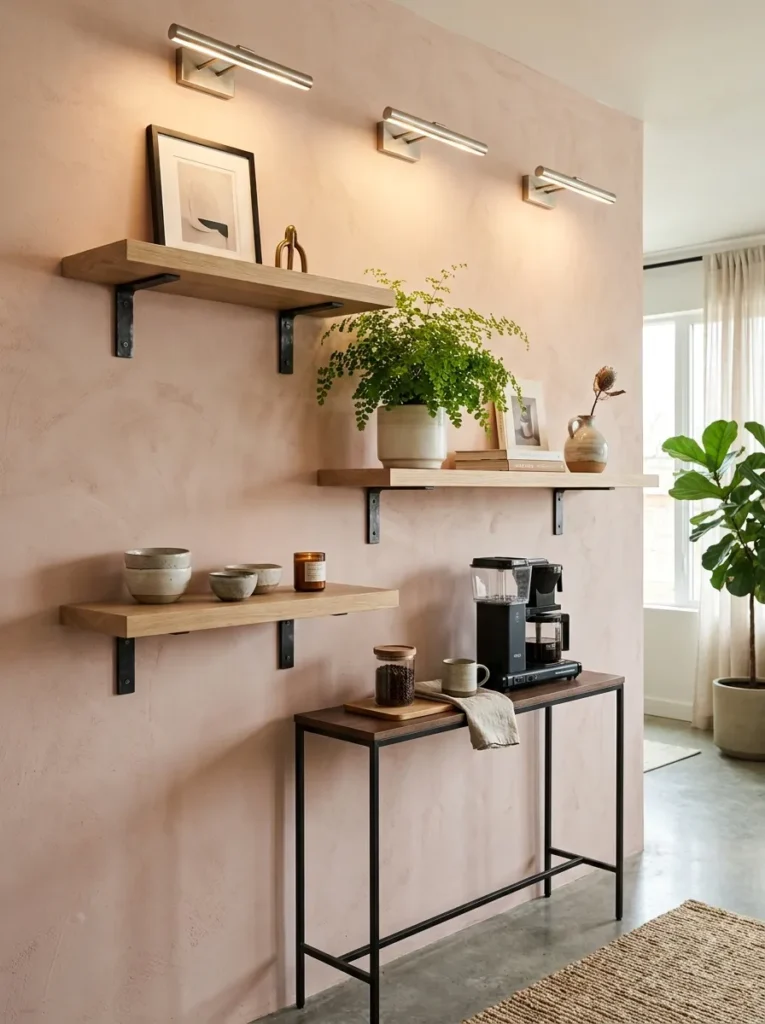
- Cabinetry/Surface: Three staggered white oak floating shelves above a slim iron-and-wood console table, wall painted in a warm plaster-pink (Farrow & Ball’s “Setting Plaster” — verify before ordering)
- Countertop/surface: The console’s top is a single slab of white oak, sealed for daily spills
- Equipment zone: Built around a compact drip machine and an open canister setup, sized for a narrow console rather than deep cabinetry
- Storage: Bottom shelf holds a stack of linen napkins and saucers; console drawer holds spoons and stirrers
- Backsplash/wall: None — the plaster-pink paint itself acts as the backdrop, left unprotected on purpose since there’s no direct splash zone
- Lighting: Two brushed-steel picture lights mounted above the top shelf, angled downward
- Plants: A small maidenhair fern in a matte black pot, kept on the middle shelf where indirect light and humidity from the coffee steam actually help it thrive
- Electrical/standout detail: Outlet mounted directly under the console’s overhang so the cord is invisible from standing height, plus blackened steel shelf brackets left exposed as a design choice rather than hidden
Why this works: Floating shelves only look intentional when the bracket hardware is treated as part of the design instead of something to disguise.
Most floating shelf setups try to hide their brackets, which almost always makes them look flimsier than they are. Leaving the blackened steel exposed here does the opposite — it reads as a deliberate industrial-meets-soft contrast against the plaster-pink wall, and it’s genuinely sturdier for holding ceramic mugs and glass canisters day to day. The maidenhair fern is doing real work, too, not just decoration. Ferns like this actually prefer the humidity that rises off a hot cup of coffee each morning, so placing one just above the machine gives it a better shot at surviving indoors than it would get on a random windowsill.
This setup earns its spot because it works in kitchens that can’t spare a single inch of base cabinetry — a narrow console and shelves above it take almost no floor footprint. The plaster-pink wall keeps the whole thing from feeling cold or clinical, which is a real risk with white oak and black metal alone. Staggering the shelf heights instead of lining them up evenly is a small detail that makes a big visual difference, giving the eye somewhere to move instead of reading as one flat block of storage.
5. Converted Reach-In Closet Bar
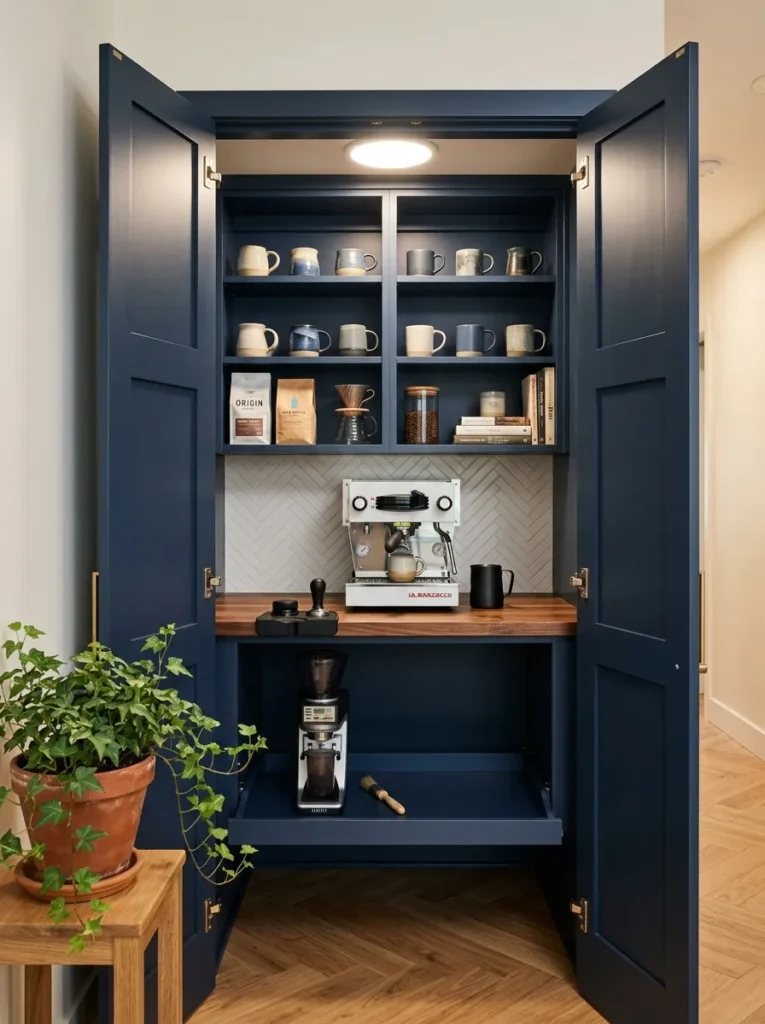
- Cabinetry/Surface: A former coat closet with the door removed and replaced by a pair of café-style swinging doors, interior painted in a deep navy (Benjamin Moore’s “Hale Navy” — verify before ordering)
- Countertop: A single piece of end-grain butcher block, chosen for durability in a tight, high-traffic space
- Equipment zone: Built around a stacked setup — espresso machine on the counter, grinder on a pull-out shelf below to save depth
- Storage: Full-height open shelving on both side walls for mugs, beans, and a small stack of towels
- Backsplash/wall: Navy paint extends up the full back wall, no separate backsplash material
- Lighting: A single flush-mount ceiling fixture, since the closet has no window and needs even overhead light rather than a directional sconce
- Plants: None inside the closet itself — a small pot of English ivy sits just outside the doors, since low light inside would kill most plants
- Electrical/standout detail: A dedicated 20-amp circuit run into the closet specifically for the espresso machine’s power draw, plus café doors that swing shut to hide the whole setup when guests come over
Why this works: A closet already has the framing, the door, and a nearby electrical run most built-ins require from scratch, which makes converting one the fastest way to gain a full coffee station without new construction.
Closets get overlooked constantly because people assume “storage closet” is the only job a closet can do. In my experience walking through client homes, an unused coat closet near the kitchen is one of the most wasted footprints in the whole house — it’s already got a door, already has framing for shelving, and usually sits within a few feet of an existing electrical run. My husband treats these conversions as some of the easiest wins on a renovation list, mainly because the hardest part of any built-in — the framing — already exists. The one thing he always checks first is whether the circuit can actually handle an espresso machine’s draw without tripping.
This idea solves a real problem: not every kitchen has spare counter space for a coffee bar, but almost every house has a closet doing very little. The café doors are the standout detail here — they let the whole station disappear behind a clean swinging panel instead of sitting out as visual clutter all day. Navy paint inside makes the small space feel intentional and cozy rather than cave-like, and the pull-out shelf for the grinder solves the depth problem that trips up most tight coffee setups.
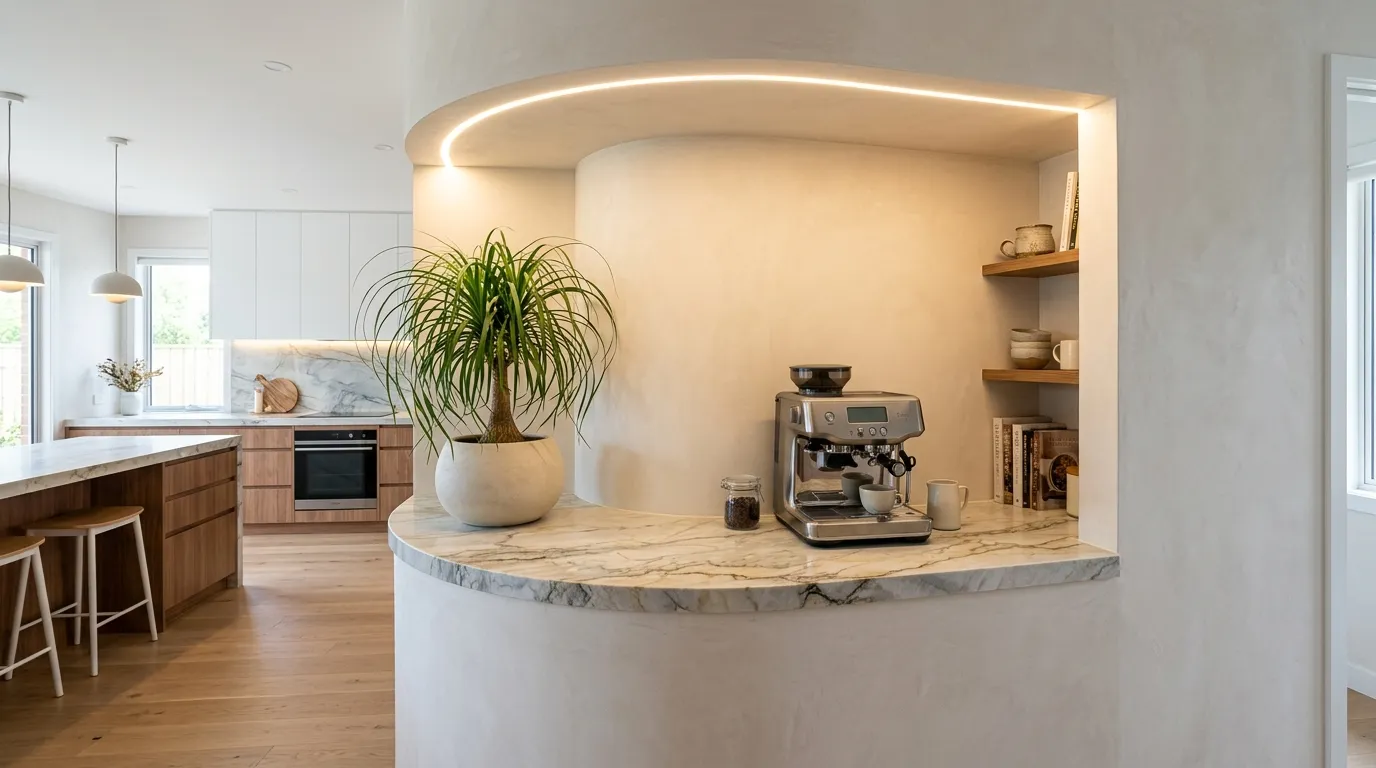
6. Curved Corner Nook
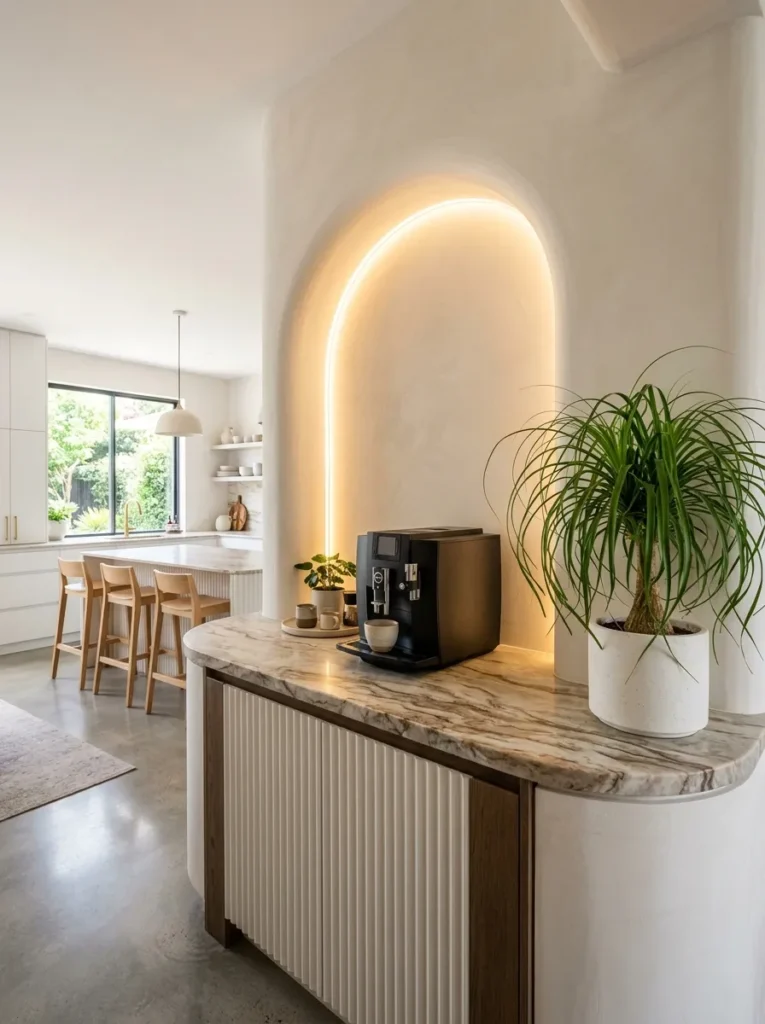
- Cabinetry/Surface: A custom curved cabinet front built into a kitchen corner, finished in a soft venetian plaster the color of unbleached linen
- Countertop: Curved-edge quartzite to match the rounded cabinet line, a small but real fabrication upgrade over a standard straight cut
- Equipment zone: Built around a bean-to-cup machine, positioned at the curve’s widest point for full clearance
- Storage: Two curved drawers below hold pods, filters, and a milk frother
- Backsplash/wall: Continuous plaster finish, curving with the cabinetry so there’s no visible seam where wall meets counter
- Lighting: A recessed puck light hidden under the upper curve, washing the counter in soft, shadowless light
- Plants: A small ponytail palm in a plaster-finish pot that echoes the wall texture
- Electrical/standout detail: Outlet built into the curve’s inner face rather than the back wall, since a flat outlet plate would have broken the rounded line
Why this works: Curved cabinetry solves the dead-corner problem that straight-lined coffee bars almost never address well.
Corners are the hardest spot in any kitchen to use without wasting space or creating an awkward reach, and a curve genuinely fixes that in a way square cabinetry can’t. This is where 2026’s shift toward soft, organic lines actually earns its place — it isn’t just an aesthetic trend, it’s solving a real spatial problem. Quartzite with a curved edge costs more to fabricate than a straight cut, so this idea sits at the higher end of the fifteen, but the payoff is a coffee station that feels sculptural instead of like an afterthought crammed into unused square footage.
The venetian plaster is the real standout here — it’s a material choice most coffee bar ideas skip entirely in favor of tile or paint, and it gives the whole nook a soft, matte warmth that catches light differently throughout the day. Hiding the outlet in the curve’s inner face instead of the back wall keeps the rounded line completely uninterrupted, which is a small fabrication detail most people wouldn’t think to request. This is a nook built for someone ready to treat their coffee corner as a genuine architectural feature, not just a functional add-on.
You May Also Love:15 Moody Farmhouse Kitchen Ideas for a Rich Cook Space
7. Outdoor Patio Coffee Station
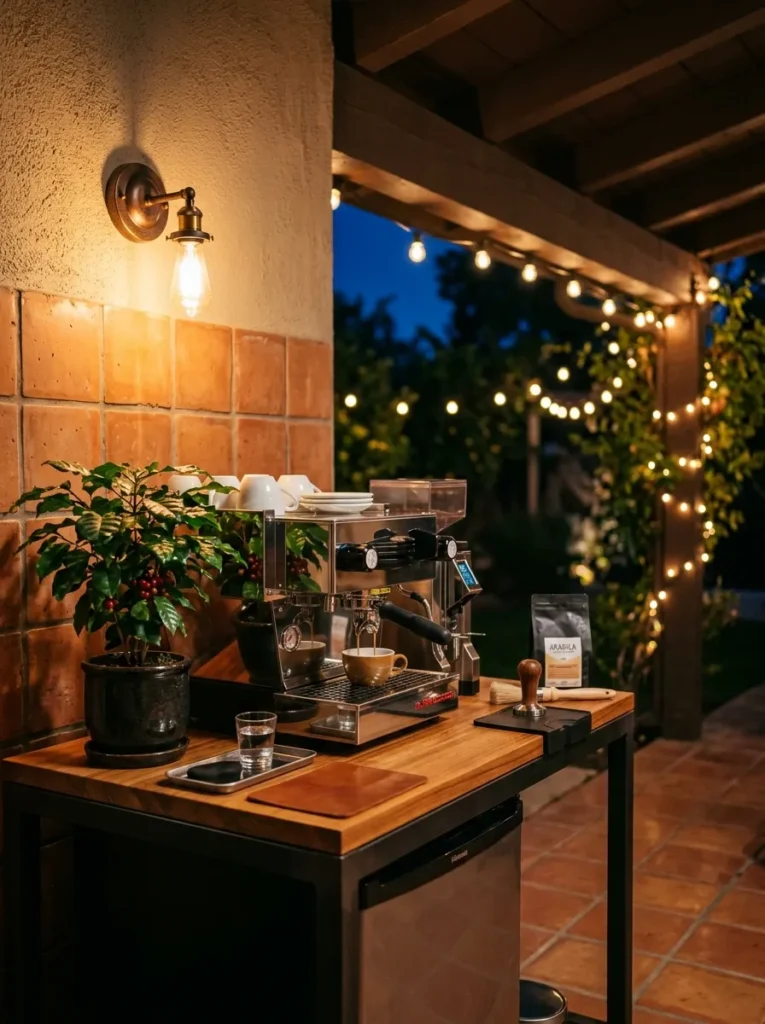
- Cabinetry/Surface: A weatherproof teak cabinet base with a stainless steel top, built against an exterior wall under a covered patio
- Countertop: Marine-grade stainless steel, chosen specifically for its resistance to Austin’s humidity and sun exposure
- Equipment zone: Built around a plumbed espresso machine with a direct water line, plus a small outdoor-rated mini fridge for milk
- Storage: A single weatherproof cabinet below holds outdoor-safe mugs and a covered bean canister
- Backsplash/wall: Exterior-grade porcelain tile in a warm terracotta, rated for both moisture and temperature swings
- Lighting: A weatherproof sconce with a warm bulb, wired to the same switch as the patio’s other exterior lighting
- Plants: A potted coffee arabica plant itself, purely ornamental in this climate but a genuine conversation piece next to the station
- Electrical/standout detail: A GFCI-protected outdoor outlet and a dedicated water line run underground from the house’s main supply, both planned before the patio’s concrete was poured
Why this works: A plumbed outdoor coffee station must be planned before the patio’s concrete is poured, since running a water line afterward means cutting into an existing slab.
A plumbed outdoor coffee station is one of the more involved builds on this list, and it’s not a weekend project — running a water line outdoors means trenching, and it needs to happen before any patio concrete goes down, not after. That’s a detail my husband’s crew flags on almost every outdoor kitchen request: people want the plumbed espresso machine, but they ask for it after the slab is already poured, which turns a straightforward job into a much bigger one. Get the timing right, and it’s a genuinely low-maintenance feature for years.
This idea earns its place by going somewhere the other fourteen don’t — outside. For anyone who spends mornings on a covered patio, a dedicated station means never carrying a hot mug across the yard. Marine-grade stainless and outdoor porcelain tile aren’t decorative choices here, they’re functional necessities against Austin’s heat and humidity swings. The arabica plant is a nice touch, but the real standout is the plumbed water line itself — it turns refilling a reservoir into a non-issue and makes the whole station feel like a permanent fixture rather than an appliance dragged outside for summer.
8. Walk-In Pantry Corner Station
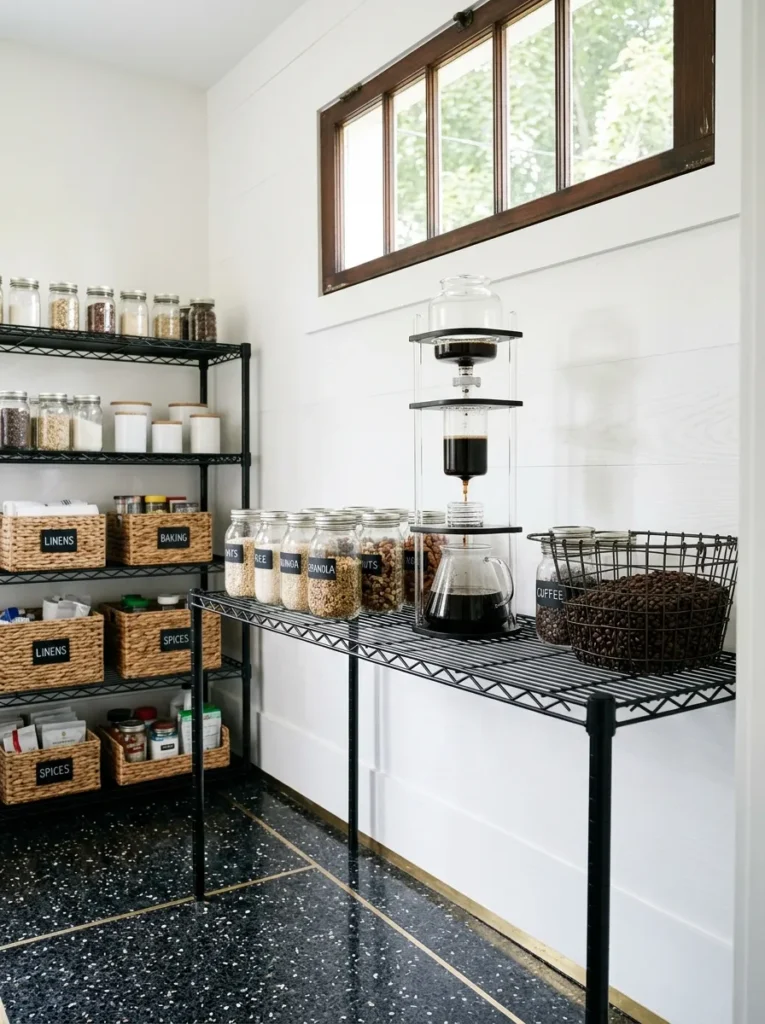
- Cabinetry/Surface: Black steel wire shelving units repurposed as the equipment stand, paired with a small brass-trimmed counter insert cut into the pantry’s existing shelf run
- Countertop: A slab of black-speckled terrazzo set into the shelf where the equipment sits, easy to wipe down in a tight space
- Equipment zone: Built around a cold brew tower with a glass reservoir, chosen because it needs no daily hands-on brewing time in a space people don’t linger in
- Storage: Wire baskets on adjacent shelves hold beans, filters, and a stack of mason jars for storing cold brew concentrate
- Backsplash/wall: Existing pantry wall left as simple white paint — the terrazzo and brass carry the visual interest instead
- Lighting: A salvaged transom window, added above the shelf during a pantry remodel, brings in real daylight where there wasn’t any before
- Plants: None — low, inconsistent light in most pantries makes this the one idea on the list that skips a plant entirely, and that’s fine
- Electrical/standout detail: A single outlet added to the pantry’s existing wiring run, positioned behind the terrazzo insert so the cold brew tower’s cord stays out of sight
Why this works: A cold brew tower removes the need for active daily attention or bright light, which is exactly what makes a windowless pantry corner a genuinely workable spot for a coffee station.
I didn’t think our pantry could hold a coffee station until my husband pointed out that it already had a windowless dead zone that was really just wasted shelf depth. Adding that transom window turned out to be a small job compared to what I expected — it borrowed light from the kitchen next door instead of needing new exterior framing. That one change made the whole corner feel usable instead of like a closet. It’s a good reminder that a lot of “no room for a coffee bar” situations are really just “nobody looked at the space they already had.”
This idea works because it doesn’t fight the pantry’s real limitations — no window, tight footprint, low daily light. A cold brew tower solves the light issue by removing the need for it altogether, since it steeps over hours rather than requiring active attention. Terrazzo and brass keep the corner from feeling purely utilitarian, even tucked inside a pantry. It’s a smart pick for anyone who wants a coffee station without giving up an inch of kitchen wall space to it.
9. Under-Stairs Angled Nook
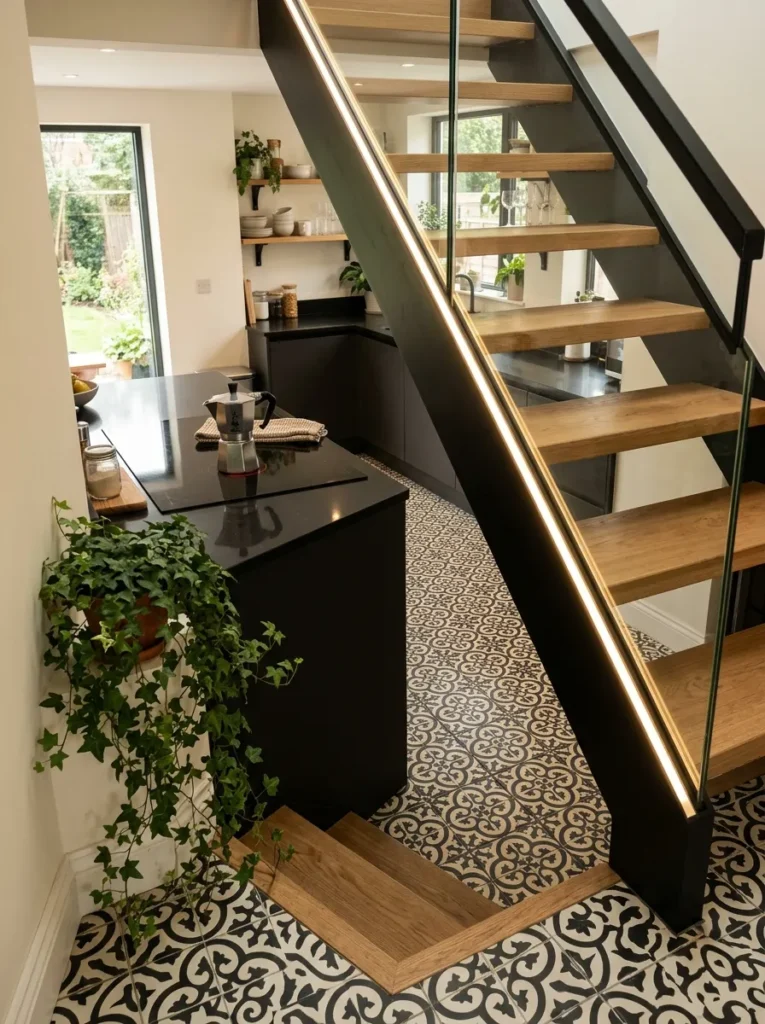
- Cabinetry/Surface: A custom cabinet built into the diagonal space beneath a staircase, framed in matte black steel with the stair’s white oak stringer left exposed as part of the design
- Countertop: A single angled slab of honed white marble, cut to follow the stair’s slope rather than sitting flat
- Equipment zone: Built around a stovetop moka pot and a small portable induction burner, since a full-size machine wouldn’t fit the shrinking headroom
- Storage: A shallow drawer at the tallest end holds the moka pot and filters; a low open cubby at the shortest end holds a stack of small cups
- Backsplash/wall: Encaustic cement tile in a black-and-white geometric pattern, covering the angled wall behind the counter
- Lighting: A slim LED strip run along the underside of the stair stringer, washing the angled counter in even light
- Plants: A small pot of trailing ivy tucked at the tallest end, where headroom allows a few inches of vertical growth
- Electrical/standout detail: The portable induction burner eliminates the need for a fixed gas or electrical hookup at the low end, which most under-stair spaces can’t support
Why this works: An under-stairs coffee nook works best with a portable induction burner rather than a fixed appliance, since the sloped ceiling limits both headroom and safe electrical placement at the low end.
This is one of the trickiest footprints in a house to design around, because the ceiling height changes dramatically across just a few feet. A moka pot and induction burner sidestep that problem entirely — there’s no espresso machine housing to squeeze under a shrinking slope, and the whole setup can shift position along the counter as headroom allows. The encaustic tile pattern draws the eye horizontally, which visually counters the diagonal ceiling line instead of emphasizing it.
What makes this nook distinct is how directly it responds to an architectural constraint most homes just leave unused. Under-stairs space is notoriously awkward, and this design doesn’t pretend otherwise — it works with the slope instead of against it. The exposed stringer and angled marble slab turn what could be a cramped afterthought into a genuinely striking detail, especially in an open-concept layout where the stairs are already a visual focal point.
10. Fold-Down Wall Panel Bar
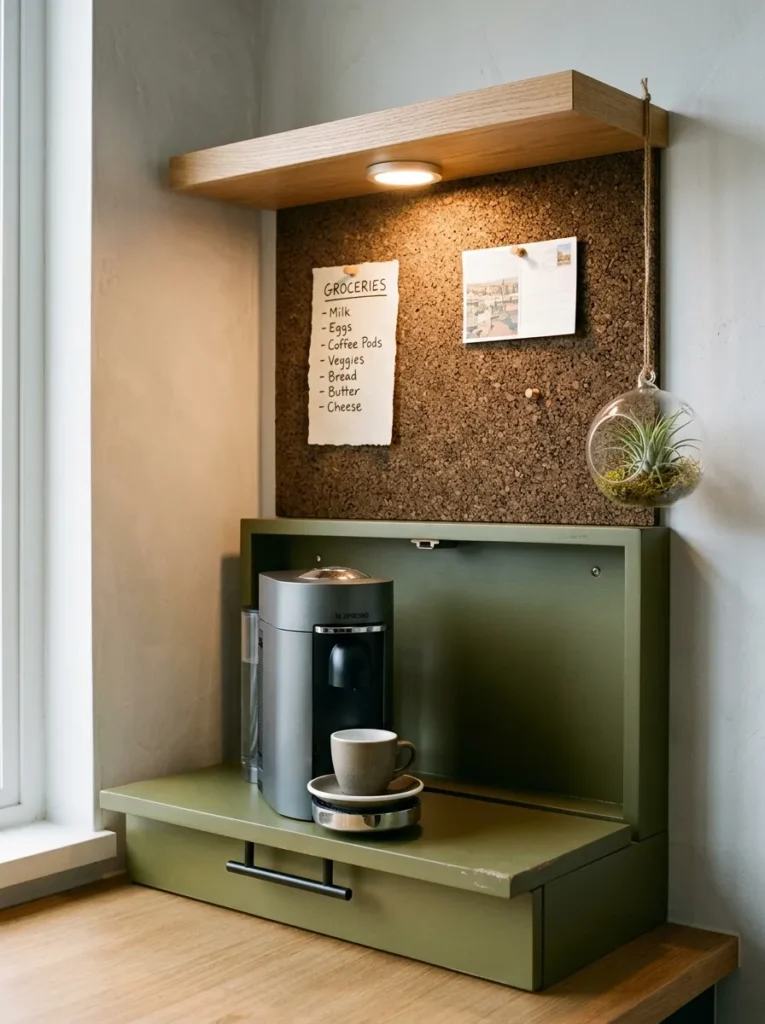
- Cabinetry/Surface: A single hinged panel in painted MDF, finished in a muted olive green, mounted flush to the wall on a heavy-duty brass piano hinge
- Countertop: The panel itself becomes the counter when lowered, reinforced underneath with a hidden steel support bracket for stability
- Equipment zone: Built around a compact pod-style espresso machine, chosen specifically for its light weight and small footprint on a fold-down surface
- Storage: A slim shelf above the panel, only 4 inches deep, holds a row of pods; a small hook rack beside it holds two mugs
- Backsplash/wall: Cork panel installed just above the fold-down unit, functioning as both backsplash and a small pinboard for recipe cards or a grocery list
- Lighting: A battery-operated puck light mounted under the shelf, since running new wiring to a fold-down unit isn’t always practical
- Plants: A single air plant tucked into a small wall-mounted glass globe beside the shelf, needing no soil or watering routine to maintain
- Electrical/standout detail: A single outlet mounted directly behind the panel, positioned so the cord tucks away completely when the panel folds flat against the wall
Why this works: A panel that folds completely flat gives the wall space back between uses, which is the one thing no fixed cabinet or cart can offer in a truly small kitchen.
This is the idea for anyone in a small apartment kitchen who’s been told, wrongly, that they don’t have room for a real coffee bar. In my experience helping friends in tiny rental kitchens, the panel folding flat when not in use is what actually sells people on trying this — it gives back the wall space entirely between uses, which no fixed cabinet or cart can do. The steel bracket underneath does the real work here, since a poorly reinforced hinge will sag under the weight of a machine within a few months.
The olive green and cork combination keeps this from reading as a purely space-saving gimmick — it looks intentional folded down or up. A pod machine is the right equipment choice for this format specifically, since anything heavier risks stressing the hinge over time. This is a genuinely renter-friendly idea: everything mounts with minimal wall damage, and the whole setup can come down cleanly when it’s time to move.
11. Waterfall-Edge Island Extension
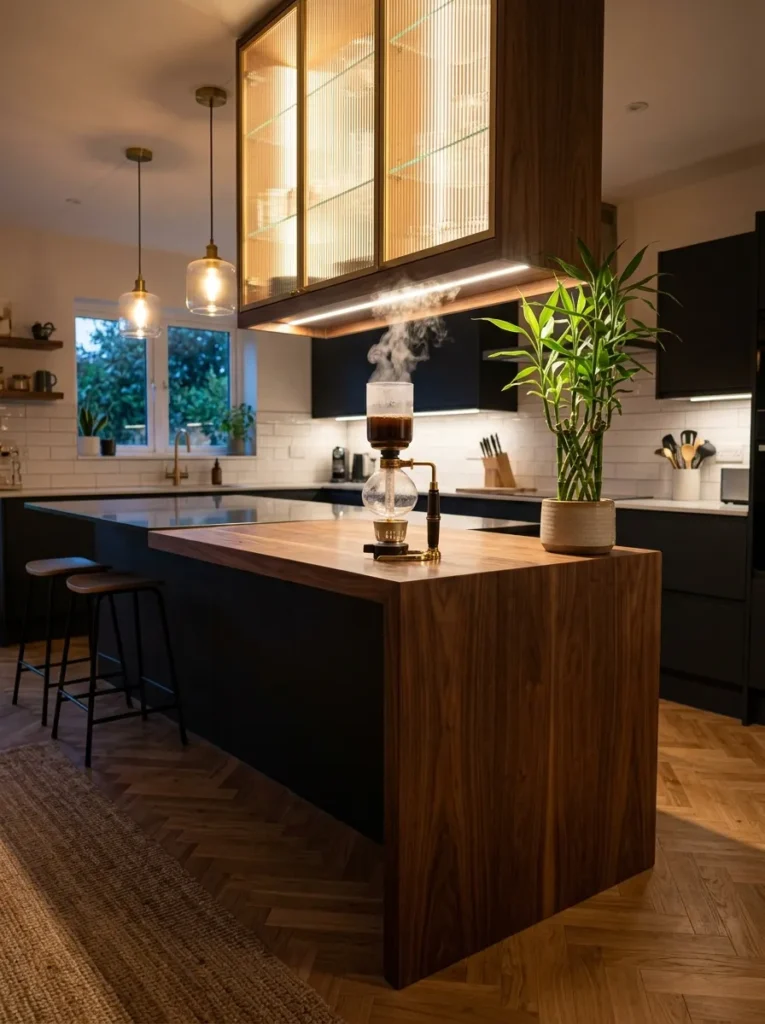
- Cabinetry/Surface: A walnut waterfall-edge extension built onto one end of an existing kitchen island, cabinetry below finished in the same walnut for a continuous, seamless line
- Countertop: The waterfall edge itself is the walnut butcher block, sealed with a food-safe oil finish rated for daily use
- Equipment zone: Built around a siphon-style vacuum coffee brewer, chosen for its visual theater — the brewing process itself is part of the design
- Storage: A single ribbed glass-front cabinet above holds cups and beans on display, lit from within
- Backsplash/wall: No wall involved — this idea sits at the island’s end, floating in the room rather than against a backsplash
- Lighting: An LED strip built into the underside of the ribbed glass cabinet, casting a soft glow onto the display shelf below
- Plants: A small pot of lucky bamboo on the counter’s edge, chosen for its ability to thrive without soil in a wet-prone spot near the brewer
- Electrical/standout detail: A matte black floor outlet installed directly beneath the island during construction, since running power up through cabinetry after installation would have meant cutting into finished walnut
Why this works: A siphon-style vacuum brewer works especially well on a kitchen island because the brewing process itself becomes visible, theatrical countertop activity rather than something hidden inside a machine.
Most coffee equipment disappears into its housing the moment it’s turned on — a siphon brewer does the opposite, with glass chambers and visible vapor that make the process part of the room’s daily rhythm. Floor outlets like this one need to go in during initial construction, since retrofitting one under finished walnut cabinetry means tearing into work that’s already done. Planning that detail early is what keeps the final result looking seamless.
An island extension earns its spot on this list because it uses space that’s already central to the kitchen instead of carving out a separate zone. The waterfall edge is a genuine upgrade over a standard countertop overhang, giving the whole extension a sculptural, furniture-like presence. Lit glass-front storage turns beans and cups into a display rather than clutter, and the siphon brewer’s visual drama makes this the most conversation-starting setup on the entire list.
12. Cane-Front Bay Window Bench
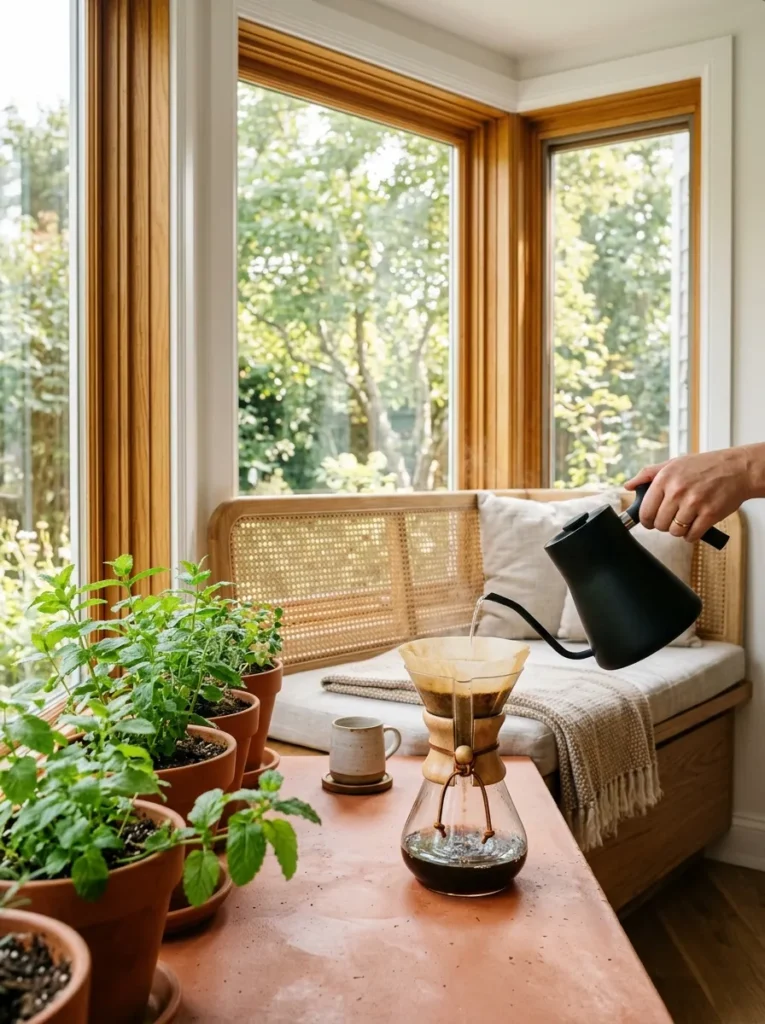
- Cabinetry/Surface: A built-in bench seat with cane-webbed cabinet doors below, set into a bay window, finished in a warm honey oak frame
- Countertop: A narrow terracotta-tiled ledge running along the window sill, serving as the actual work surface
- Equipment zone: Built around a Chemex pour-over setup, chosen because the ritual pairs naturally with sitting and watching the brew while looking outside
- Storage: Cane-front cabinets below the bench hold filters and a small stack of linen coasters; the bench lid lifts for extra bean storage
- Backsplash/wall: No backsplash — the window itself is the backdrop, framed by simple white-painted trim
- Lighting: Entirely natural daylight during the day; a small clip lamp with a linen shade for evening use
- Plants: A row of small potted herbs — mint and lemon balm — lined along the sill, chosen for scent that pairs well with a slower coffee ritual
- Electrical/standout detail: A single outlet mounted low on the side wall for the kettle, positioned so the cord runs behind the bench rather than across the window ledge
Why this works: Turning a bay window into a coffee corner gives a slow brewing ritual an actual reason to linger, which is something a built-in cabinet run against a wall can’t offer.
A bay window is one of the most underused spots in a kitchen for anything beyond a plant shelf, and turning it into a slow coffee corner solves a problem no built-in cabinet run can: it gives the whole ritual a reason to linger instead of rushing back to the counter. Cane webbing is the standout material here, and it’s a texture that shows up constantly in 2026 interiors precisely because it softens what would otherwise be a fairly boxy bench. The terracotta ledge keeps the whole setup grounded and warm rather than precious, which matters in a spot people will actually sit and use daily.
This idea works because it treats coffee-making as something worth sitting down for, not just a stop on the way out the door. A Chemex is the right equipment match for a bench like this — it’s slow, visual, and doesn’t need a dedicated outlet the way an espresso machine would. The herb row does double duty as both decor and a small daily-use ingredient source, and the lifted bench lid solves storage without adding a single visible cabinet to the window’s clean lines.
13. Blackened Steel Barn Door Armoire
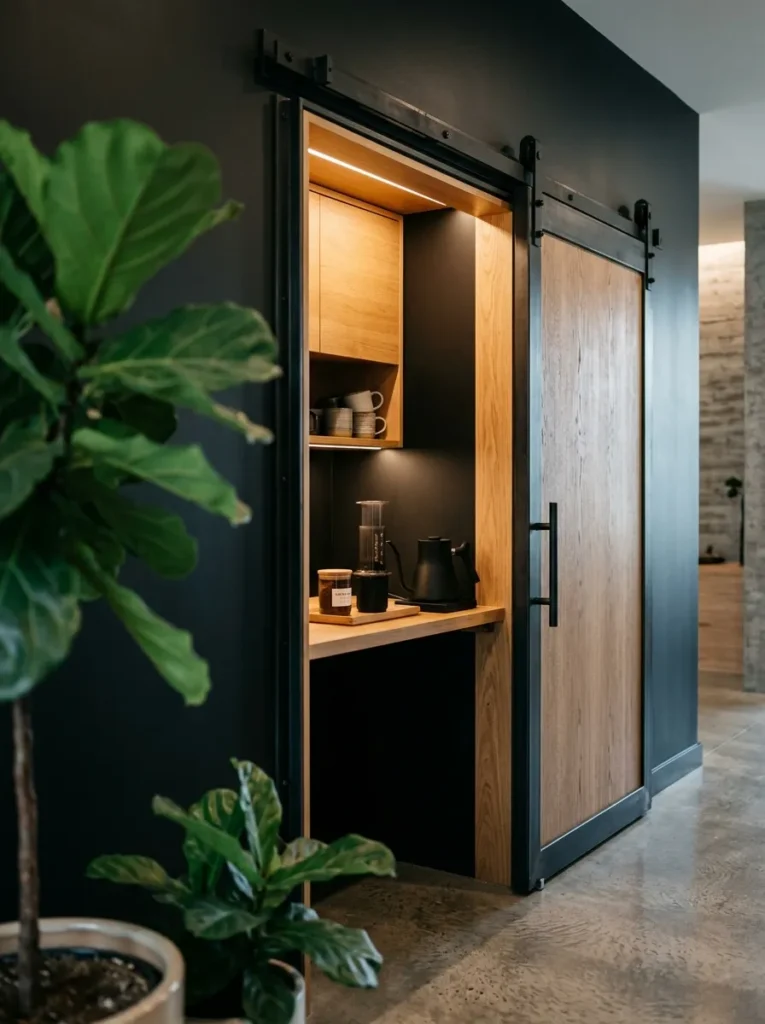
- Cabinetry/Surface: A tall freestanding armoire with a sliding blackened-steel barn door on an exposed track, interior finished in rift-sawn white oak
- Countertop: A pull-out rift oak shelf inside the armoire serves as the working counter, tucked away when the door slides shut
- Equipment zone: Built around an AeroPress and a small electric kettle, chosen for a setup compact enough to fully disappear behind a closed door
- Storage: Interior shelving holds a rotating stock of three to four bean bags, a scale, and a stack of paper filters in a labeled tin
- Backsplash/wall: None needed — the armoire’s interior back panel is simply painted matte black to match the door
- Lighting: A battery-operated motion-sensor puck light that switches on automatically when the door slides open
- Plants: None inside — a single fiddle leaf fig stands beside the armoire in the room itself, unrelated to the coffee setup but framing it visually
- Electrical/standout detail: The armoire is positioned over an existing floor outlet rather than requiring new electrical work, with a small cutout drilled in the back panel to route the cord internally
Why this works: A sliding barn door on a freestanding cabinet lets an entire coffee station disappear from view in seconds, which matters most for open-concept kitchens where every surface is visible from the living room.
This is the idea for someone who wants the coffee ritual available daily but doesn’t want small appliances as part of their kitchen’s permanent visual landscape. The motion-sensor puck light is a small but genuinely useful touch — no fumbling for a switch with hands full of beans and a kettle. Positioning the armoire over an existing outlet instead of running new wiring keeps the whole project a weekend job rather than a renovation.
This armoire earns its place by solving visibility rather than space. Most fixed coffee bars are designed to be looked at; this one is designed to be hidden until it’s needed. Rift-sawn oak inside gives it a warmth that contrasts nicely against the blackened steel exterior, so opening the door feels a little like uncovering something intentional rather than just accessing storage. It’s a strong option for anyone whose kitchen doesn’t have a spare wall or corner but does have room for one more freestanding piece.
14. Terracotta Pegboard Wall Station
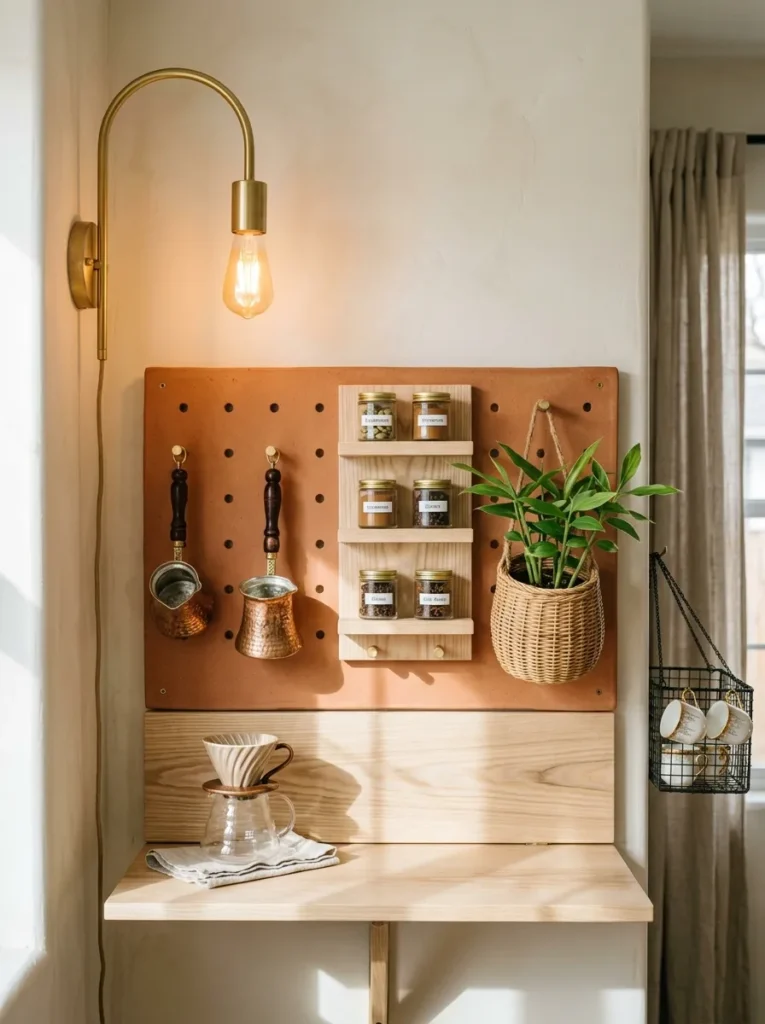
- Cabinetry/Surface: No cabinetry at all — a large painted pegboard panel in a warm terracotta finish mounted directly to the wall, with a small fold-down shelf as the only surface
- Countertop: The fold-down shelf is a single piece of solid ash, hinged to lie flat against the pegboard when not in use
- Equipment zone: Built around a stovetop cezve for Turkish coffee, since the setup needs almost no counter space — the actual brewing happens on the stovetop nearby
- Storage: Pegboard hooks hold two small cezve pots by their handles, a wall-mounted spice rack for cardamom and cinnamon, and a hanging basket for demitasse cups
- Backsplash/wall: The pegboard itself functions as the entire wall treatment — no tile, no paint beyond the terracotta base coat
- Lighting: A single adjustable gooseneck wall sconce, clamped to the pegboard’s edge and repositionable as needed
- Plants: A small cardamom plant in a woven basket planter, hung from one of the pegboard hooks
- Electrical/standout detail: No dedicated outlet required, since the cezve brews on the stovetop — this is one of the only ideas on the list with zero electrical planning needed
Why this works: Brewing on the stovetop instead of with an appliance removes the outlet, counter depth, and plumbing planning every other idea on this list requires, making it the easiest station here to install yourself.
I’ve noticed pegboard gets dismissed as a garage material, but painted in the right color and hung with the right objects, it works just as well in a kitchen. This station skips almost every planning headache on this list — no outlet, no plumbing, no counter depth — because a cezve brews on the stovetop rather than needing its own footprint. That makes it one of the easiest ideas here to actually install yourself over a weekend, no contractor required.
Terracotta pegboard is the standout choice, giving the whole wall warmth and texture instead of the flat, utilitarian look pegboard usually carries. Hanging the cezve pots by their handles turns functional storage into a display, and the cardamom plant nods to the spices traditionally paired with Turkish coffee itself. This idea is best for someone drawn to a specific brewing ritual rather than a full equipment lineup — it’s intentionally minimal, and that restraint is exactly what makes it feel considered rather than empty.
15. Reclaimed Barn Wood Mudroom Bench Station
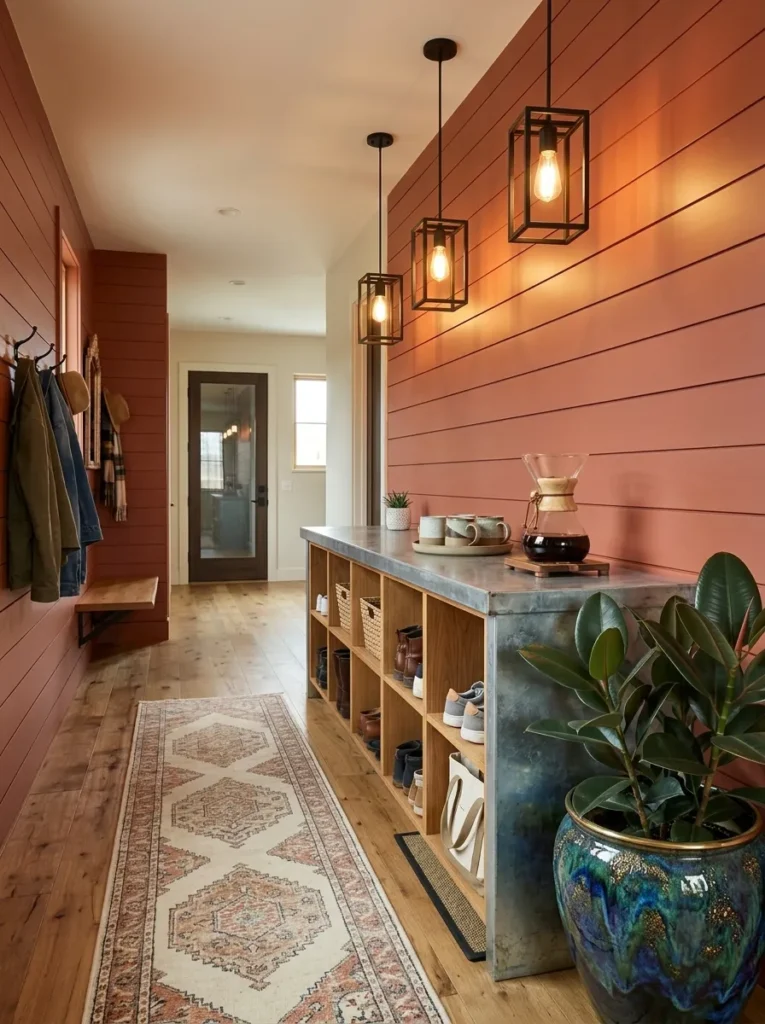
- Cabinetry/Surface: A long built-in bench with reclaimed barn wood facing and a galvanized steel counter above, set into a mudroom just off the kitchen
- Countertop: Galvanized steel sheet, chosen for durability against muddy boots and backpacks nearby, easy to wipe down
- Equipment zone: Built around a large-capacity drip carafe system, sized specifically for brewing enough for a family of four to five rather than a single serving
- Storage: Open cubbies below the bench, shared with shoe and bag storage, with one dedicated cubby lined in a removable tray for mugs
- Backsplash/wall: Shiplap painted in a deep clay red, extending the full height of the wall behind the counter
- Lighting: A row of exposed-bulb pendant lights on a black cord, hung at staggered heights above the counter
- Plants: A large potted rubber plant in a galvanized steel tub in the corner, tough enough to handle the mudroom’s temperature swings near an exterior door
- Electrical/standout detail: A dedicated outlet on its own circuit, sized for a higher-wattage carafe system than a standard countertop coffee maker would need
Why this works: A high-capacity setup built for volume rather than ritual is what actually holds up for a busy household, since a family of five needs a full carafe fast, not a slow single-serving process.
A high-capacity coffee station makes far more sense in a busy family’s mudroom than a single-serving setup ever would, and that’s the gap this idea fills — everything else on this list assumes one or two people, but a family of five needs volume, not ritual. My husband’s crews run into this constantly with larger households: a standard 15-amp outlet is fine for a small drip machine, but a bigger carafe system pulling more wattage benefits from its own dedicated circuit, especially if it’s running alongside a mudroom’s washer and dryer nearby. Getting that circuit sized correctly up front avoids a tripped breaker on a Monday morning.
This station earns its place by being the most practical, least precious idea on the list, and that’s the point. Galvanized steel and reclaimed barn wood can take real daily abuse — muddy hands, dropped mugs, backpacks leaning against the bench — without showing wear the way a marble counter would. The clay red shiplap keeps it from feeling purely utilitarian, and the staggered pendant lights add just enough visual interest to make the corner feel designed rather than incidental. For a house with kids and a morning rush, this is the setup that actually survives daily use.
Styling Principles: Plan the Plug Before You Plan the Pretty
Every idea in this list works because the equipment came first and the styling came second, not the other way around. Before choosing a single tile or paint color, figure out three things: how much depth your equipment actually needs (most machines and grinders want 14 to 18 inches), where the nearest outlet is or needs to be added, and whether that outlet can handle the wattage of what you’re plugging in. The single biggest reason home coffee bars stop getting used is that the equipment was styled around instead of planned for from the start.
Once the functional bones are settled, the design choices — cane webbing, terracotta, blackened steel, whatever fits your kitchen — are the easy, fun part. Skip that order, and even the most beautiful setup ends up pushed to the side within a month.
Frequently Asked Questions
How much counter depth does a coffee bar need? Most home coffee equipment needs 14 to 18 inches of usable counter depth. Espresso machines and grinders in particular need that full range to sit safely without overhanging the edge, so measure your actual equipment before finalizing cabinetry.
What’s the best storage for coffee accessories? A mix of open and closed storage works best — open shelving for daily-use mugs you want within reach, and closed cabinetry or drawers for beans, filters, and syrups that don’t need to be on display or exposed to light.
What are some budget-friendly modern coffee bar ideas? A repurposed vintage cabinet, a fold-down wall panel, or a pegboard wall station are the most budget-friendly setups on this list, since none require new plumbing, dedicated circuits, or custom cabinetry.
How do I hide cords on a coffee bar? Plan the outlet location before installing any cabinetry or shelving. Outlets mounted behind backsplash tile, inside a cabinet cutout, or directly under a fold-down panel keep cords out of sight without needing an extension cord or a cord cover.
What are good small-space coffee bar solutions? A bar cart, a fold-down wall panel, or a converted closet are the strongest small-space options, since none require dedicated floor footprint or permanent counter space the way a built-in nook does.
Do I need a dedicated outlet for an espresso machine? Not always, but for higher-wattage machines or setups serving more than two people, a dedicated circuit prevents a tripped breaker, especially if the coffee bar shares a circuit with other kitchen appliances.
Conclusion
A great coffee bar isn’t about finding the prettiest photo to copy — it’s about matching a setup to how you actually make coffee every day. Whether that’s a five-minute pour-over by a window or a full espresso routine tucked into a closet, these modern coffee bar ideas are built to hold up past the first week. Pin the one that fits your space and your morning, and don’t be afraid to adjust the details to your own kitchen’s layout.
I’ve watched enough of these come together in real homes to know the ones that stick are always the ones planned around real daily use. Save this post, try one idea this month, and pass it along to anyone still making coffee over a cluttered counter.