15 DIY Fall Leaves Decor Ideas That Last
Fall leaves are everywhere in October, and most of them are gone by November. That’s not bad luck — it’s chemistry. The moment a leaf is picked, it starts losing moisture and breaking down the very pigments that made it beautiful in the first place, which is why so many DIY fall leaves decor ideas end up curling, fading, or crumbling within a couple of weeks of being displayed. I’ve thrown out more than one gorgeous garland that didn’t make it past Halloween. The good news is that a few real preservation techniques — glycerin soaking, pressing, wax dipping — can stretch that lifespan from days into months, sometimes years.
This post walks through fifteen ways to bring real, preserved leaves into every room of your home, with the actual method behind each one so your fall decor still looks beautiful well into the season.
Why Most DIY Fall Leaf Crafts Don’t Survive the Season
Here’s what nobody tells you when you’re gathering leaves off the sidewalk: the moment you pick them, they start dying. Fresh leaves keep losing moisture and breaking down their chlorophyll and carotenoid pigments after they’re cut from the branch, which is exactly why untreated leaves curl, dull, and turn brittle within days of sitting on your mantel. A pressed or glycerin-preserved leaf can hold its color and shape for months, while an untreated leaf typically starts curling within 48 to 72 hours of being brought indoors. I learned this the hard way after a gorgeous gingko garland turned to confetti on my dining table in under a week. This post walks through fifteen genuinely preserved leaf projects, spread across every room, that are actually built to last.
Glycerin Oak Leaf Table Runner
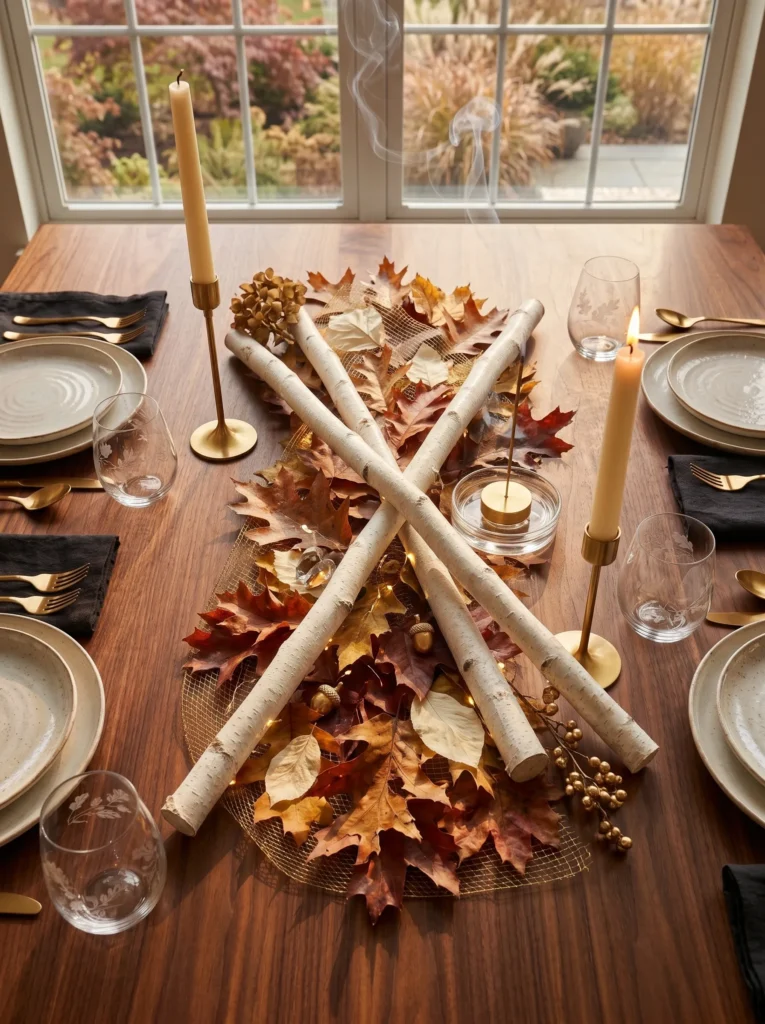
- Leaves to use: Red oak and sugar maple, picked while still pliable, before the first hard frost hits
- Preservation method: A two-week glycerin soak (one part glycerin to two parts water) draws the sap out and pulls the solution in, keeping leaves soft instead of crumbly
- Time & cost: About 20 minutes of prep, roughly $8 for a bottle of glycerin, then two weeks of hands-off waiting
- Styling placement: Lay leaves in a loose, overlapping line down the table’s center, mixing in a few unpeeled birch branches for height
- How long it lasts: Six months to a year, with color that stays warm rather than fading to brown
Why this works: Glycerin-preserved leaves stay soft and pliable long after untreated leaves would have curled and dropped their color.
Most fall centerpieces last two weeks, tops. Glycerin preservation changes that math. Unlike drying, which pulls moisture out and leaves foliage stiff and prone to cracking, glycerin replaces the water inside the leaf’s cells with a solution that keeps the tissue flexible. That’s why a glycerin-treated oak leaf can bend without snapping months after it was picked. For a table runner, that flexibility matters: leaves need to drape and overlap naturally instead of lying flat and brittle. Sugar maple and red oak both take glycerin well, holding their color through the process instead of fading out.
Sugar maple leaves preserved in glycerin tend to hold their deep amber and burgundy tones better than any other common variety, which is why florists reach for them first. I’ve used this exact method for three years running, and the leaves from my first batch are still soft enough to bend around a candlestick. What surprised me most was the smell — a properly glycerin-soaked leaf has almost no scent at all, which makes it safe to use near food on a dining table. Skip leaves that are already crisp or curling when picked; they won’t absorb the solution evenly, and you’ll end up with patchy, stiff sections mixed in with the good ones.
Pressed Gingko Wall Gallery
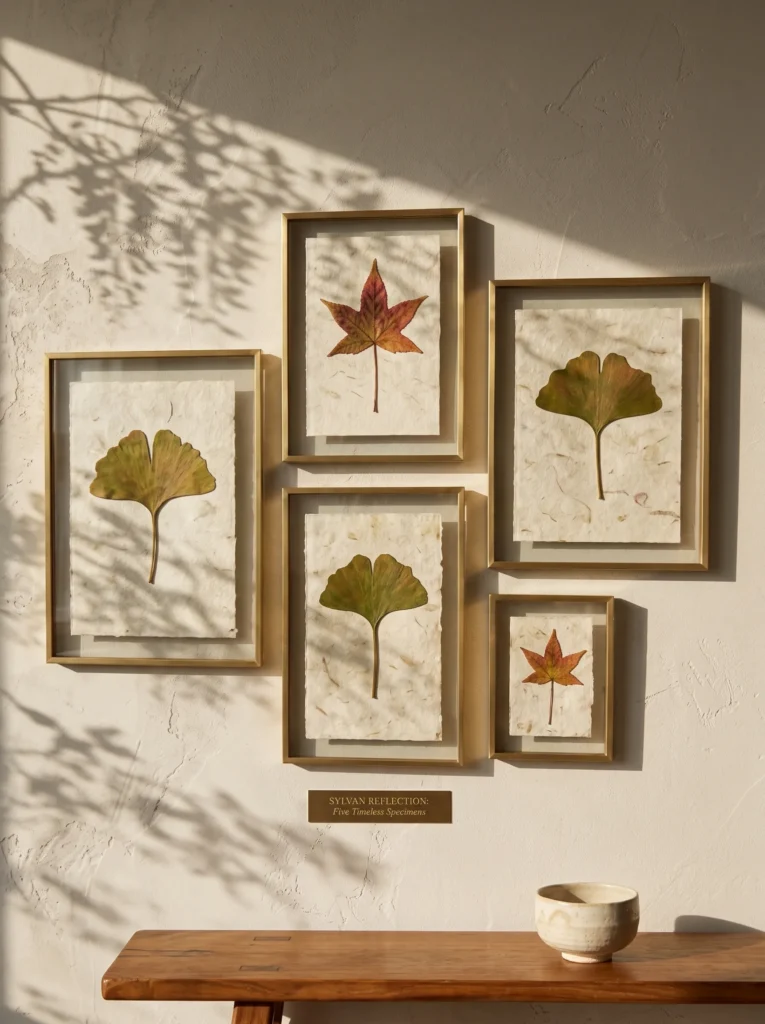
- Leaves to use: Gingko biloba and sweetgum, chosen for their flat, symmetrical shapes that press cleanly
- Preservation method: Pressed for 10–14 days between sheets of parchment paper inside a heavy book, or a flower press for faster, more even results
- Assembly: Mounted individually on cream cardstock inside thin black or brass frames, arranged in an asymmetrical grid rather than a perfect grid
- Time & cost: A weekend project — pressing is passive, framing takes about an hour; budget $10–15 per frame depending on size
- How long it lasts: Pressed leaves behind glass can last for years since the frame protects them from humidity and light exposure
Why this works: A pressed leaf framed under glass is protected from the humidity that causes most dried botanicals to eventually crumble.
There’s a reason botanists have pressed specimens for centuries instead of just drying them loose: pressing removes moisture gradually and evenly while keeping the leaf completely flat, which prevents the curling and cracking that ruins air-dried leaves within days. Gingko leaves are especially well suited to this because their fan shape and waxy surface hold up under the weight of a press better than thinner, more delicate leaves do. Sweetgum adds contrast with its star-shaped silhouette and deeper red-purple color. Framed together in a scattered gallery arrangement, the two varieties read as an intentional botanical study rather than a random collection of pressed leaves.
I keep a small gingko gallery in my home office, and it’s the one fall decoration guests always ask about — mostly because they assume the leaves are printed, not real. Gingko is worth seeking out even if you don’t have a tree nearby; many botanical gardens and city sidewalks have them, and the fan shape presses almost perfectly flat with very little warping. Hang frames in odd numbers — three, five, or seven — at slightly varied heights rather than a rigid line. That small asymmetry is what keeps the wall from looking like a corporate lobby display instead of a personal collection.
Wax-Dipped Mirror Frame Accent
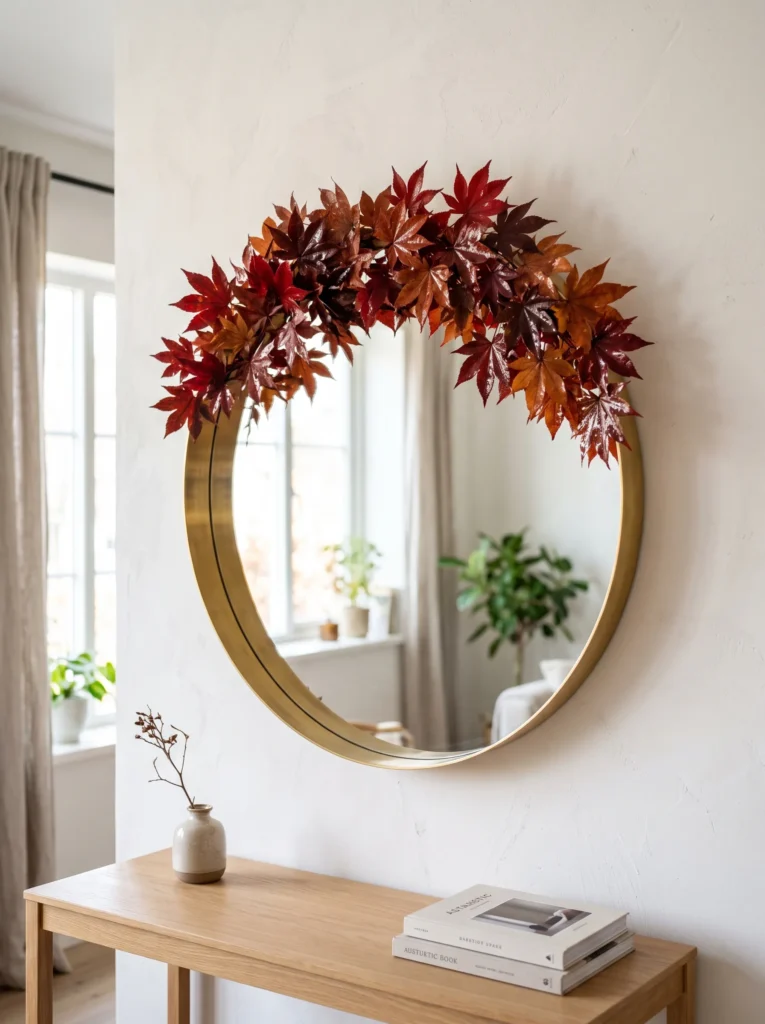
- Leaves to use: Japanese maple, prized here for its small size and deeply lobed silhouette
- Preservation method: Leaves dipped briefly in melted paraffin wax, which seals the surface and locks in color and shine
- Mounting approach: Leaves attached with small dots of hot glue directly to the mirror’s existing frame, working in a loose, uneven cluster rather than a symmetrical wreath
- Construction note: My husband always checks that a mirror frame is solid wood or heavy composite before anything gets glued to it — thin veneer frames can warp or peel under the heat of a glue gun
- How long it lasts: Wax coating holds shine and shape for two to three months, even in a humid bathroom or entry
Why this works: A thin wax coating seals moisture inside the leaf, giving it a glossy, almost lacquered finish that catches light differently than a dry, matte leaf.
Wax-dipped leaves behave nothing like their dried counterparts. Where a naturally dried leaf goes matte and dull within a week, a wax-sealed one keeps a glassy sheen that actually reflects light, which is exactly why this technique works so well next to a mirror — the leaves and the glass end up trading light back and forth instead of competing for it. Japanese maple is the right leaf for this job because its small, star-shaped form doesn’t overwhelm a mirror frame the way a larger oak or sycamore leaf would. Clustered along just the top third of the frame, the leaves read as an accent rather than a full wreath.
I tried this first on a thrifted brass mirror in my entryway, expecting the wax to look cheap or plasticky. It didn’t — it actually deepened the maple’s red into something closer to lacquered cherry wood. One thing I’ve noticed: dip the leaves stem-first and hold them by a clothespin so your fingers never touch the melted wax, which stays hotter than most people expect. Work in a well-ventilated space, since melting paraffin does give off a faint odor. Let each leaf drip-dry over parchment paper for about ten minutes before it’s ready to glue in place.
Dried Branch Corner Vessel
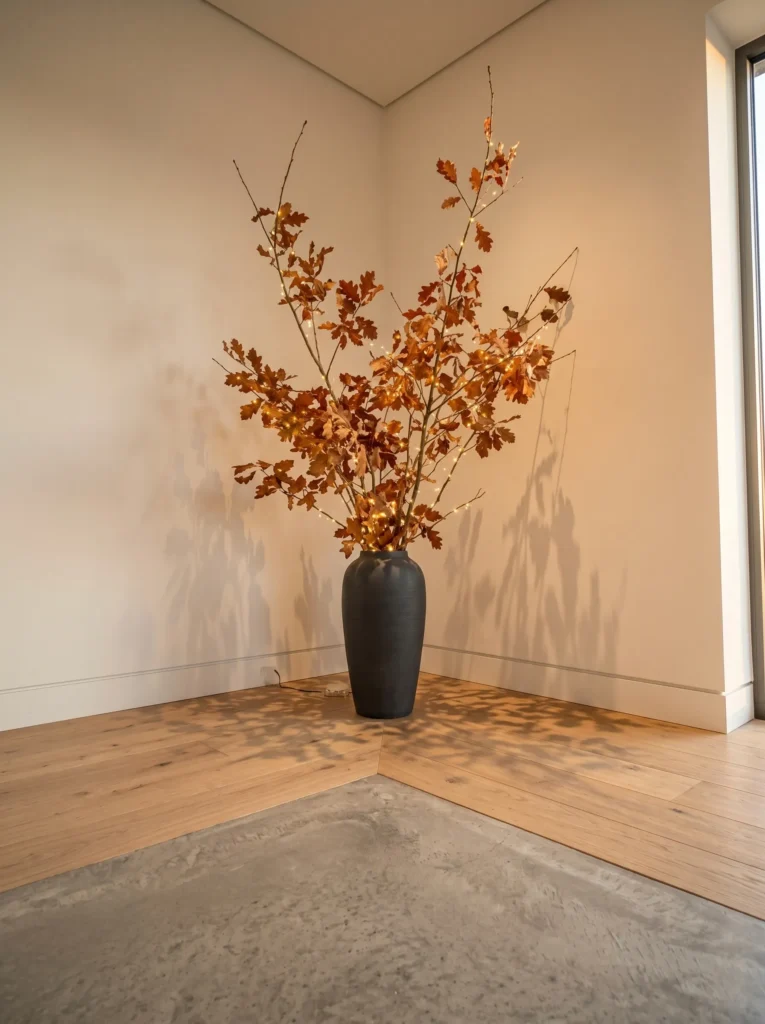
- Leaves to use: Whole oak branches with leaves still attached, air-dried rather than picked loose
- Preservation method: Hung upside down in a dry, dark closet for two to three weeks until the leaves stiffen and the branch itself dries out
- Vessel choice: A tall, narrow stoneware or concrete floor vase, roughly 24–30 inches, to give the branches enough height to feel architectural rather than accidental
- Placement: An empty corner that currently has nothing in it — the goal is filling dead space, not competing with existing furniture
- How long it lasts: Fully dried branches can last an entire season or longer, since there’s no moisture left to break down
Why this works: Air-drying whole branches preserves their natural curve and structure, giving a floor arrangement architectural height that loose stems can’t match.
Every home has one corner that never quite gets decorated — the one between the sofa and the window, or the dead space behind a reading chair. That’s exactly where a tall branch arrangement earns its keep. Because the leaves and branch dry together as one piece instead of being reattached individually, the whole arrangement keeps its natural bend and asymmetry, which is what makes it look gathered from the yard rather than assembled. Oak works particularly well since its leaves are sturdy enough to survive the drying process without shattering, unlike more delicate leaves such as birch or aspen.
I use this exact arrangement every October in the corner behind my reading chair, and it’s the lowest-effort project in this entire list — no glue, no wax, no soaking, just time. The branches I cut this year came from a storm-damaged oak in my own backyard, which is worth mentioning because you don’t need a perfect specimen; slightly irregular, curved branches actually look better in a tall vase than straight ones. Choose a vessel with some visual weight to it, since a floor arrangement this tall can look top-heavy in anything narrow or lightweight like thin glass.
Pressed Leaf Bookend Shelf Styling
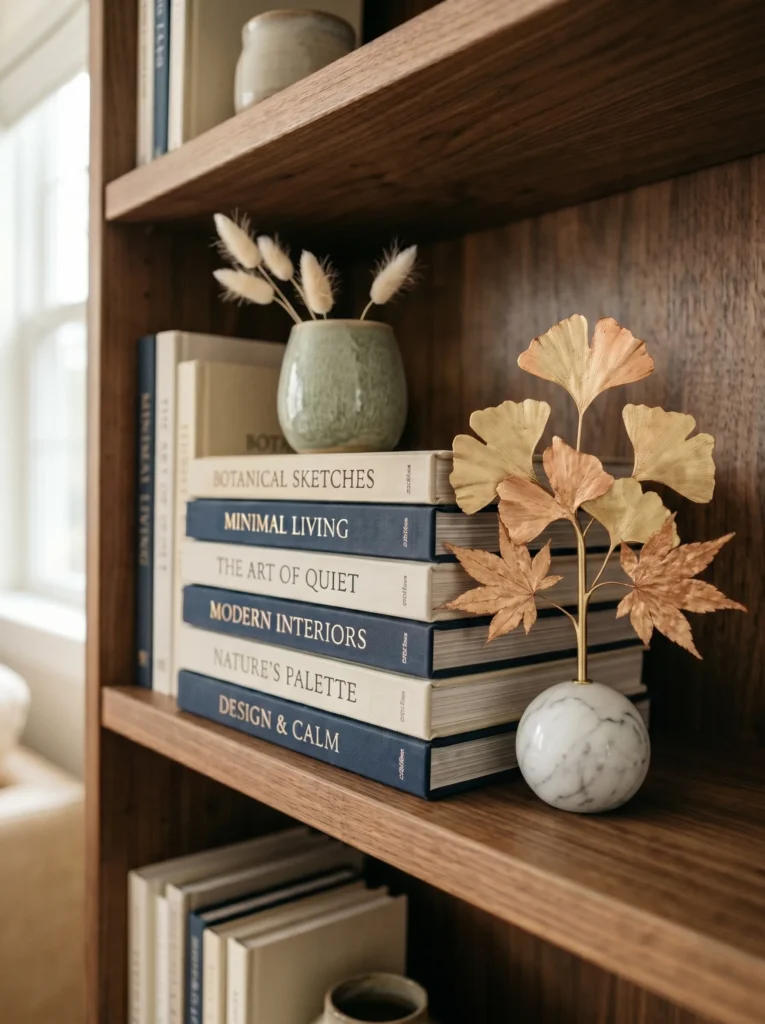
Layering botanicals into bookshelves is one of the fastest ways to make built-ins look curated instead of cluttered. Pressed sweetgum and Japanese maple leaves, tucked between stacked books and propped against a small ceramic vase, add color without taking up real shelf space.
- Leaves to use: Sweetgum and Japanese maple, chosen for their small scale next to book spines
- Preservation method: Pressed flat for 10 days, then lightly coated with a matte spray sealant to prevent curling from shelf humidity
- Styling approach: Lean 2–3 pressed leaves against a stack of horizontal books, propped with a small brass bookend or a smooth river stone
- Time & cost: Under 30 minutes to style once leaves are pressed; sealant runs about $6 a can
- How long it lasts: Four to six months indoors, longer if kept out of direct sun
Why this works: Small pressed leaves fill the awkward negative space between books without adding bulk or shrinking usable shelf room.
Bookshelves either look intentional or look like storage, and the difference usually comes down to what’s filling the gaps. A pressed leaf leaning against a stack of books does more visual work than most decor objects twice its size, because it introduces color and organic shape without needing its own dedicated shelf real estate. Sweetgum’s star shape and reddish tone read well against neutral book spines, while Japanese maple adds a finer, lacier texture. Since the leaves are already flat from pressing, they sit naturally against vertical surfaces instead of curling away from them the way a fresh leaf would within days.
I rearrange my living room shelves every fall, and the leaf-and-bookend combination is the one styling trick that consistently gets photographed by friends who visit. What I’ve noticed after several seasons of doing this: leaves pressed and sealed with a light matte spray hold their shape noticeably longer than unsealed ones, especially on shelves near a window where afternoon humidity swings throughout the day. Skip glossy sealants here — they can make pressed leaves look plastic under indoor lighting, which undercuts the whole point of using real botanicals in the first place.
Preserved Leaf Swag Over the Front Door
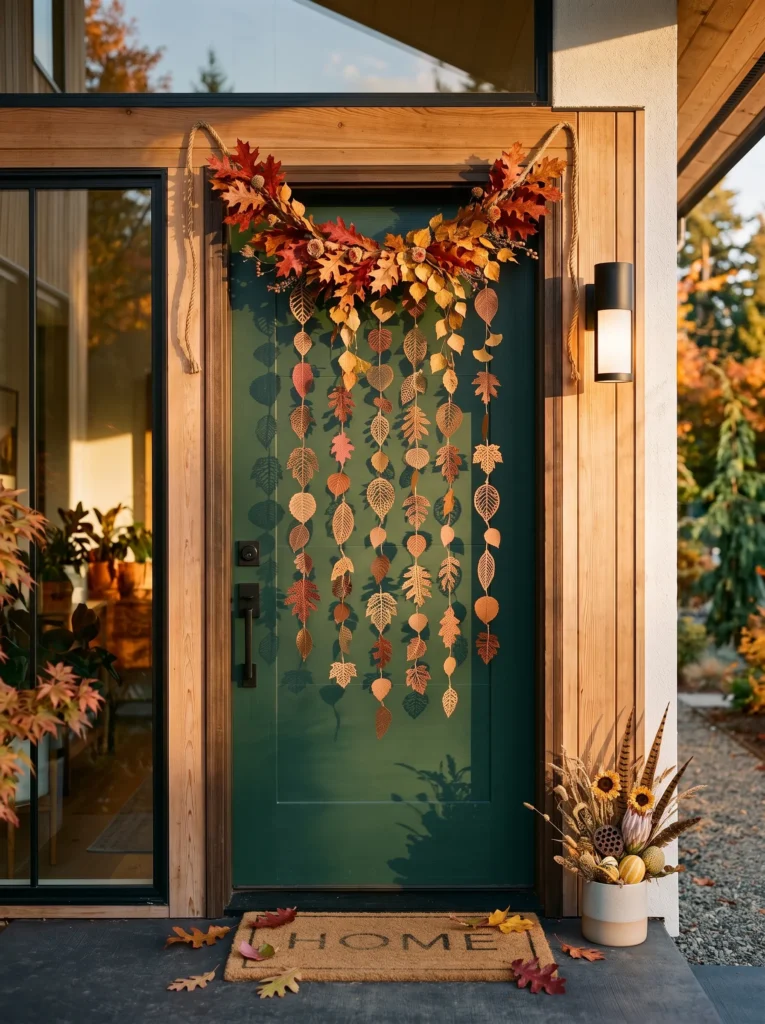
Most entryway fall decor defaults to a wreath, which is exactly why a horizontal leaf swag stands out. Hung above the door frame instead of centered on the door itself, it changes the whole entry line without blocking the door’s hardware or sightline.
- Leaves to use: Red oak and birch leaves, both sturdy enough to hold up outdoors through fluctuating fall weather
- Preservation method: Glycerin-soaked for durability against outdoor humidity swings, since untreated leaves left outside dry out even faster than indoor ones
- Construction detail: My husband always recommends mounting swags to the door frame’s trim, not the door itself, using small finish nails rather than adhesive hooks that can fail in heat or rain
- Assembly: Leaves wired in small clusters along a length of jute twine, then draped in a loose arc above the doorway
- How long it lasts: Glycerin treatment holds up better than dried leaves in outdoor humidity, typically lasting six to eight weeks outside before fading
Why this works: Mounting to the door frame instead of the door itself means the swag never has to be removed or rehung every time the door opens.
A wreath announces itself the second you walk up; a swag reveals itself more slowly, which is part of why it photographs so well against a painted front door. Because glycerin-treated leaves resist the moisture loss that untreated leaves experience almost immediately once picked, they hold their color and flexibility outdoors far longer than leaves in a typical dried wreath. Red oak brings depth and structure to the arc, while paper-thin birch leaves add movement whenever there’s a breeze. The horizontal line also does something a round wreath can’t: it draws the eye across the whole width of the entry, not just to a single center point.
I switched to swags over wreaths three years ago after my glycerin oak wreath kept swinging into the door every time someone left in a hurry. Frame-mounted swags solved that instantly, since the door itself never touches them. One detail that surprised me: outdoor humidity actually helps glycerin-preserved leaves stay flexible longer than they’d stay indoors, where dry heating air pulls moisture back out. If your entry gets direct afternoon sun, expect faster fading regardless of preservation method — position the swag on the shadier side of the frame if you have a covered porch to work with.
Leaf-Woven Café Curtain Rod
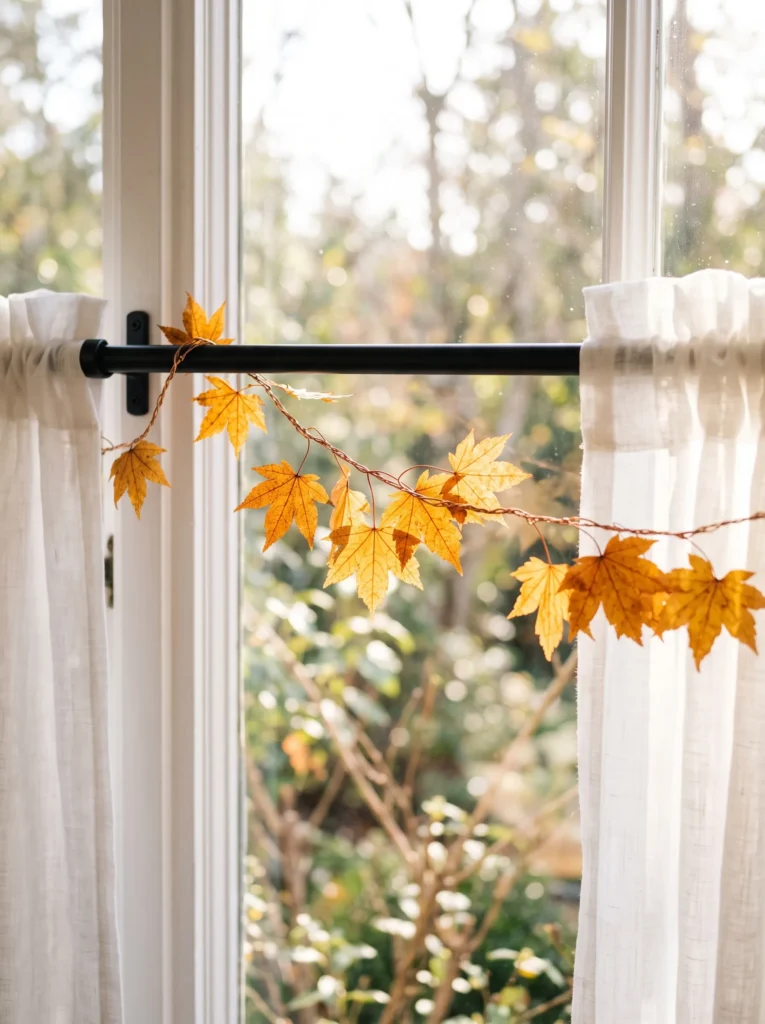
A leaf garland strung along a café curtain rod turns an ordinary window into a seasonal focal point without blocking any actual light. It’s a placement most fall decor lists skip entirely, which makes it one of the more distinctive ideas in this list.
- Leaves to use: Small maple and birch leaves, chosen specifically for their light weight so they don’t strain the rod or curtain clips
- Preservation method: Air-dried flat for one week, then given a light matte spray seal to prevent excess shedding
- Assembly: Leaves threaded onto thin copper wire in small clusters, then wrapped loosely around the existing curtain rod between the fabric panels
- Time & cost: About 45 minutes to assemble, roughly $12 in copper wire and leaves gathered for free
- How long it lasts: Six to eight weeks before leaves start shedding noticeably and need replacing
Why this works: Wrapping the garland around the rod itself, rather than hanging it separately, keeps the window’s actual light-filtering function completely undisturbed.
Most people don’t think of a curtain rod as decor real estate, which is exactly why it works so well here — nothing else in the room is competing for attention at that height. Lightweight leaves matter more in this placement than almost any other in this list, since a garland that’s too dense can pull curtain clips loose or sag unevenly along the rod. Small maple leaves keep their shape well even after drying, and their warm amber tone catches window light in a way that heavier oak leaves simply don’t from that close a distance. The result reads as a delicate, almost jewelry-like detail rather than a bulky seasonal addition.
I first tried this on the café curtains in my kitchen nook, mostly out of curiosity about whether it would look finished or half-done. It read as intentional almost immediately, especially once morning light started coming through the leaves themselves rather than just around them. One practical note: skip this technique on rods holding heavier drapery fabric, since the added weight from even a light garland can pull at cheap curtain hardware over time. A slim café rod with lightweight cotton panels handles the extra weight without any strain.
Chandelier Leaf Garland
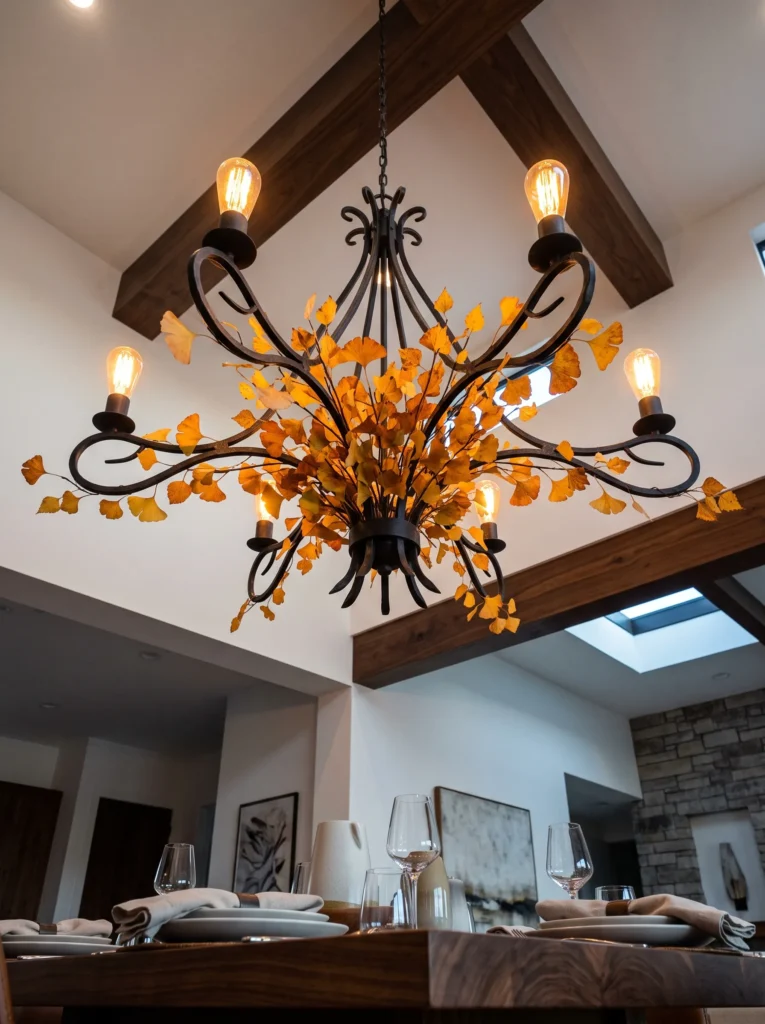
Draping preserved leaves through a chandelier or pendant light fixture sounds risky, but done with the right materials and distance from bulbs, it turns a dining room’s ceiling into part of the seasonal display instead of just the table below it.
- Leaves to use: Small gingko and birch leaves, both lightweight enough not to strain the fixture’s arms
- Preservation method: Glycerin-preserved for flexibility, since the leaves need to bend and drape around metal arms without cracking
- Safety note: My husband insists on keeping all foliage at least 6 inches from any bulb and never using this technique with halogen fixtures, which run significantly hotter than LED or incandescent bulbs
- Assembly: Leaves wired in small clusters directly onto the chandelier’s arms, concentrated near the base and thinning out toward the bulbs
- How long it lasts: Glycerin preservation holds shape and flexibility for two to three months, even in the fixture’s dry, elevated position
Why this works: Concentrating leaves at the base of the fixture and thinning them toward the bulbs keeps the display safe while still transforming the whole ceiling line.
A dining room’s eye tends to land on the table first and the fixture above it second, which is exactly why decorating the fixture itself creates a more layered, dimensional room instead of a flat tablescape. Glycerin-preserved leaves are the only real option here, since dried leaves become brittle enough to shed constantly with the vibration of a fixture swinging or a door closing nearby. Gingko’s fan shape drapes naturally over rounded metal arms, while birch adds delicate movement at the edges. LED bulbs run cool enough that leaves positioned a safe distance away won’t dry out faster than they would anywhere else in the room.
I hesitated for years before trying this over our dining table, mostly out of fear of scorched leaves or a fire hazard. With LED bulbs and a 6-inch buffer zone, it’s been genuinely low-risk, and it’s now the first thing guests notice when they walk into the room. If your fixture uses halogen or incandescent bulbs that run hot, skip this project entirely or switch to LED bulbs first — the swap costs very little and makes several other fall lighting projects safer too.
Wax-Sealed Leaf Staircase Runner
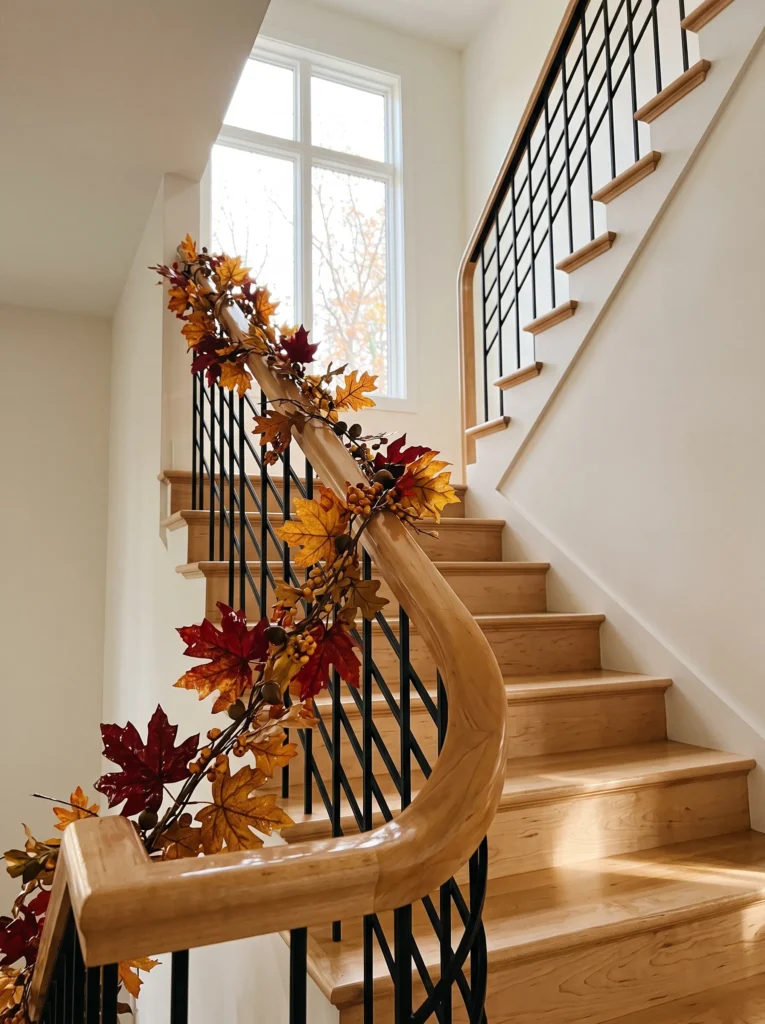
A staircase banister is prime real estate that almost never gets decorated beyond a single garland at Christmas. Wax-sealed maple and oak leaves, wound loosely along the handrail, bring the same seasonal warmth up through a stairwell that most homes only apply at ground level.
- Leaves to use: Sugar maple and small red oak, chosen for color contrast against a wood or painted railing
- Preservation method: Quick paraffin wax dip for a glossy finish that resists handling wear better than dried or pressed leaves would
- Construction note: My husband recommends securing garland with small zip ties hidden underneath the handrail rather than wire twisted directly around it, since repeated wire wrapping can scratch finished wood over a season of use
- Assembly: Leaves wired in small clusters, spaced 4–5 inches apart along a length of twine, then zip-tied to the railing at intervals
- How long it lasts: Waxed leaves handle repeated contact from hands on the railing far better than unsealed leaves, lasting two to three months without visible wear
Why this works: The wax coating creates a slightly tougher surface that holds up to daily hand contact on a railing better than any other preservation method.
Staircases get touched constantly, which is the exact detail most decor guides forget when they suggest draping fresh or dried leaves along a railing. Wax sealing solves that problem directly: the coating adds just enough surface durability that leaves can handle daily hand contact without crumbling into the stair treads below. Sugar maple’s deep red and amber tones read well against most railing finishes, from natural wood to painted white, while red oak adds structural weight to the arrangement. Spacing leaf clusters evenly rather than crowding them keeps the railing itself fully usable and safe to grip.
This is one of the only projects on this list where I’d say durability matters more than initial appearance, since a beautiful garland that shreds within a week isn’t actually worth the effort. I learned to space clusters at least 4 inches apart after an early attempt left the railing crowded and slippery-looking, which is the opposite of the effect you want on a staircase. If you have young kids or guests who lean on railings while descending, keep the garland toward the top half of each baluster run rather than directly under the hand’s natural grip point.
Pressed Leaf Bathroom Vanity Tray
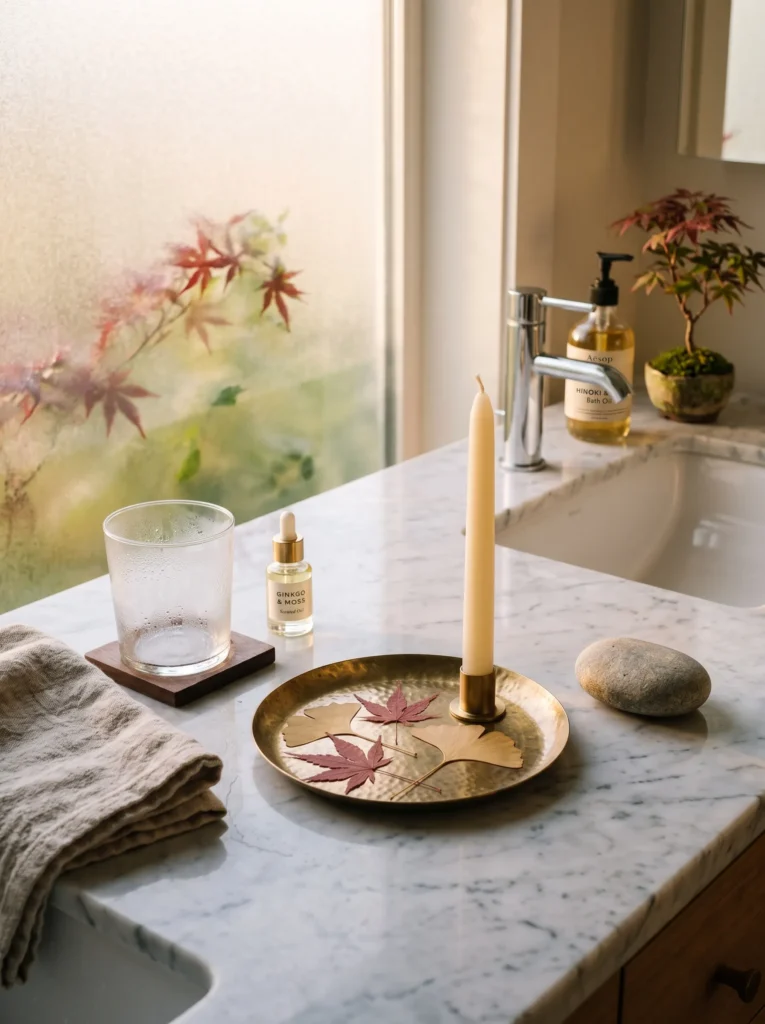
A bathroom rarely gets any seasonal attention beyond a hand towel swap, which makes a small styled vanity tray one of the most overlooked opportunities in a home for a quick, high-impact fall update.
- Leaves to use: Small Japanese maple and gingko leaves, chosen for their compact size next to everyday vanity items
- Preservation method: Pressed flat and sealed with matte spray, since bathroom humidity breaks down unsealed pressed leaves faster than almost anywhere else in the house
- Styling approach: Arranged in a small brass or ceramic tray alongside a taper candle and a smooth stone, tucked beside the sink rather than centered
- Time & cost: 15 minutes to style, under $10 if leaves are already pressed and sealed
- How long it lasts: Two to three months even with regular bathroom humidity, thanks to the sealant coating
Why this works: A sealed pressed leaf resists the humidity swings of a bathroom far better than an unsealed one, which is the detail most people get wrong in this specific room.
Bathrooms run through more humidity swings in a single day than almost any other room, between showers, hot water, and steam, which is exactly why unsealed pressed leaves fail here faster than they would on a bookshelf or mantel. A proper matte sealant creates a light barrier against moisture without making the leaves look glossy or artificial. Japanese maple’s small, lacy shape fits naturally into a compact vanity tray without overwhelming the sink area, while gingko adds a rounder, contrasting silhouette. Keeping the arrangement off to one side rather than centered leaves the sink itself fully functional for daily use.
I didn’t bother decorating bathrooms at all for the first few years of doing this, mostly assuming the humidity would ruin anything worth the effort. A properly sealed pressed leaf changed that completely, and the vanity tray in our guest bathroom is now one of the lowest-maintenance seasonal touches in the entire house. If your bathroom has a working exhaust fan, run it during and after every shower — reducing ambient humidity extends the life of sealed leaves noticeably more than the sealant does on its own.
Glycerin Leaf Runner Along the Kitchen Range Hood
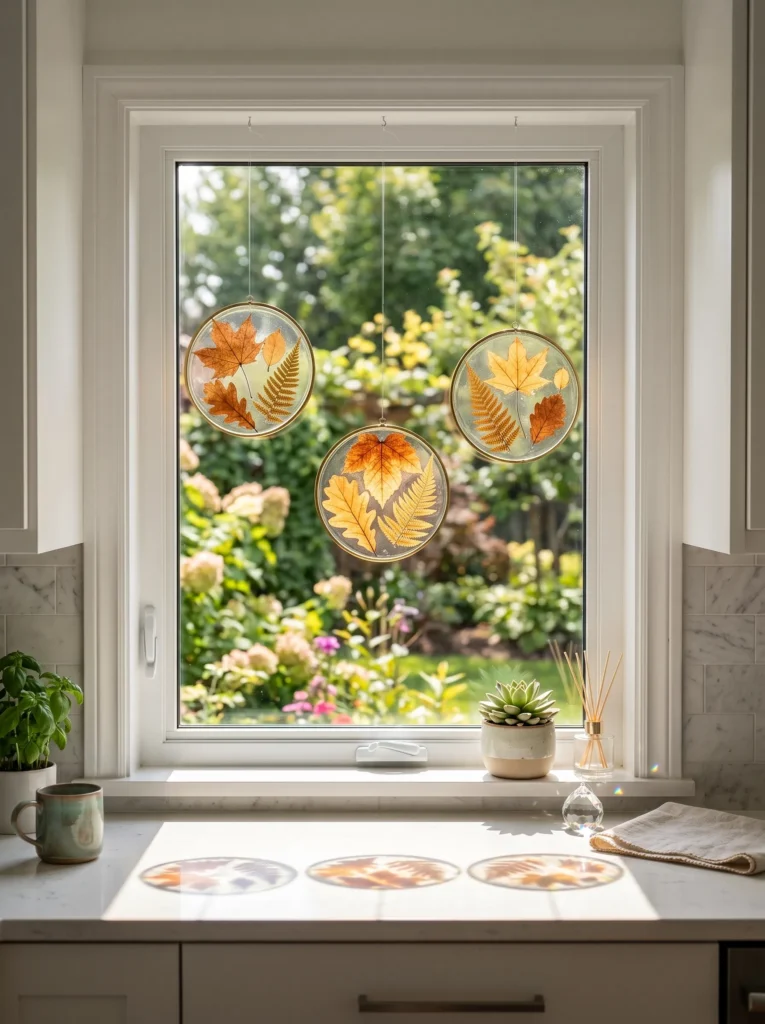
A range hood is one of the largest uninterrupted surfaces in a kitchen, and it almost always sits completely bare. A slim glycerin-preserved leaf garland tucked along its lower edge gives that dead space real presence, without going anywhere near heat or steam from the actual cooktop below.
- Leaves to use: Small gingko and sweetgum, chosen for their compact, non-fussy shapes against a hood’s clean lines
- Preservation method: Glycerin-soaked for two weeks, which keeps the leaves flexible enough to drape along a curved or angled hood edge
- Construction note: My husband always recommends mounting with small adhesive clips rated for kitchen heat, never regular tape or hooks, since range hood surfaces run warmer than most walls even when the stove isn’t directly below the mounting point
- Assembly: Leaves wired in small, loose clusters along a thin brass chain, draped in a shallow curve just under the hood’s front edge
- How long it lasts: Glycerin preservation holds up well even with occasional ambient heat exposure, typically lasting two to three months before needing a refresh
Why this works: Draping the garland along the hood’s front edge rather than across its face keeps the leaves clear of steam and grease while still transforming the kitchen’s largest bare surface.
Kitchens rarely get botanical styling above counter height, which is exactly the gap this idea fills. A range hood’s clean, often metal surface benefits from the contrast a warm leaf garland provides, especially in a kitchen with a lot of white or stainless finishes. Glycerin preservation matters more here than almost anywhere else on this list, since the leaves need to hold their shape through months of ambient heat and occasional steam without becoming brittle. Gingko’s fan shape and sweetgum’s star silhouette both drape cleanly along a chain without looking overly formal, keeping the whole look closer to a subtle accent than a full garland statement.
I added this to our kitchen almost as an afterthought, mostly because the space above our stove had never once been decorated in the eight years we’ve lived here. It’s held up far better than I expected, even with regular cooking happening just below it. One thing worth noting: keep the garland along the front lip of the hood rather than draping it across the face, since even glycerin-preserved leaves will discolor faster with direct, repeated heat exposure from a stovetop running underneath them.
Wax-Dipped Leaf Bowl for the Entry Console
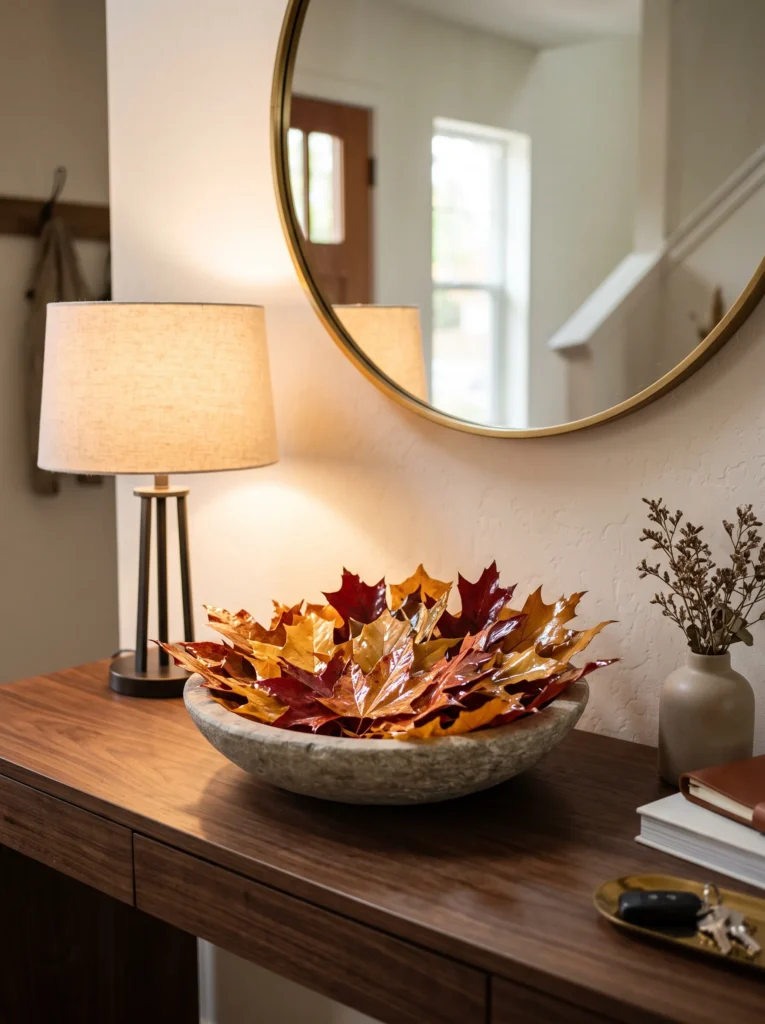
An entry console table usually holds keys, mail, and not much else worth looking at. A shallow bowl of wax-dipped leaves changes that instantly, giving the first surface guests see a small, deliberate moment of color without adding anything you have to move to set your keys down.
- Leaves to use: A mix of red oak, sweetgum, and small maple for varied shape and color within one bowl
- Preservation method: Quick paraffin wax dip, which gives each leaf a glossy, almost lacquered finish that catches console lighting well
- Vessel choice: A shallow ceramic or stone bowl, wide enough that leaves can overlap loosely rather than stack
- Time & cost: About 30 minutes total dipping time for a full bowl; roughly $5 in paraffin wax
- How long it lasts: The wax coating holds gloss and shape for two to three months, even with regular handling as guests set items nearby
Why this works: The glossy wax finish reflects console and entry lighting in a way that a matte, dried leaf simply can’t, making the bowl a genuine light-catching moment rather than background decor.
An entry console gets seen constantly but rarely gets styled with any real intention, which is part of why a small detail like this makes such an outsized impression. Mixing three leaf varieties in one bowl — oak’s broad lobes, sweetgum’s star shape, maple’s classic silhouette — creates visual variety without needing multiple objects competing for space. The wax coating does double duty: it protects the leaves from the wear of a busy entryway while also giving them a polished sheen that looks closer to a florist’s finished arrangement than a craft project. Overlapping the leaves loosely, rather than stacking them neatly, keeps the bowl from looking overly staged.
I keep this exact bowl by our front door every October, and it’s held up remarkably well considering how much daily traffic that surface sees — mail dropped on top, keys tossed nearby, the occasional bumped elbow. That durability is the wax talking; an unsealed dried leaf wouldn’t survive a week in that spot. If your entry gets direct sun for part of the day, expect the color to mellow slightly faster than it would in a shadier spot, though the glossy finish itself holds regardless.
Glycerin Leaf Runner Along the Kitchen Range Hood
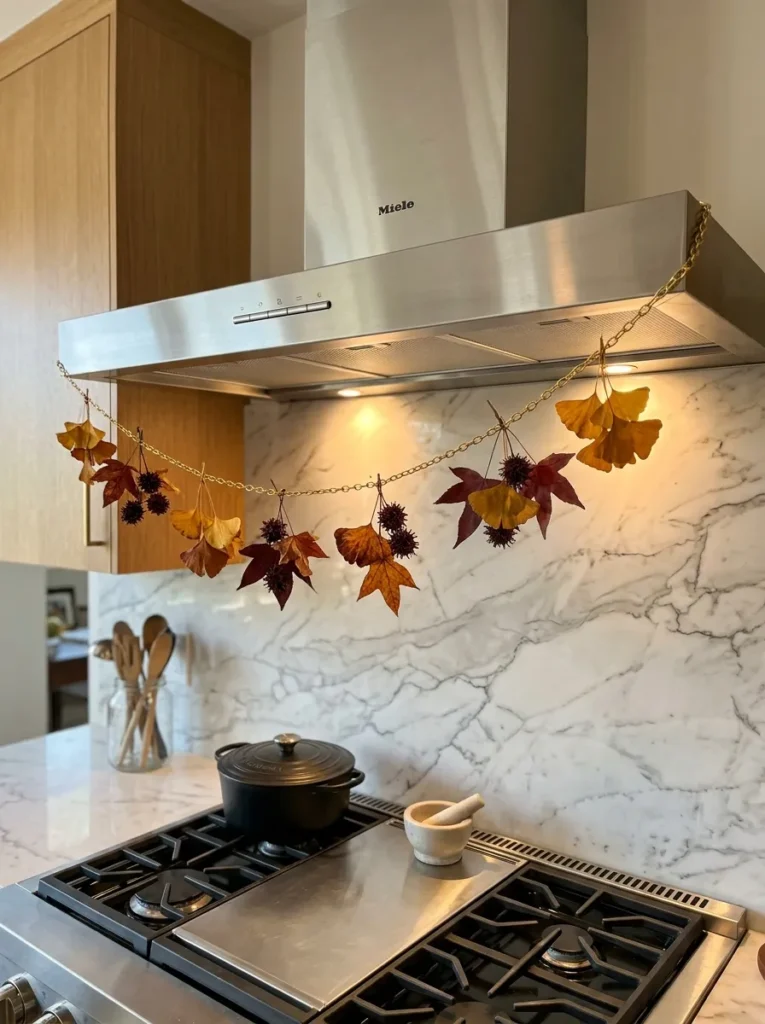
A range hood is one of the largest uninterrupted surfaces in a kitchen, and it almost always sits completely bare. A slim glycerin-preserved leaf garland tucked along its lower edge gives that dead space real presence, without going anywhere near heat or steam from the actual cooktop below.
- Leaves to use: Small gingko and sweetgum, chosen for their compact, non-fussy shapes against a hood’s clean lines
- Preservation method: Glycerin-soaked for two weeks, which keeps the leaves flexible enough to drape along a curved or angled hood edge
- Construction note: My husband always recommends mounting with small adhesive clips rated for kitchen heat, never regular tape or hooks, since range hood surfaces run warmer than most walls even when the stove isn’t directly below the mounting point
- Assembly: Leaves wired in small, loose clusters along a thin brass chain, draped in a shallow curve just under the hood’s front edge
- How long it lasts: Glycerin preservation holds up well even with occasional ambient heat exposure, typically lasting two to three months before needing a refresh
Why this works: Draping the garland along the hood’s front edge rather than across its face keeps the leaves clear of steam and grease while still transforming the kitchen’s largest bare surface.
Kitchens rarely get botanical styling above counter height, which is exactly the gap this idea fills. A range hood’s clean, often metal surface benefits from the contrast a warm leaf garland provides, especially in a kitchen with a lot of white or stainless finishes. Glycerin preservation matters more here than almost anywhere else on this list, since the leaves need to hold their shape through months of ambient heat and occasional steam without becoming brittle. Gingko’s fan shape and sweetgum’s star silhouette both drape cleanly along a chain without looking overly formal, keeping the whole look closer to a subtle accent than a full garland statement.
I added this to our kitchen almost as an afterthought, mostly because the space above our stove had never once been decorated in the eight years we’ve lived here. It’s held up far better than I expected, even with regular cooking happening just below it. One thing worth noting: keep the garland along the front lip of the hood rather than draping it across the face, since even glycerin-preserved leaves will discolor faster with direct, repeated heat exposure from a stovetop running underneath them.
Dried Leaf Branch Bud Vases for the Bedroom Dresser
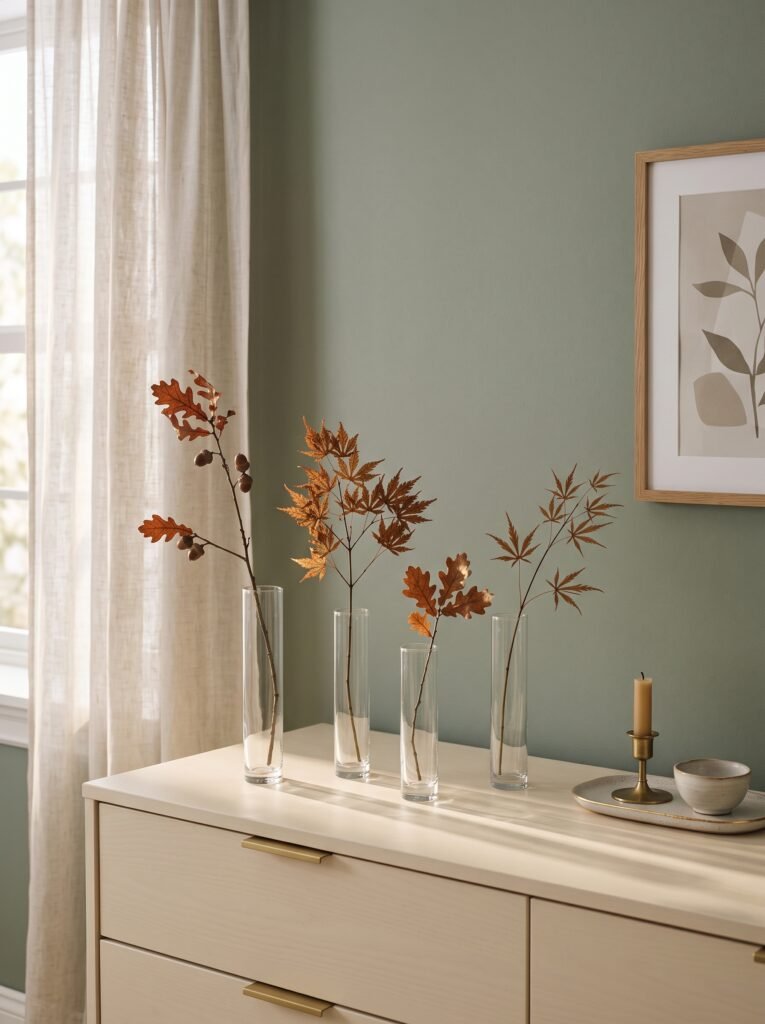
A bedroom dresser rarely gets seasonal treatment the way a living room or entry does, mostly because most fall decor feels too bold or rustic for a space meant to feel calm. A row of slim bud vases, each holding a single dried leaf branch, brings in color without disrupting the quieter mood a bedroom needs.
- Leaves to use: Small oak or maple branches with two or three leaves still attached, chosen for their slim, upright profile
- Preservation method: Air-dried upright in the vases themselves over one to two weeks, no separate drying step required
- Vessel choice: Three or four narrow glass bud vases, mismatched slightly in height, grouped along the dresser’s left side
- Time & cost: About 10 minutes to arrange; bud vases run $4–8 each if bought individually
- How long it lasts: Three to four months, since the branches are already dry and stable by the time they’re displayed
Why this works: Drying the branches directly in the vases skips a separate preservation step entirely, making this the lowest-effort project in this list without sacrificing how finished it looks.
Bedrooms benefit from restraint more than almost any other room, which is why a single stem per vase does more here than a full arrangement would. Because the branches dry in place rather than being preserved beforehand, there’s no waxing, soaking, or pressing involved — just time. Oak’s sturdier structure holds its shape well as it dries upright, while maple offers a slightly more delicate, arching line. Grouped at uneven heights along one side of the dresser, the vases create a quiet, asymmetrical moment that adds seasonal color without competing with a nightstand lamp or existing decor.
I keep a version of this on my own dresser every fall, mostly because it takes almost no effort and still reads as considered. What I’ve noticed after several years of doing this: branches picked with leaves already slightly curled tend to dry into more interesting, sculptural shapes than perfectly flat ones. If your bedroom gets strong afternoon sun, position the vases somewhat back from the window — direct light will fade the leaf color noticeably faster than filtered or indirect light will.
Pressed Leaf Hearth Floor Arrangement
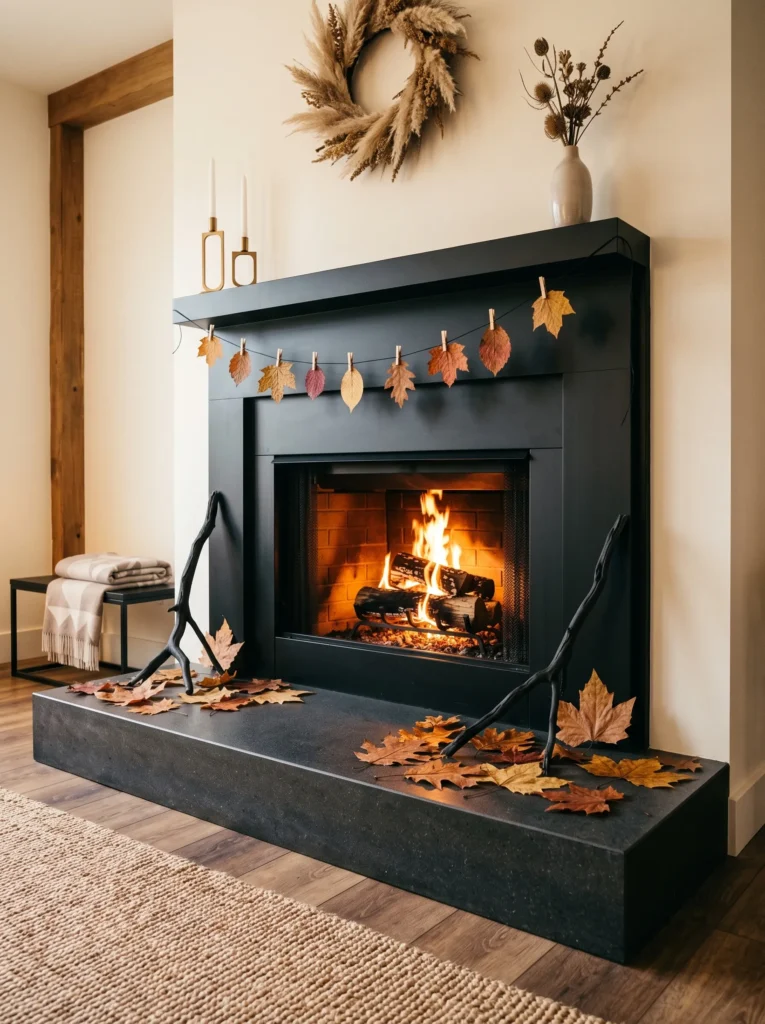
The area directly in front of a fireplace, below the mantel line, is often left completely bare once the summer’s decor comes down. A low, wide arrangement of pressed leaves and dried branches laid across the hearth floor fills that space with the same intention usually reserved for the mantel above it.
- Leaves to use: Large pressed oak and sycamore leaves, chosen for their size and flat profile once dried
- Preservation method: Pressed flat over two weeks, then arranged loose rather than mounted, so the natural shapes stay visible
- Styling approach: Leaves laid flat across the hearth stone in a loose, overlapping row, mixed with two or three dried branch pieces for height variation
- Construction note: My husband always checks that hearth stone or tile is fully cooled and the fireplace isn’t in use before anything gets placed directly on it, especially with dry, pressed botanicals nearby
- How long it lasts: Pressed leaves left loose rather than sealed typically last four to six weeks before needing to be refreshed
Why this works: Filling the hearth floor extends the fireplace’s seasonal presence beyond just the mantel, turning the whole vertical space into one cohesive display instead of a decorated top and a bare bottom.
A fireplace is usually treated as two separate zones — the mantel gets all the attention, and the hearth floor beneath it stays empty. That imbalance is easy to fix. Large pressed oak and sycamore leaves have enough visual weight to hold their own on the floor, where smaller leaves would read as scattered debris rather than intentional styling. Laying them loose instead of framing or sealing them keeps the arrangement flexible enough to refresh easily as the season goes on, since hearth-level decor gets more incidental dust and foot traffic than a mantel ever does.
This is one of the simplest projects in the entire list, and also one people forget to try because a hearth floor doesn’t feel like decor space until you actually see it done. I refresh mine every few weeks through October, swapping in newly pressed leaves as older ones start to lose color. Never place fresh or pressed botanicals on a hearth during active fireplace use — heat and dry leaves are a genuinely bad combination, which is exactly the kind of detail worth double-checking before you get started.
Choosing the Right Preservation Method for Where It’s Going
The biggest mistake in DIY fall leaf decor isn’t the leaves you pick — it’s matching the wrong preservation method to the wrong room. A leaf’s environment determines its lifespan more than the leaf itself does. Humid spots like bathrooms and kitchens call for a sealed or wax-dipped finish; unsealed pressed leaves absorb ambient moisture and go limp within days there. Pieces that get handled constantly — a staircase railing, an entry bowl — need wax’s added surface durability, since dried or pressed leaves shred under repeated contact.
Anything in direct sun, from a window suncatcher to a sun-facing console, will fade faster no matter the method, so plan for a shorter run or shift it slightly out of the light. And for true longevity, framed work behind glass is the only technique that reliably holds for months, sometimes years, rather than weeks. Read the room’s conditions first. Let the leaf choice follow.
Frequently Asked Questions
How long do preserved fall leaves actually last? It depends on the method. Glycerin-preserved leaves typically hold for two to three months and stay flexible the whole time. Pressed leaves sealed behind glass can last for years. Wax-dipped leaves keep their glossy finish for two to three months. Air-dried leaves have the shortest run, usually four to six weeks, since nothing protects them from moisture or handling.
What’s the best leaf for pressing versus glycerin preservation? Thin, flat leaves — Japanese maple, gingko, sweetgum — press cleanly because they dry evenly with minimal curling. Sturdier leaves like oak and larger maple varieties take to glycerin better, since their thicker structure absorbs the solution evenly and stays pliable instead of turning brittle.
How do I stop leaves from curling as they dry? Curling comes from uneven moisture loss. Pressing under weight is the most reliable fix, since it flattens the leaf as it dries. For leaves you’re not pressing, drying them flat on a baking sheet in a low-humidity spot — rather than hanging them — helps them dry more evenly and curl less.
What’s the most budget-friendly preservation method? Air-drying costs nothing beyond the leaves themselves and suits short-run arrangements, like a floor vase or open jar display. Pressing runs a close second, needing only heavy books or a basic flower press, and buys a longer-lasting result for very little extra effort.
Can I use fresh, unpreserved leaves without treating them at all? Yes, for the short term. Fresh leaves start losing moisture and breaking down their pigments the moment they’re picked, so expect visible curling and fading within about a week — sometimes faster indoors near a heating vent. Fine for a one-night dinner centerpiece, not built for the full season.
Do pressed leaves need sealant, or is pressing enough on its own? Pressing alone works for short-term, low-humidity spots — a bookshelf away from windows, for instance. Anywhere with humidity swings, handling, or direct light benefits from a light matte spray sealant, which meaningfully extends how long the color and shape hold.
Conclusion
Fall decorating doesn’t have to mean buying a new box of decor every October. Once you understand how glycerin, pressing, and wax actually protect a leaf’s structure, the same handful of techniques can dress up every room in your home, from a dining table centerpiece to a bathroom vanity tray. I’ve built most of these pieces myself over the years, and the ones done right are still holding their color months later.
Pick two or three DIY fall leaves decor ideas that fit your space, start with whatever’s already falling in your yard, and save this post to come back to as the season goes on. Your home — and your leaves — will hold up beautifully.