25 Fall Garden Ideas That Actually Transform Your Yard
Most fall garden ideas online are really just decorating tips wearing a gardening hat — pumpkins on the porch, a few mums by the door, done. But fall is actually the best season of the entire year to plant, and almost nobody explains why. Cooler air paired with still-warm soil gives roots weeks to establish without the stress of summer heat or spring’s unpredictable frosts, which is exactly the kind of detail that separates a genuinely useful fall garden guide from a decorative one.
I’ve watched this play out in my own Austin beds more times than I can count. This post walks through real landscaping transformations — bare corners, tired beds, forgotten side yards — each one built on both good styling instinct and correct fall planting science, so what you plant now actually thrives.
Why Fall Gardening Actually Matters
Most people think fall garden prep means raking leaves and buying a few mums. It’s actually the opposite — fall is the single best planting window of the entire year, and almost nobody treats it that way. Here’s the science: in autumn, soil holds onto summer’s warmth for weeks after the air cools down, which means roots keep growing even as the plant stops pushing new leaves. That combination — warm soil, cool air — lets a new plant establish its root system without the heat stress of summer or the frost gamble of spring. Fall planting reduces transplant shock more effectively than any other season because roots can develop without the plant also fighting to support new top growth. I’ve watched this play out in my own Austin beds — perennials I put in during October outperformed ones I rushed into the ground in April. This post walks through exactly what to plant, prune, and prep right now, and why the timing actually matters.
Rust & Copper Mum Containers for Fall Gardens
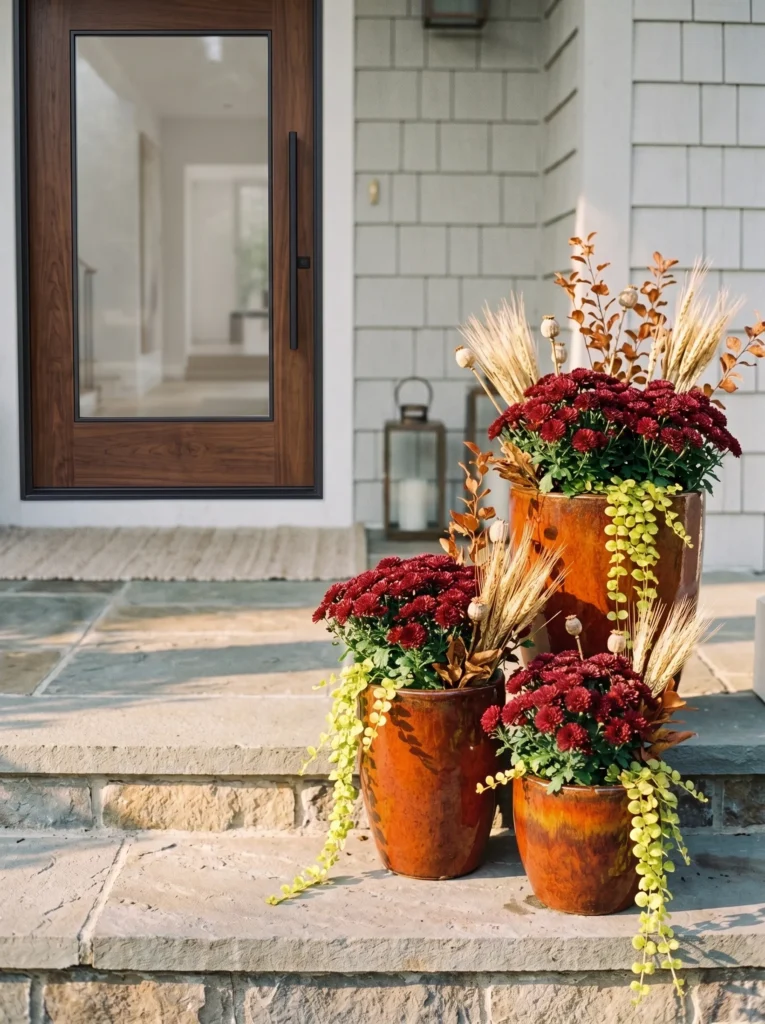
- Choose glazed ceramic pots in a true rust or burnt-clay finish, not plastic mimics
- Anchor with burgundy or bronze mums as the “thriller,” not the standard yellow
- Add dried wheat stems or bunny tail grass for height and movement
- Trail ivy or creeping jenny over the rim to soften hard edges
- Group in odd numbers — three or five pots — at varying heights
- Cluster near the front door where afternoon light hits the glaze
Why this works: Burgundy and bronze mums photograph richer than standard yellow or orange because their deeper pigments absorb more of the warm, low-angle autumn light instead of reflecting it flatly back.
I switched away from orange mums three years ago, and I haven’t gone back. Burgundy and bronze varieties read as sophisticated rather than seasonal, which matters if you want your porch to look intentional past the first week of October. Glazed rust-toned ceramic pots hold that same warm register, so the container and the plant work as one unit instead of competing. Skip the thin plastic pots that mimic terracotta — the glaze catches afternoon light in a way plastic can’t fake, and the added weight keeps arrangements from tipping in sudden fall wind.
Structure matters more than color choice alone. Use the classic thriller-filler-spiller formula: mums as the thriller in the center, dried wheat or bunny tail grass adding height behind them, and trailing creeping jenny or ivy spilling over the container’s edge. Grouping three or five pots in slightly different heights creates visual rhythm instead of a flat, matched row. Place the cluster where it catches late-day sun — the low autumn light angle makes glazed rust ceramic glow in a way that midday sun never quite achieves, and it’s the single easiest way to make a porch arrangement look styled rather than seasonal.
Cozy Fire Pit Corner
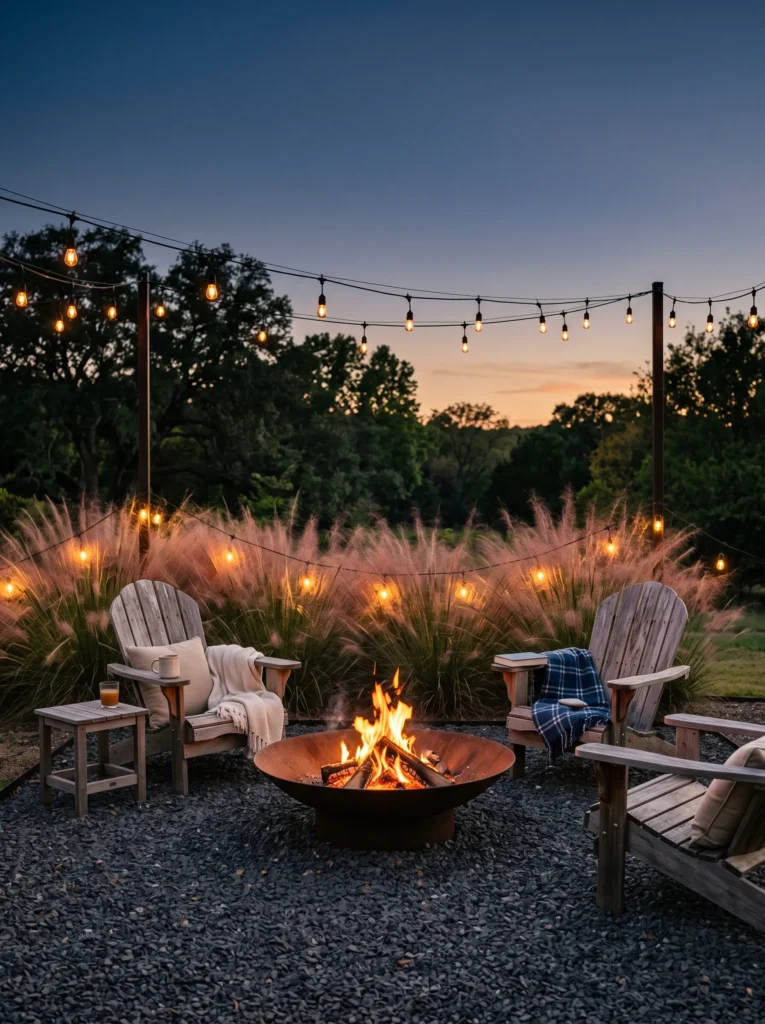
- Set a steel fire bowl on a bed of crushed granite, not directly on grass or mulch
- Frame the space with cedar Adirondack chairs left unfinished to weather naturally
- Plant clumps of miscanthus or muhly grass behind seating for movement and privacy
- String warm amber bulb lights along a nearby pergola or fence line
- Leave 3 feet of clearance around the pit for airflow and safety
- Add a low stone or concrete ledge as informal extra seating
Why this works: A gravel or crushed-stone base under a fire pit prevents the heat-and-moisture cycle that cracks concrete patios over time — a detail most outdoor living guides skip entirely.
My husband has poured more patios than he can count, and the fire pit question comes up every single time: can it just sit on the existing concrete? His answer is almost always no. Direct heat on a slab causes thermal shock, especially where moisture has seeped into hairline cracks, and over a few winters that stone or concrete surface will spall and crumble. A bed of crushed granite four to six inches deep breaks that contact point, letting heat dissipate downward instead of concentrating on one spot. It’s a small choice that prevents an expensive repair down the road.
Once the base is right, the styling can do the rest of the work. Unfinished cedar Adirondack chairs weather to a soft silver-gray over a season or two, which suits a fall garden far better than painted furniture that shows wear immediately. Ornamental grasses like miscanthus or muhly planted just behind the seating catch low light and add motion without blocking sightlines to the fire. String amber bulb lights overhead for evenings, and keep a clear three-foot radius around the pit itself — both for safety and because it keeps the whole corner from feeling cluttered or closed in.
Bare Side Yard Fix
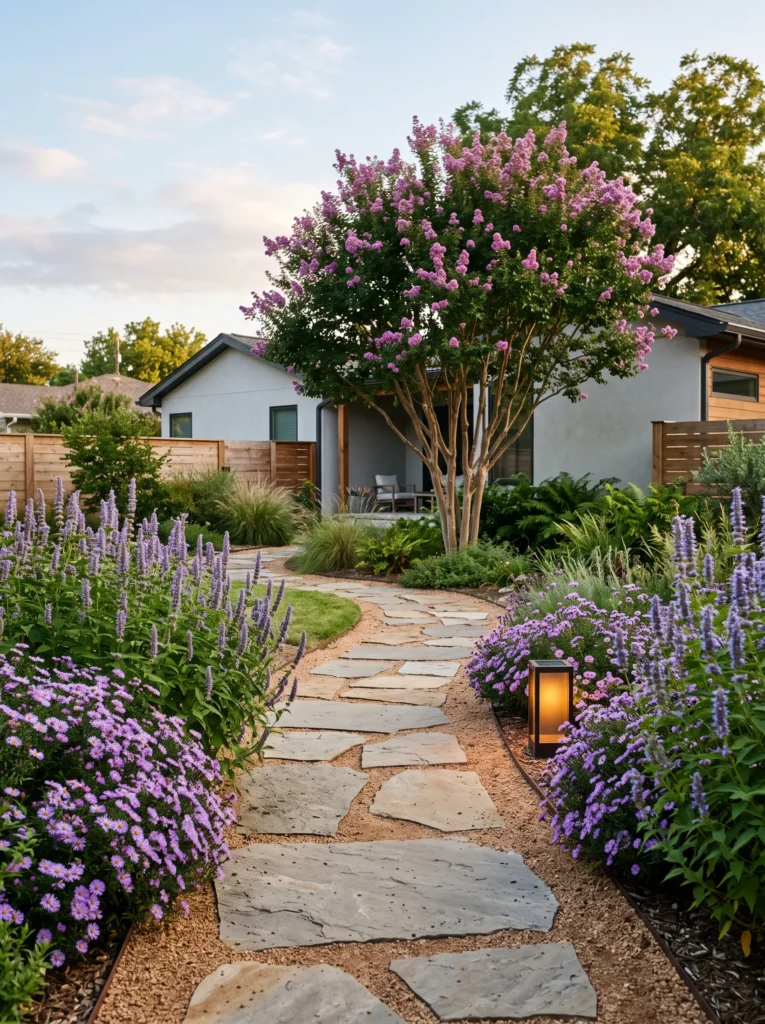
- Replace patchy grass with a dry-laid flagstone path set in decomposed granite
- Line both edges with drifts of purple aster and ‘Blue Fortune’ anise hyssop
- Add a single multi-stem crape myrtle as a vertical anchor near the house
- Underplant with liriope for a tidy, low-maintenance border along the stone
- Use solar path lights spaced 6 feet apart for evening definition
- Mulch beds with shredded hardwood, not bark nuggets, for a finer texture
Why this works: A defined path immediately reads as “designed” rather than “leftover,” and fall-planted perennials like aster and anise hyssop use the cooling season to build root mass before their first bloom cycle next year.
Most side yards are the forgotten strip between the fence and the house — usually thin grass, bare dirt, or a dumping ground for trash cans. The fix isn’t more plants scattered randomly; it’s a defined path that gives the eye a place to travel. Dry-laid flagstone set in decomposed granite creates that structure immediately, even before anything blooms. Purple aster and anise hyssop planted along the edges in fall get a full season of undisturbed root growth, so by next September they’ll return thicker and fuller than anything planted in spring ever manages in its first year.
The transformation finishes with height and light. A single multi-stem crape myrtle breaks up the flat horizontal line of the path and fence, giving the space a focal point that reads well from the street. Liriope tucked along the stone edge stays neat through winter and keeps the border from looking sparse once the perennials die back. Solar lights spaced evenly along the path turn a once-ignored side yard into a space people actually walk through after dark, which is often the difference between a forgotten strip and a genuine extension of the garden.
Empty Corner Makeover
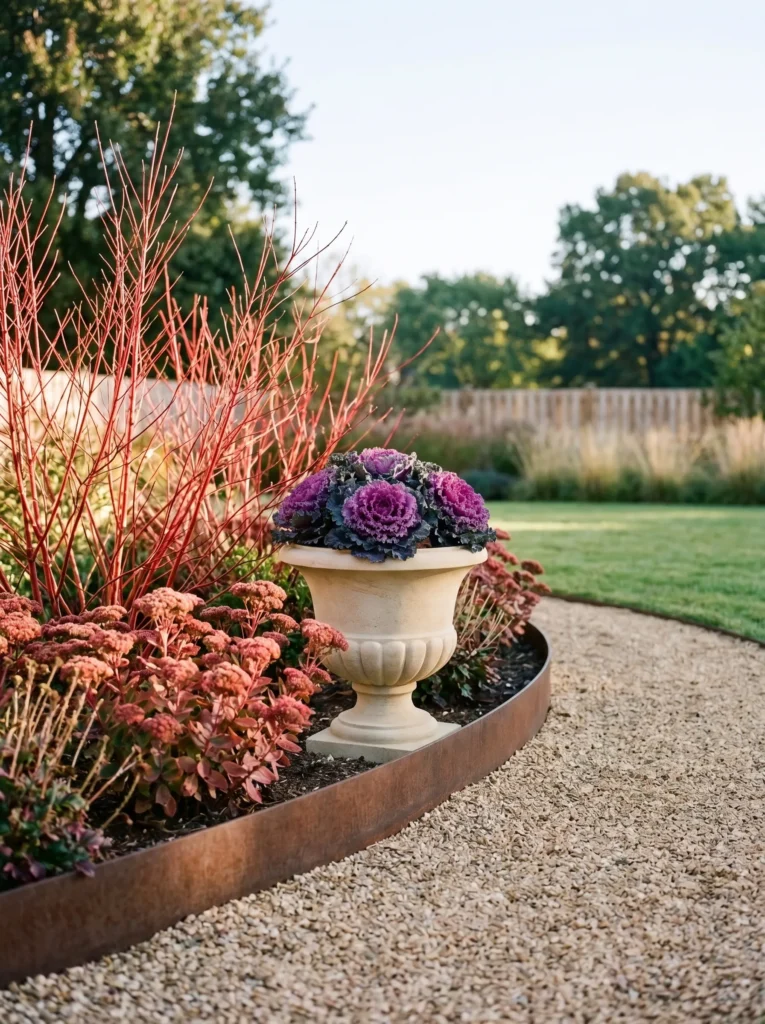
- Layer three heights: a red-twig dogwood, mid-height sedum ‘Autumn Joy,’ and creeping thyme
- Edge the bed with a low, curved steel border for a clean, modern line
- Add a single weathered concrete urn planted with ornamental kale as a focal piece
- Underplant bare soil gaps with dwarf mondo grass for year-round coverage
- Top-dress with pea gravel instead of mulch for a more architectural finish
- Position the grouping where morning light hits the dogwood’s red bark directly
Why this works: Red-twig dogwood’s bark color intensifies as chlorophyll production slows in cooler weather, which means the “wow” moment of this corner actually gets better through late fall and into winter, not worse.
I’ve seen this exact corner in a dozen backyards — an awkward triangle where the fence meets the house, usually empty or holding a single sad shrub nobody planted on purpose. Layering height is what turns it into a real feature. Red-twig dogwood anchors the back and does something unexpected: its bark actually deepens in color as temperatures drop, so this corner looks more striking in December than it does in September. Sedum ‘Autumn Joy’ fills the middle at a rust-pink stage that pairs naturally with the dogwood’s red stems, and creeping thyme softens the front edge.
A curved steel border gives the whole grouping a defined shape instead of letting it dissolve into the lawn, and it’s a detail my husband installs on nearly every landscape bed he frames for clients — it holds a clean line for years without the heaving that plastic edging eventually shows. A weathered concrete urn planted with ornamental kale adds a focal point at eye level, while pea gravel underfoot reads more intentional than mulch and won’t wash out during heavy fall rain. The result is a corner that finally looks planned.
Plain Flower Bed Refresh
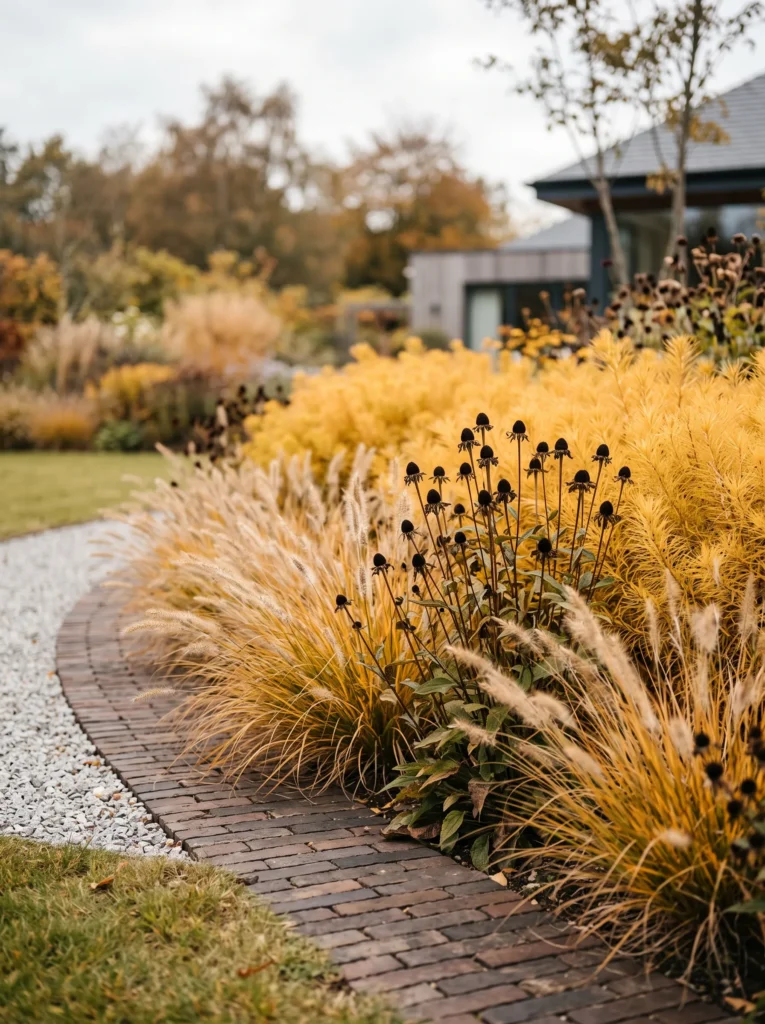
- Remove leggy, spent summer annuals down to bare soil before replanting
- Anchor the back row with amsonia hubrichtii for feathery gold fall foliage
- Add mid-row black-eyed Susan seed heads left standing for texture and birds
- Front the bed with dwarf fountain grass for movement in fall wind
- Edge with a hand-laid brick border set flush with the soil line
- Top with a 2-inch layer of compost, worked in before the first frost
Why this works: Amsonia hubrichtii turns a clear gold in fall because it’s one of the few perennials whose foliage color show rivals its spring bloom, giving a bed real seasonal interest instead of going dormant and dull.
A flower bed that peaked in July and never got refreshed is one of the most common sights in fall — brown, collapsed annuals, bare patches, nothing holding interest. The fix starts with subtraction: pull the spent annuals completely rather than tucking new plants around them. Amsonia hubrichtii is the plant most people overlook here. It’s grown mainly for spring’s soft blue flowers, but its real payoff comes in fall, when the thread-like foliage turns a clear, consistent gold that few other perennials can match. Planted now, it establishes roots through winter and rewards you with that color display next October.
Black-eyed Susans left standing with their seed heads intact aren’t a maintenance oversight — they’re a deliberate choice that adds structure and feeds goldfinches through the colder months. Dwarf fountain grass in front catches wind in a way flowers can’t, giving the bed motion even on a still day. A hand-laid brick border set flush with the soil keeps mower and trimmer lines clean, and working two inches of compost into the top layer before frost feeds the soil biology through winter, setting next spring’s growth up before the ground even freezes.
Unused Patio Edge
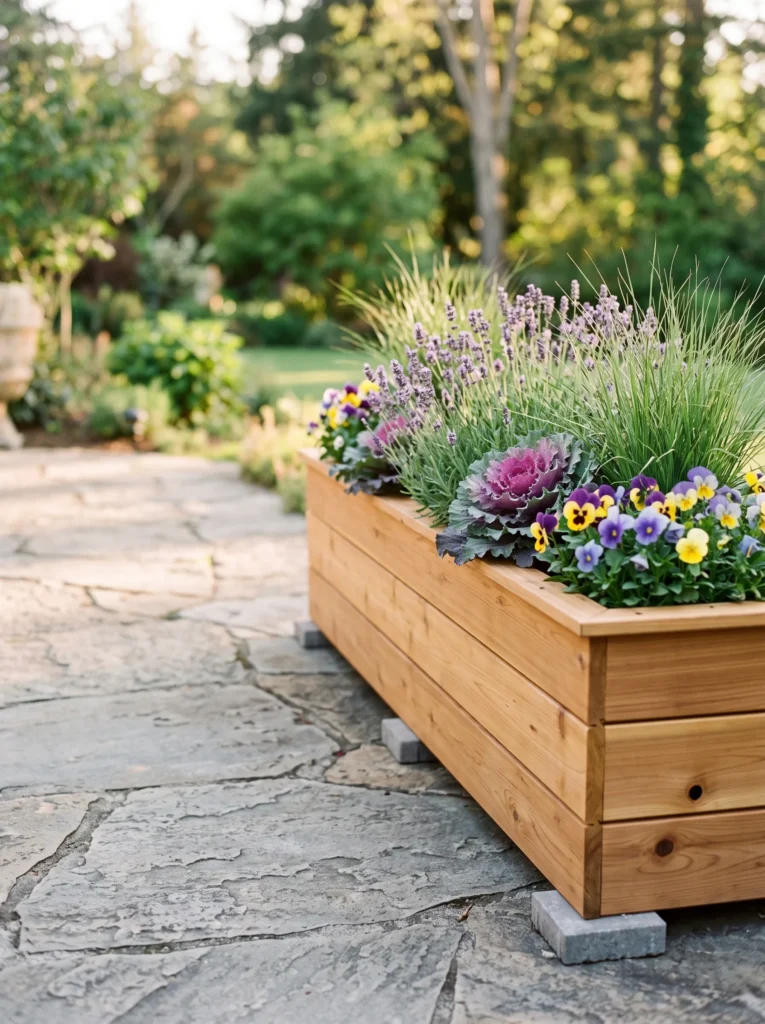
- Build a raised cedar planter, 12 inches deep, along the patio’s bare edge
- Fill with a well-draining mix: two parts topsoil, one part compost, one part perlite
- Plant ornamental cabbage, violas, and dwarf switchgrass for layered fall color
- Drill 1-inch drainage holes every 8 inches along the planter’s base, not just corners
- Line the interior with landscape fabric before filling to prevent soil washout
- Set the planter on paver feet to keep the cedar off standing water
Why this works: Drainage holes concentrated only at the corners are the single most common cause of raised planter rot my husband sees on job sites — even spacing along the entire base is what actually keeps a cedar planter dry and structurally sound for years.
The strip along a patio’s edge usually ends up empty, or worse, cluttered with mismatched pots nobody chose on purpose. A single well-built raised planter solves both problems at once. My husband’s rule for any outdoor wood structure is that water management matters more than the wood species you choose — and he’s right. Most raised planters fail early because builders only drill drainage holes at the corners, leaving the center of the base to hold moisture against the cedar. Spacing holes evenly across the entire bottom, roughly every 8 inches, keeps water moving through instead of pooling.
Once the structure is right, the planting can lean fully into the season. Ornamental cabbage brings dense, ruffled texture in soft lavender and cream, violas add small pops of color that hold up through light frost, and dwarf switchgrass gives the arrangement height and movement without overwhelming the planter’s scale. Setting the whole thing on paver feet lifts the cedar fully off the patio surface, so even a heavy fall rain never leaves the wood sitting in standing water — a small step that adds years to the planter’s life.
Foundation Bed Overhaul
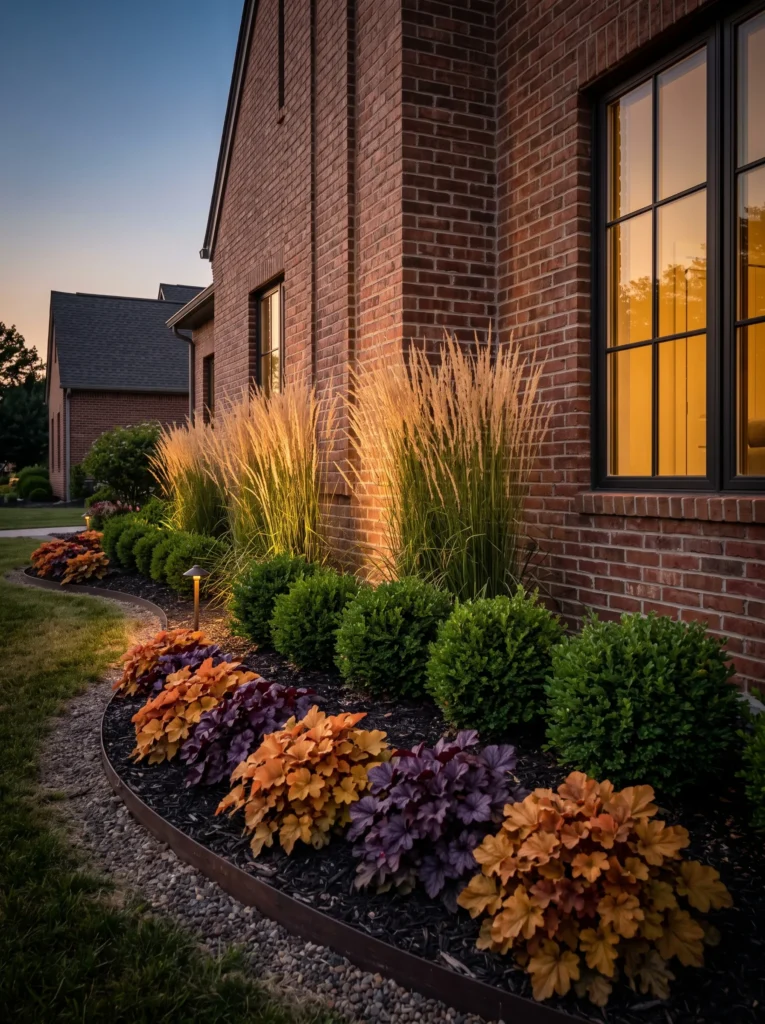
- Remove overgrown boxwood hugging the foundation and replace with dwarf inkberry holly
- Layer ‘Karl Foerster’ feather reed grass at the corners for vertical structure
- Underplant with heuchera in caramel and plum tones for low seasonal color
- Keep a consistent 18-inch gap between plantings and the foundation for airflow
- Mulch with pine straw for a finer texture against brick or stone exteriors
- Add uplighting at two points to highlight grass seed heads after dark
Why this works: An 18-inch planting gap isn’t a design preference — it’s the minimum clearance my husband requires on every job to keep soil moisture and mulch from wicking against siding or brick, which is one of the most common causes of rot and pest entry he sees in older homes.
Overgrown boxwood pressed right against the house is one of the most common foundation planting mistakes, and it’s rarely about the plant itself — it’s about spacing. My husband has replaced more rotted sill plates than he can count, almost always traced back to shrubs planted flush against siding, holding moisture against the wood or brick for years without anyone noticing. Dwarf inkberry holly stays naturally compact, so it can be planted with real clearance from the foundation instead of needing constant shearing to keep it off the wall. That gap isn’t just structural protection — it also improves airflow, which reduces fungal issues on the foliage itself.
Once the spacing is correct, the layering brings the bed to life. ‘Karl Foerster’ feather reed grass at the corners adds vertical structure that holds through winter, its seed heads catching low light beautifully after dark with simple uplighting. Heuchera in caramel and plum tones fills the lower layer with color that doesn’t fade the way summer annuals do, and pine straw mulch gives foundation beds a finer, more finished texture than bulky bark against brick or stone siding.
Dead-End Pathway Fix
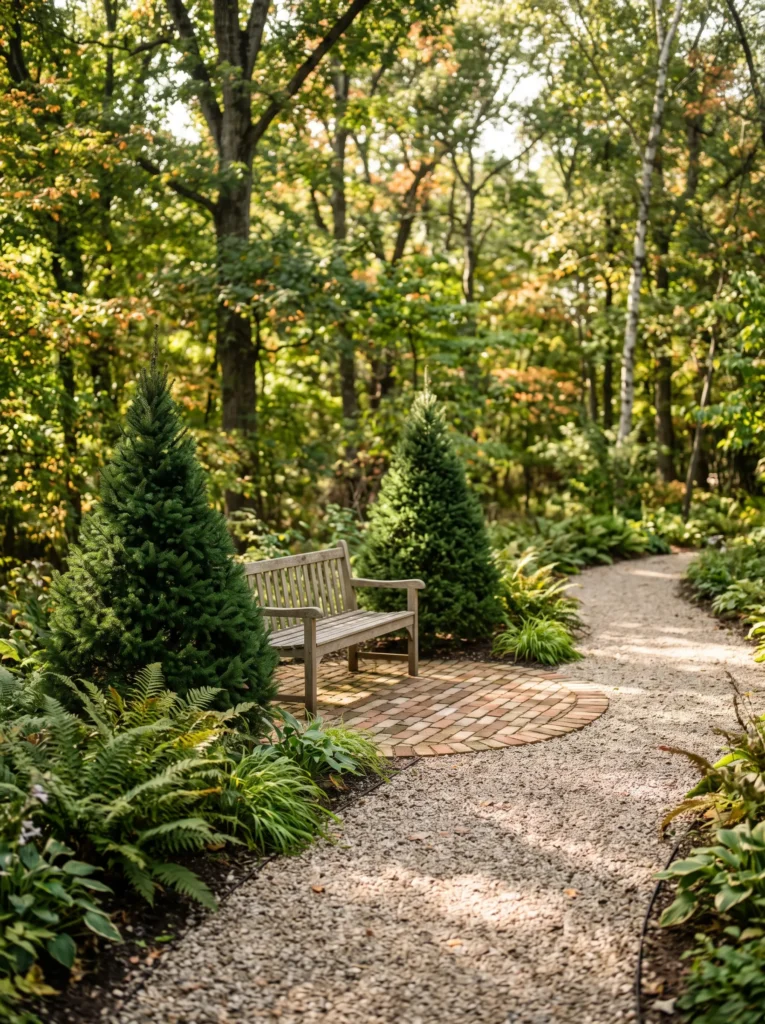
- Extend a gravel path to a defined stopping point instead of trailing off into grass
- Build a small circular terminus using reclaimed brick set in a herringbone pattern
- Center a weathered wood bench facing back toward the house
- Flank the bench with two dwarf Alberta spruce for year-round structure
- Underplant the terminus edge with autumn fern for texture in shade
- Run low-voltage path lighting the full length to guide evening use
Why this works: A path that ends without a clear destination reads as unfinished even when the plants around it are healthy, because the human eye instinctively looks for a resting point at the end of any directional line.
A gravel or stepping-stone path that just trails off into lawn is one of the most common half-finished landscaping features in older yards — someone started a project and never gave it an ending. The eye follows a path expecting a destination, and without one, even a well-planted route reads as incomplete. A circular terminus built from reclaimed brick in a herringbone pattern gives the path a clear stopping point, and it doesn’t need to be large — just defined enough to signal “this is the destination,” not an accident of where the gravel ran out.
A bench facing back toward the house turns that terminus into an actual usable spot, not just a decorative endpoint. Dwarf Alberta spruce on either side stays narrow and structured, adding year-round green without ever needing much pruning, and autumn fern tucked along the shaded edge fills in texture where grass typically struggles anyway. Running path lighting the full length, rather than stopping halfway, means the space stays usable and inviting well after the fall sun goes down, extending the yard’s function into evening hours.
Boring Backyard Border
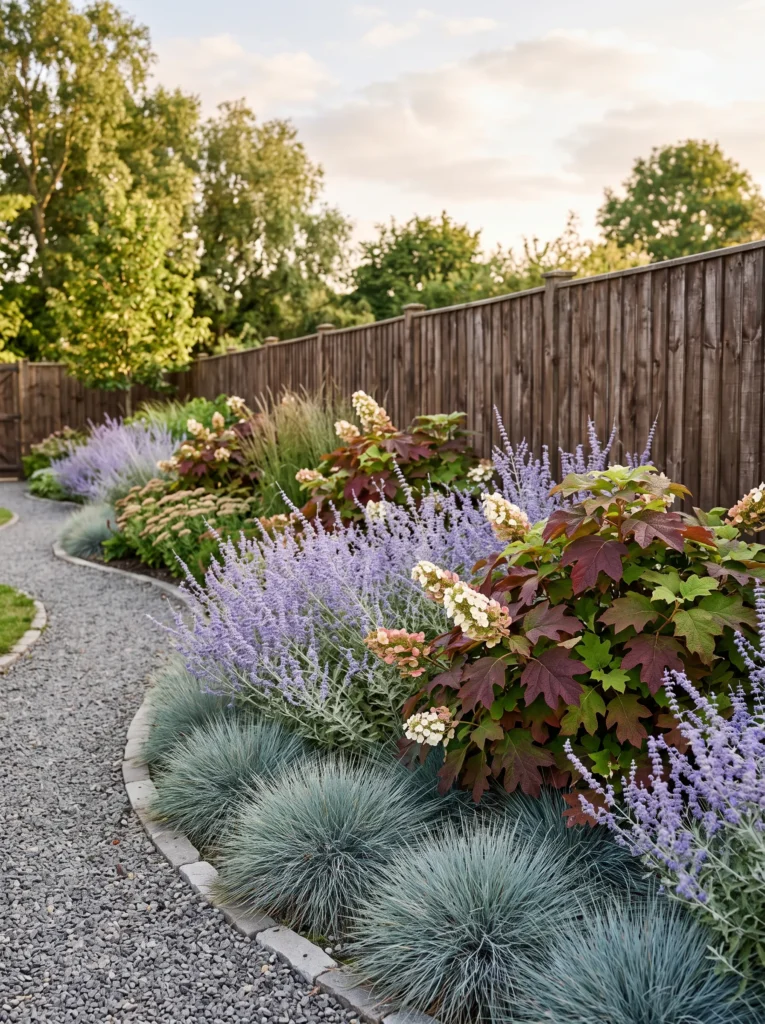
- Replace a single row of hostas with a layered mixed border, three plants deep
- Back row: oakleaf hydrangea for structure and burgundy fall foliage
- Middle row: Russian sage for silver-blue texture and late fragrance
- Front row: ‘Elijah Blue’ fescue in tight mounded clumps along the edge
- Curve the border line instead of running it straight along the fence
- Edge with steel landscape edging set 2 inches below grade for a clean reveal
Why this works: Oakleaf hydrangea holds its burgundy-red fall color longer than nearly any other flowering shrub because its foliage contains higher concentrations of anthocyanin pigments, which stay stable even after nighttime temperatures drop sharply.
A single straight row of hostas along a fence line is the most common “starter border” in backyards, and it almost always reads as flat once you’ve seen it. The fix is depth, both literal and visual. A layered border — tall shrub at the back, mid-height perennial in the middle, low grass at the front — creates dimension a single row never can. Oakleaf hydrangea anchoring the back holds deep burgundy foliage well into November, longer than most flowering shrubs manage, because its leaves produce anthocyanin pigments that stay chemically stable even as temperatures drop, unlike the more fragile pigments in many other plants.
Russian sage in the middle layer adds silver-blue texture and a light fragrance that carries through early fall evenings, while ‘Elijah Blue’ fescue mounds neatly along the front edge without ever needing division. Curving the border line, rather than running it dead straight along the fence, immediately makes the space feel designed rather than functional. Steel edging set slightly below grade keeps grass from creeping into the bed without creating a visible lip that catches a mower blade or a bare foot.
Rain Garden Corner
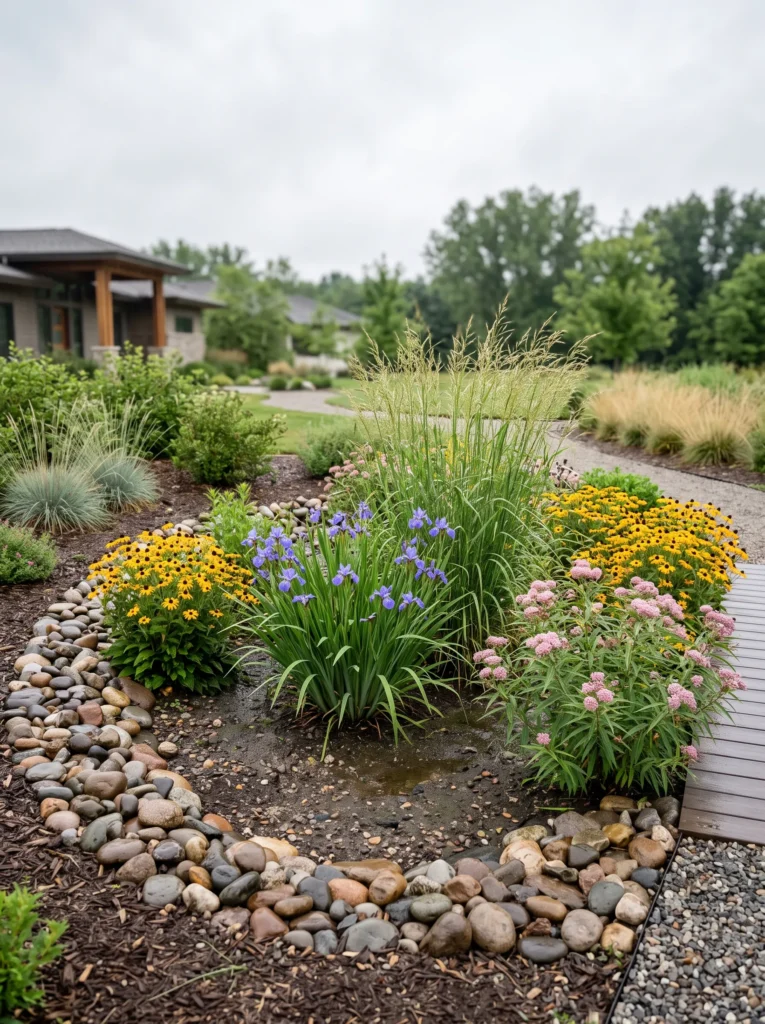
- Carve a shallow, bowl-shaped depression where a downspout currently pools water
- Plant switchgrass and blue flag iris in the deepest, wettest center zone
- Ring the mid-zone with black-eyed Susan and swamp milkweed for pollinators
- Edge the outer rim with river rock to mark the transition from lawn
- Slope the depression gently, no more than 6 inches deep at center
- Direct the downspout extension directly into the planted basin, not past it
Why this works: A rain garden isn’t decorative wetland mimicry — switchgrass and swamp milkweed both evolved deep, fibrous root systems specifically to tolerate saturated soil, which is exactly why they thrive where ordinary lawn grass drowns.
Every yard has that one soggy spot where a downspout empties and grass never quite recovers — usually patchy, muddy, and ignored. Instead of fighting the water, a rain garden works with it. Switchgrass and blue flag iris planted in the lowest point of the basin have root systems built for exactly this kind of saturation; they pull excess water down and out of the soil far faster than turf grass ever could, which is why this spot stops looking swampy within a season. Planted in fall, both establish root mass through the cool months, ready to handle spring’s heavier rain by the time it arrives.
The outer rings finish the transformation. Black-eyed Susan and swamp milkweed in the mid-zone tolerate occasional wet feet without struggling, and both draw pollinators well into fall. A ring of river rock at the outer edge marks a clean boundary between lawn and basin, so the whole feature reads as a deliberate garden element rather than a low spot nobody dealt with. The result turns a yard’s most frustrating corner into one of its most functional.
Deer-Resistant Fall Garden Bed
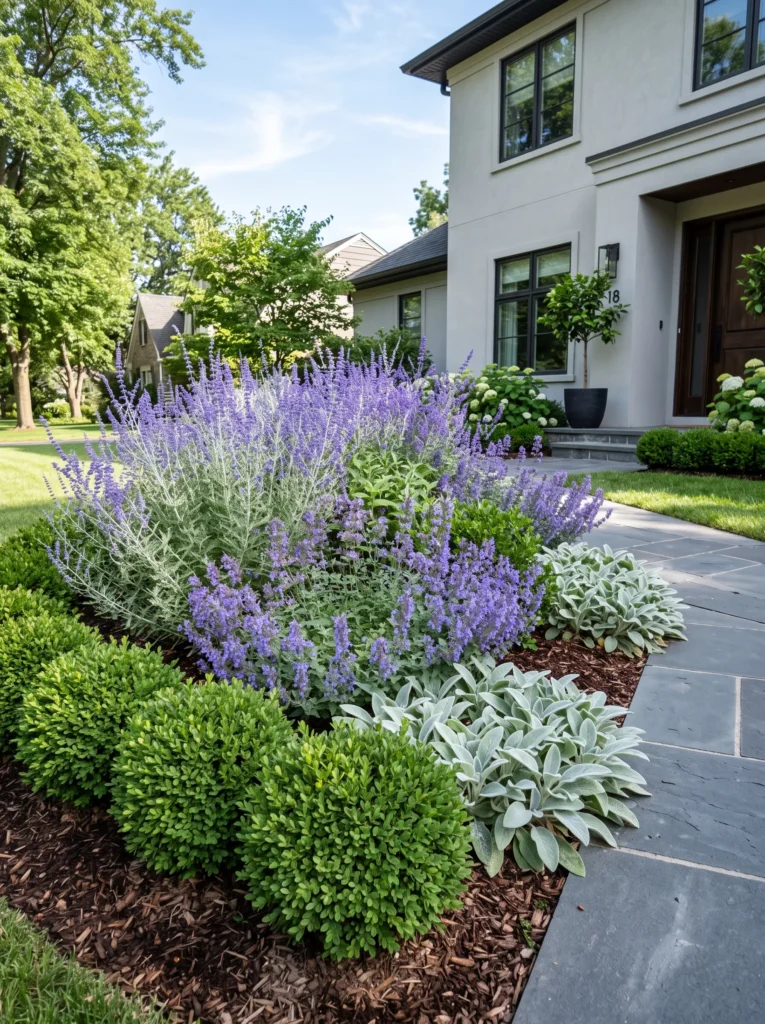
- Replace hostas and daylilies with Russian sage, catmint, and threadleaf coreopsis
- Layer in boxwood ‘Green Velvet’ for structure deer rarely browse
- Add lamb’s ear along the front edge for texture and scent deterrence
- Space plants 18 inches apart to allow full mature spread by next fall
- Mulch with cedar chips, which carry a scent deer tend to avoid
- Skip anything from the lily or hosta family entirely in deer-heavy areas
Why this works: Deer avoidance isn’t about a single repellent plant — it’s about aromatic foliage oils like those in Russian sage and catmint, which deer find unpalatable enough to consistently browse around rather than through.
A front bed that gets grazed down to stubs every few weeks is exhausting to maintain, and most homeowners respond by adding sprays instead of rethinking the plant list. The more permanent fix is choosing plants deer skip on their own. Russian sage, catmint, and threadleaf coreopsis all contain aromatic oils in their foliage that deer find unappealing, so they browse around these plants rather than through them — no spray required. Fall is the ideal time to make this switch, since newly planted aromatic perennials get a full dormant season to establish roots before facing their first spring grazing pressure.
Boxwood ‘Green Velvet’ adds structure that holds its shape year-round and rarely gets touched, giving the bed a backbone even in winter when the perennials die back. Lamb’s ear along the front edge adds soft, silvery texture and reinforces the same scent-based deterrent. Spacing everything a full 18 inches apart might look sparse at planting, but it gives each plant room to reach its mature spread by next fall, filling in fully without the crowding that leads to fungal issues in humid weather.
Wind-Battered Corner Fix
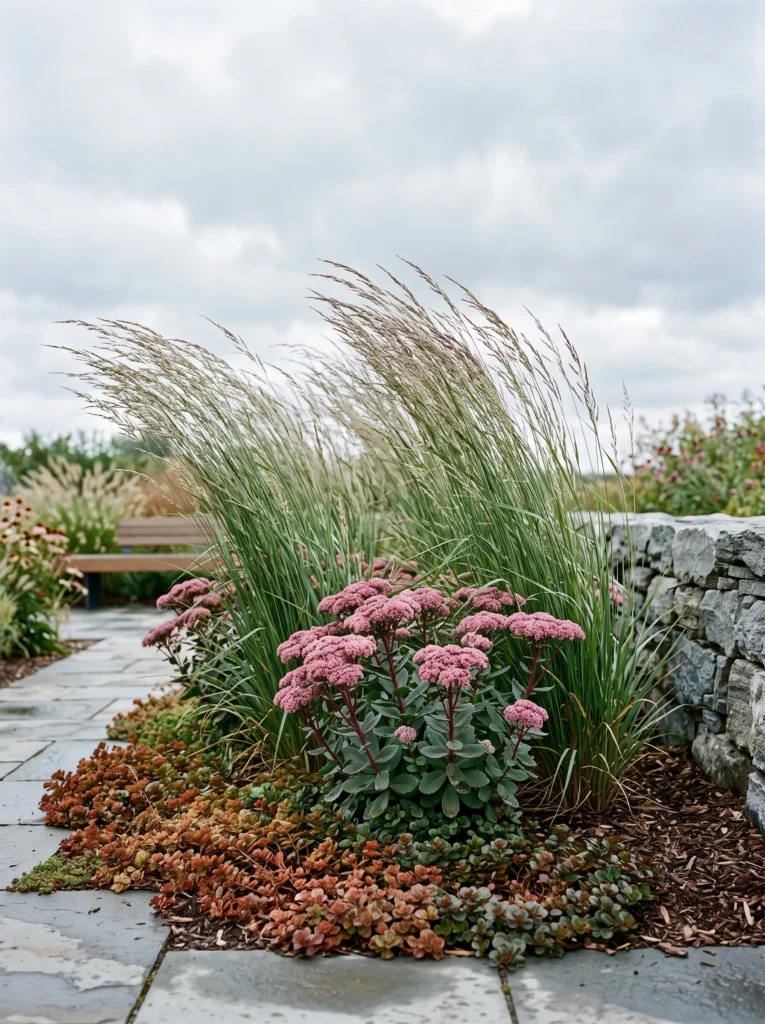
- Replace flimsy annuals in an exposed corner with wind-tolerant ornamental grasses
- Anchor with ‘Northwind’ switchgrass, which holds a rigid, upright form in wind
- Add sedum ‘Matrona’ at the base for weight and late-season color
- Skip tall, floppy perennials entirely — they’ll shred in sustained gusts
- Stake nothing; choose plants structurally suited to the site instead
- Underplant bare gaps with creeping sedum for a low, wind-resistant carpet
Why this works: ‘Northwind’ switchgrass was specifically bred for a tight, vertical growth habit that resists lodging in wind, which is why it stays upright through storms that flatten looser ornamental grasses entirely.
Every yard has that one exposed corner — near a fence gap or the side of the house — where wind shreds anything delicate within a week of planting. The usual response is staking, which is a losing battle against sustained gusts. The better fix is choosing plants built for the site’s actual conditions. ‘Northwind’ switchgrass was bred specifically for a narrow, rigid, upright habit, unlike looser ornamental grasses that splay and flop once wind pressure builds. Planted in fall, it roots deeply enough by spring to handle a full season of gusts without needing a single stake.
Sedum ‘Matrona’ at the base adds visual weight low to the ground, where wind has the least effect, along with rich mauve-pink color that holds through several frosts. Creeping sedum fills any remaining bare soil with a mat-like, ground-hugging habit that simply can’t be knocked over. The result is a corner that finally looks intentional instead of like a spot where nothing survives — because for the first time, everything planted there was actually suited to the wind it faces.
Overgrown Hedge Reset
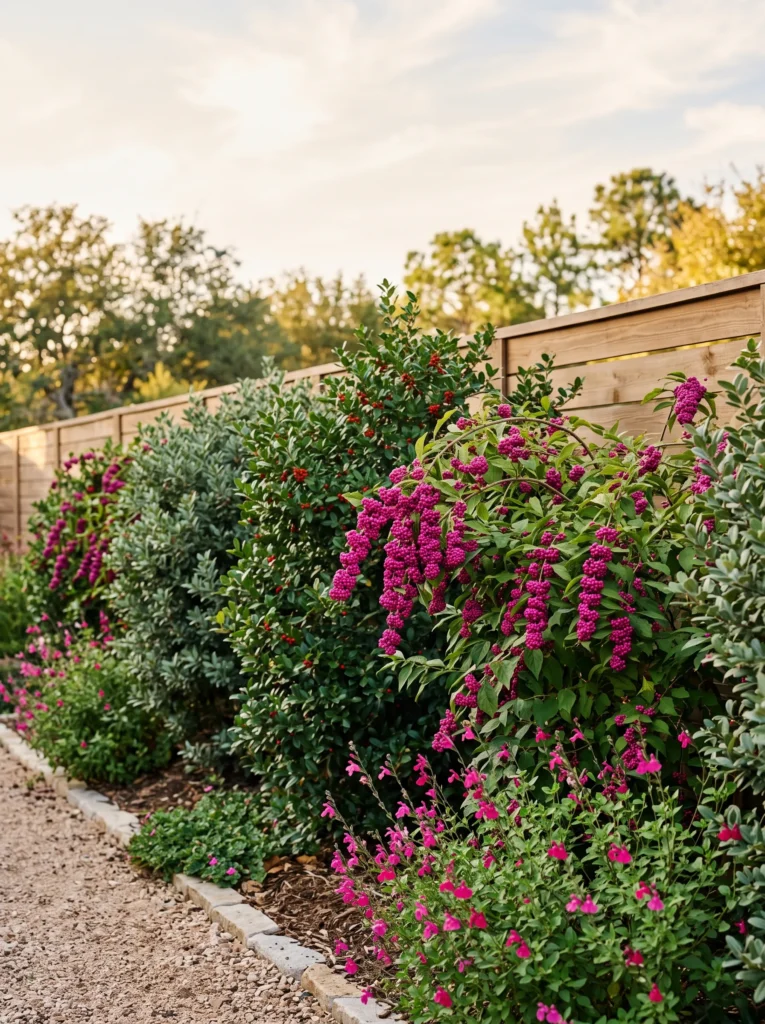
- Remove a straggly, overgrown privet hedge down to a clean fence line
- Replace with a mixed screen: yaupon holly, wax myrtle, and beautyberry
- Space each shrub 5 feet apart to allow natural form rather than shearing
- Let beautyberry’s magenta fall berries provide seasonal color the old hedge never had
- Underplant the base with autumn sage for a low pollinator-friendly layer
- Skip formal shearing entirely — let each shrub keep its natural silhouette
Why this works: A mixed-species screen resists the total collapse a single-species hedge risks when one pest or disease moves through, and it gives year-round interest a solid privet wall never could.
A single overgrown privet hedge is one of the most common yard features people inherit and never touch, mostly because it feels like an all-or-nothing project. But a mixed screen planted in fall solves the density problem privet was originally meant for, while adding real seasonal interest. Yaupon holly stays evergreen through winter, wax myrtle brings fine aromatic texture, and beautyberry produces clusters of vivid magenta berries in fall that no clipped privet hedge has ever offered. Planting now lets all three establish root systems through the cool months, well before next summer’s heat tests them.
Spacing each shrub five feet apart, rather than jamming them tight the way a formal hedge is planted, lets each one keep its natural shape without constant shearing. That’s a deliberate trade — a slightly looser screen in exchange for far less annual maintenance. Autumn sage tucked along the base fills the lower layer with color and draws pollinators through the last warm weeks of the season, finishing a screen that looks intentional and layered instead of like a wall of identical green.
Cracked Concrete Walkway Redo
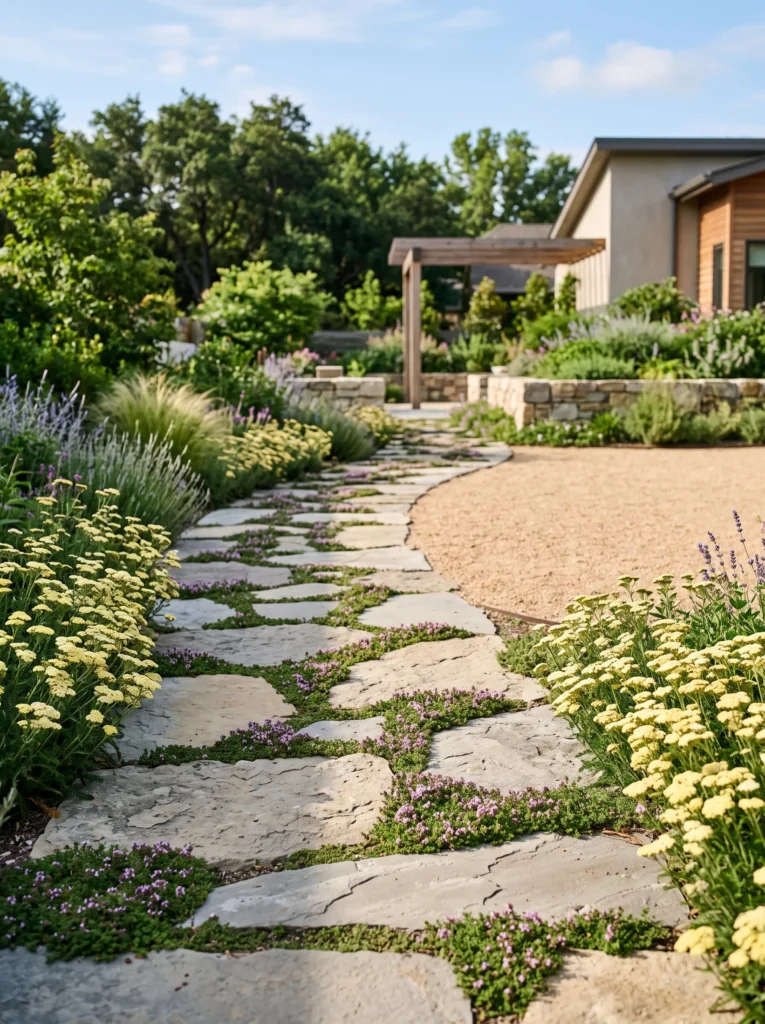
- Remove a cracked, heaving concrete walkway down to bare, compacted soil
- Replace with irregular flagstone set in a sand-and-gravel base, not mortar
- Leave 1-inch gaps between stones and fill with creeping thyme
- Border the path with dwarf yarrow in a soft yellow-cream tone
- Slope the base slightly away from the house for proper drainage
- Compact the gravel base in 2-inch layers to prevent future settling
Why this works: Concrete cracks and heaves because it’s a single rigid slab reacting to ground movement; a dry-laid flagstone path flexes with the same freeze-thaw cycles instead of fighting them, which is why it lasts decades longer without cracking.
A heaving, cracked concrete walkway is a problem my husband sees constantly, and the fix isn’t patching — it’s rethinking the material entirely. Concrete is a single rigid slab, so when the ground beneath it freezes, thaws, and shifts through the seasons, the slab has nowhere to go but crack. Dry-laid flagstone set on a compacted sand-and-gravel base works with that same ground movement instead of against it; each stone can shift slightly without breaking, which is why a properly built flagstone path can outlast concrete by decades with far less maintenance.
Leaving one-inch gaps between the stones and filling them with creeping thyme turns a purely functional fix into something genuinely beautiful — the thyme releases fragrance underfoot and softens every hard edge of the stone. Dwarf yarrow bordering the path in a pale yellow-cream tone adds low color without competing with the stone’s natural tones. Sloping the base slightly away from the house handles drainage correctly from the start, which is the detail most DIY path projects skip and regret within a year or two.
Blank Fence Line Softener
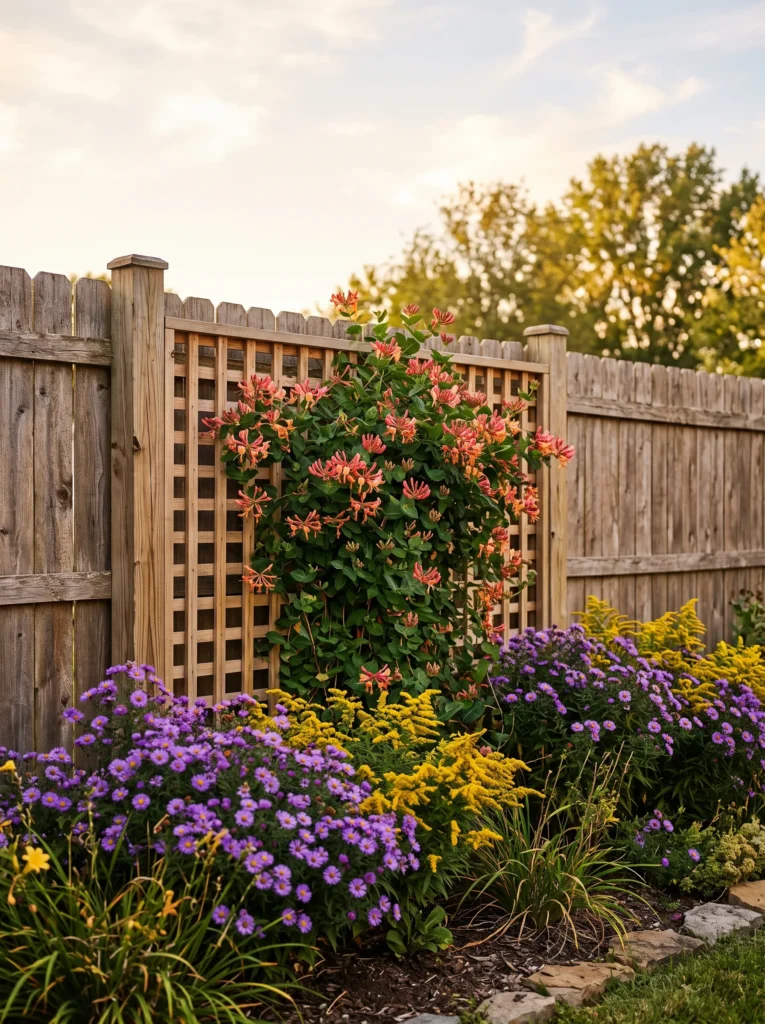
- Install a simple cedar lattice panel along a bare, unattractive fence stretch
- Train climbing ‘Cape Honeysuckle’ or coral honeysuckle vine up the lattice
- Underplant with a mixed border of aster, goldenrod, and switchgrass
- Set the lattice 4 inches off the fence to allow airflow behind the vine
- Stake young vine growth loosely until it grips the lattice on its own
- Add a narrow gravel strip at the base to keep mower access clean
Why this works: A 4-inch gap between lattice and fence isn’t optional — without airflow behind climbing vines, trapped moisture accelerates wood rot on both the fence and the lattice itself within just a few seasons.
A plain, blank fence line is one of the easiest things to fix and one of the most commonly ignored, mostly because people assume vines alone will do the job. My husband’s rule on any vine-and-lattice installation is non-negotiable: the lattice has to sit off the fence, not flush against it. Vines trap moisture against whatever they’re growing on, and without that airflow gap, both the lattice and the fence behind it start rotting within a few seasons — a repair that costs far more than doing the spacing right the first time. Coral honeysuckle planted in fall roots deeply through the cool months, ready to climb aggressively once spring arrives.
Once the structure is right, the planting fills in the rest. Purple aster and golden goldenrod along the base bloom in overlapping waves through fall, while switchgrass adds height and motion behind them. A narrow gravel strip at the very base keeps the planting from encroaching on mower access, so the fence line stays maintained without anyone needing to trim right up against the vine’s base by hand.
Muddy Dog-Run Fix
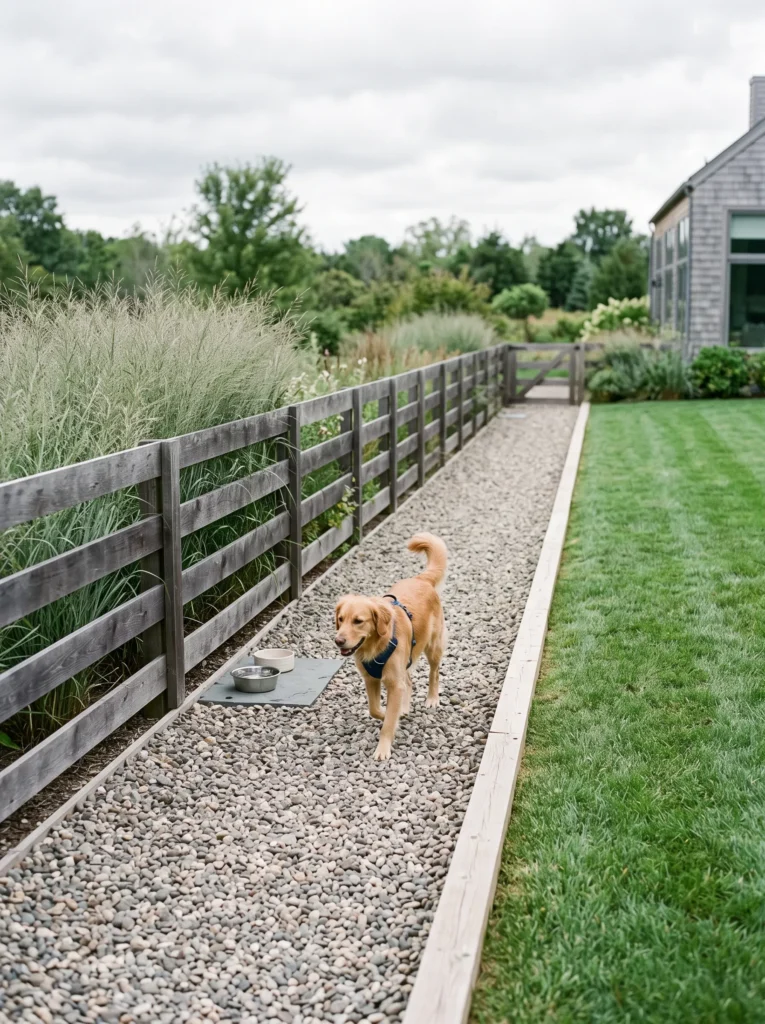
- Replace a worn, muddy dog path along the fence with a dedicated gravel run
- Use pea gravel over a compacted base, never mulch, which retains bacteria and odor
- Border the run with sturdy, non-toxic plants like switchgrass that tolerate foot traffic
- Skip anything with thorns, berries, or toxicity — check the ASPCA plant list first
- Slope the gravel run slightly for drainage so it doesn’t pool after rain
- Add a low wood edging to keep gravel contained and off the lawn
Why this works: Mulch retains moisture and bacteria in high-traffic pet areas in a way loose gravel simply doesn’t, which is why gravel dog runs stay drier and lower-odor through fall’s wetter weeks.
The worn, muddy strip along a fence where a dog runs back and forth is one of the most common backyard eyesores, and grass never survives it no matter how many times it’s reseeded. A dedicated gravel run solves the wear problem directly. Pea gravel over a compacted base drains fast and doesn’t hold onto moisture or bacteria the way mulch or bare soil does, which matters even more once fall rain becomes more frequent. Fall is also a good time to install this kind of hardscape feature, since cooler temperatures make compacting the base and setting edging far more comfortable work than doing it in summer heat.
Bordering the run with dog-safe plants finishes the look without adding any risk. Switchgrass tolerates occasional brushing and accidental trampling far better than delicate perennials, and it’s non-toxic, which matters for anything planted where a dog spends real time. Checking the ASPCA’s toxic plant list before adding anything else is a step worth taking seriously — several common fall favorites, including certain mums and some ornamental bulbs, aren’t safe for pets. A simple wood edging keeps the gravel contained, so it stays a defined run rather than slowly spreading into the lawn.
Sunken Patio Retreat
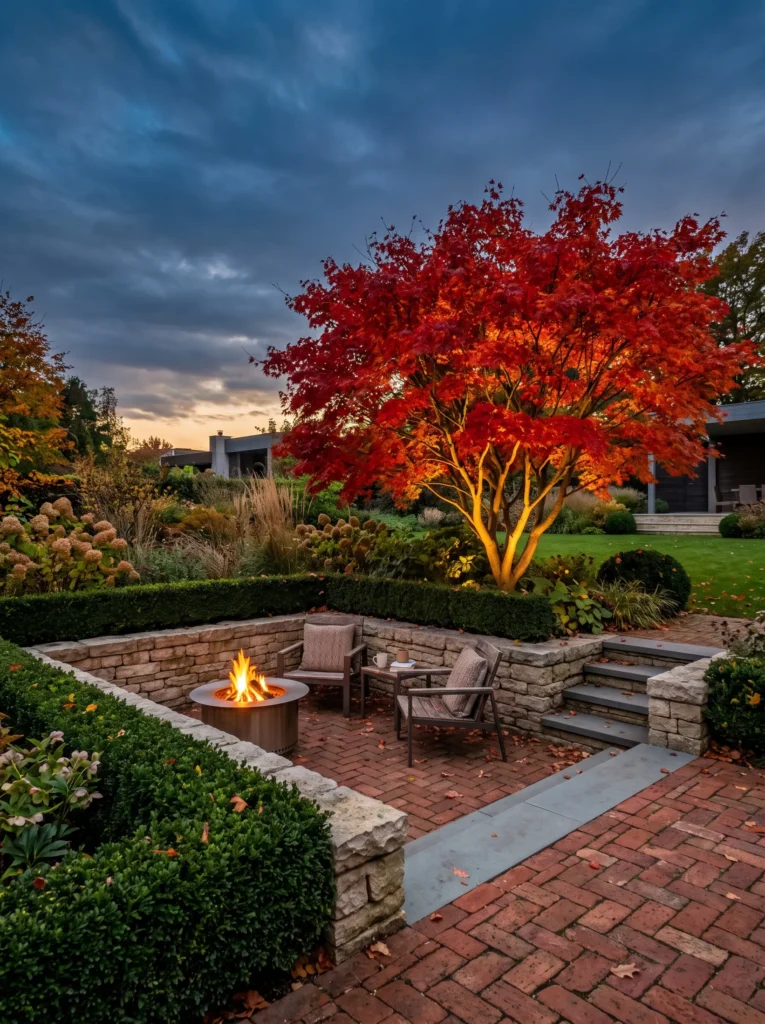
- Excavate a bare lawn low spot into a sunken patio, framed by a low limestone retaining wall
- Set reclaimed brick pavers in a running bond pattern for the patio floor
- Anchor one corner with a multi-trunk Japanese maple for filtered fall canopy color
- Surround the wall’s outer edge with dwarf boxwood in a clipped, low hedge
- Add a built-in bench seat along the retaining wall’s longest side
- Light the maple from below with a single low-voltage uplight for evening depth
Why this works: Japanese maple foliage turns brilliant red and orange in fall because cooler temperatures halt chlorophyll production while anthocyanin pigments, already present in the leaf, become visible for the first time all season.
A low spot in the yard usually gets filled in and forgotten, but it’s actually a natural starting point for a sunken patio — the excavation work is already halfway done by the terrain itself. A limestone retaining wall frames the space and doubles as informal seating, while reclaimed brick underfoot gives the floor warmth that poured concrete never quite achieves. Planting the Japanese maple in fall, once temperatures cool, reduces the transplant stress a tree this size would face if moved during summer heat, letting its root system establish before it has to support next year’s full canopy.
The clipped boxwood hedge along the wall’s outer edge gives the whole space a tailored, finished line even in winter when the maple has dropped its leaves. A single uplight positioned beneath the canopy turns the tree into the evening focal point, throwing dramatic shadow patterns from its branching structure onto the patio floor. What started as an awkward drainage problem becomes the most requested seating spot in the yard by the time evening temperatures cool enough to actually enjoy it outside.
Grapevine Arbor Refresh
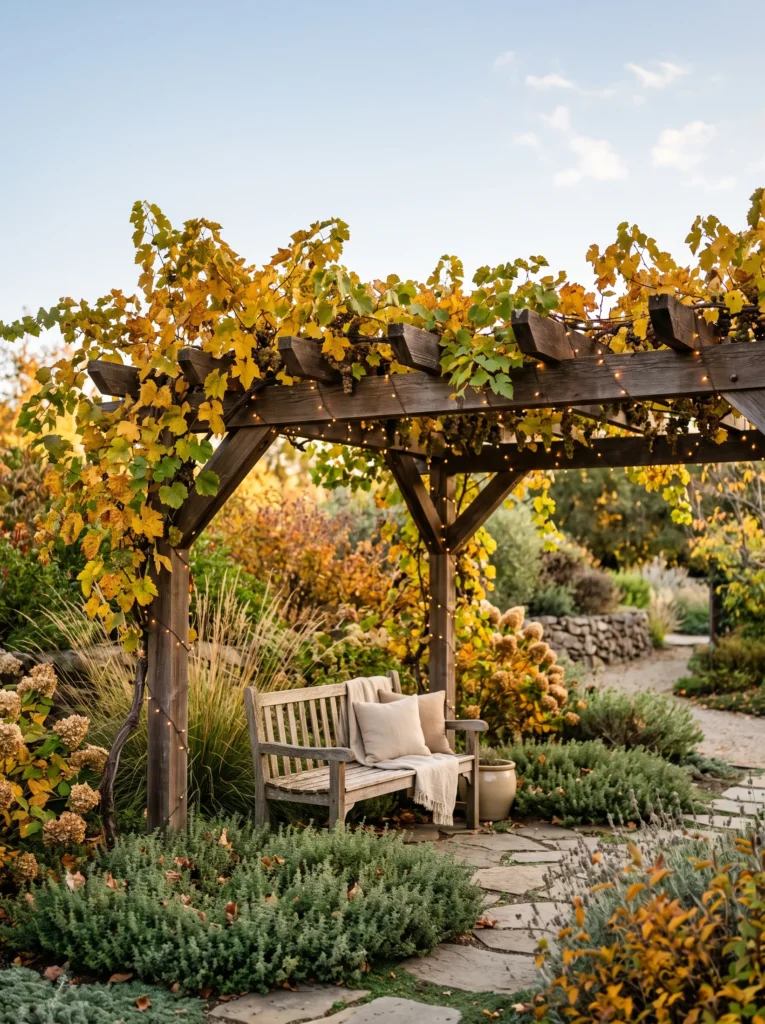
- Replace a bare, unused arbor frame with a trained Concord grape vine
- Prune existing canes back to two or three main leaders before fall dormancy
- Underplant the arbor’s base with a mounding thyme groundcover to suppress weeds
- Add a reclaimed wood bench directly beneath the arbor’s shaded center
- String small warm-white lights along the top framework for evening ambiance
- Mulch the root zone with straw, not bark, to protect roots through winter
Why this works: Grape vines are best pruned in late fall once they’ve gone fully dormant, because cutting canes while sap is still moving causes the plant to “bleed” excess sap and lose stored energy it needs for spring growth.
An empty arbor is one of the most common half-finished features in older backyards — someone built the structure, never planted anything, and it’s sat bare ever since. A Concord grape vine solves that instantly, and it does double duty as both a shade feature and something genuinely useful come next summer’s harvest. My husband built our arbor with extra-wide top slats specifically to give a mature vine’s canes room to spread without crowding, a small framing decision most arbor kits skip entirely. Fall is the right season to prune back to just two or three main leaders, since the vine has already gone dormant and won’t bleed sap the way an early-spring cut would.
Underneath, a mounding thyme groundcover keeps weeds from competing with the vine’s root zone while adding fragrance to the shaded seating area below. A reclaimed wood bench positioned at the arbor’s center gives the space actual daily use rather than remaining purely ornamental, and warm-white string lights along the top framework carry the space into evening once the vine’s canopy has filled in enough to soften the light.
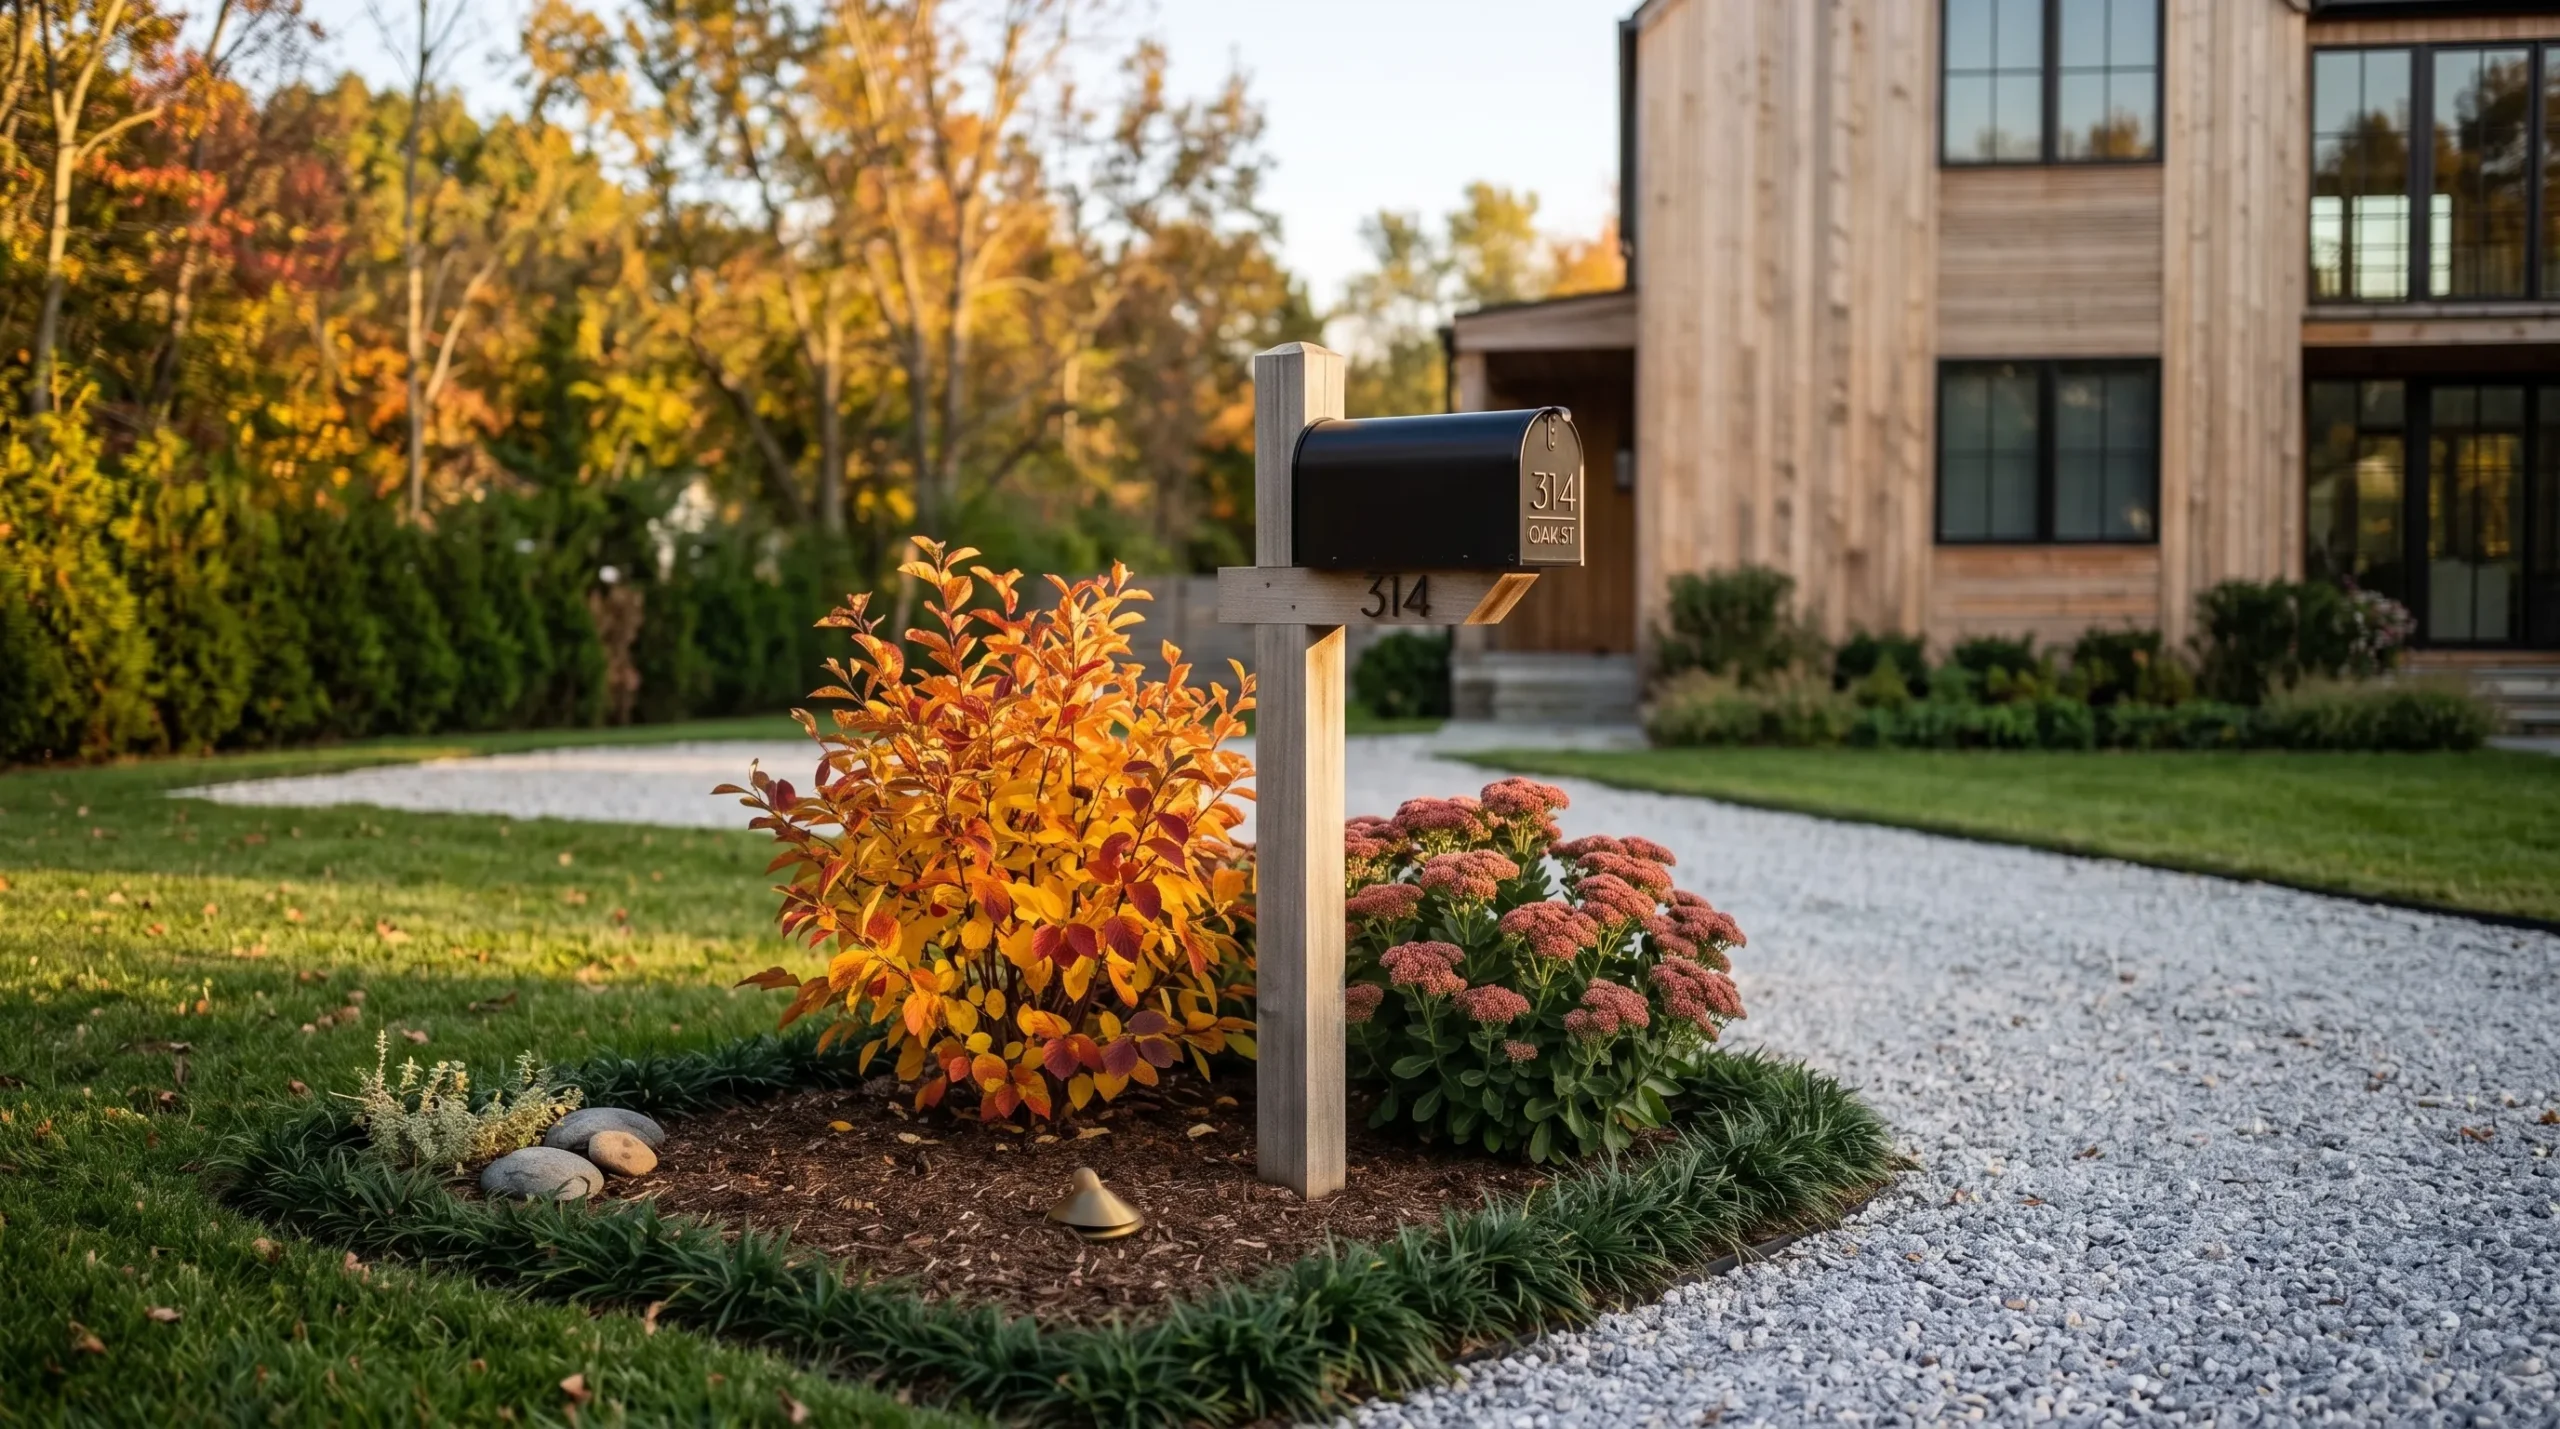
Mailbox Garden Glow-Up
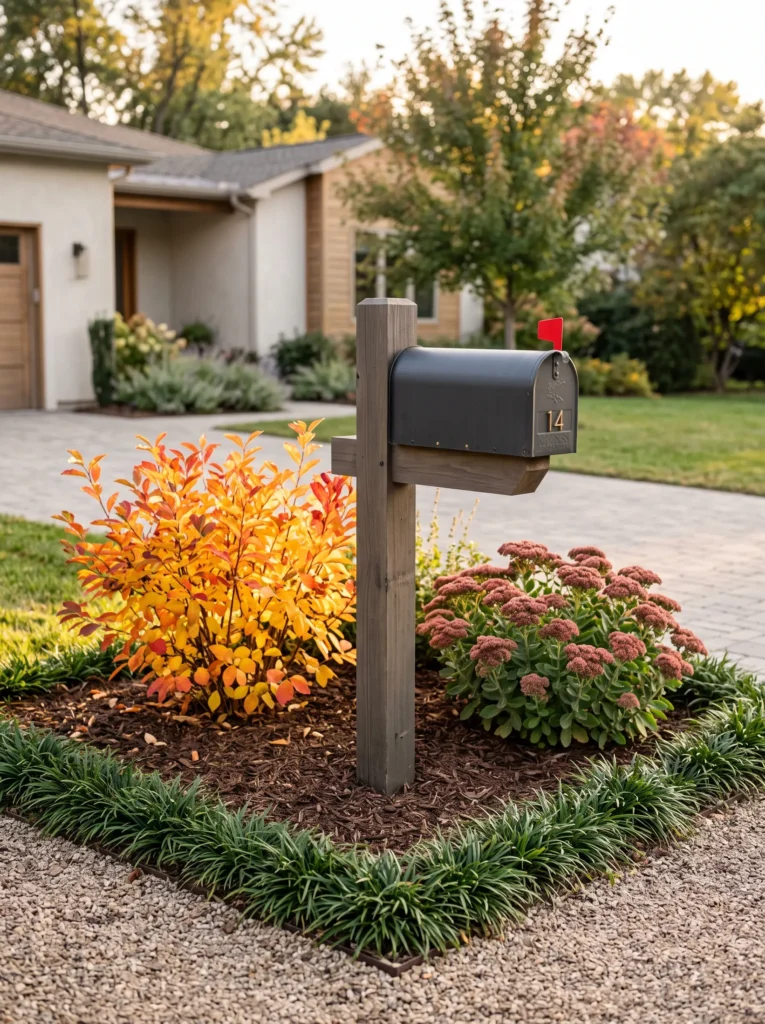
- Remove sparse grass circling a bare mailbox post down to clean bed lines
- Plant dwarf fothergilla at the base for spectacular fall foliage in a single shrub
- Add a low drift of ‘Autumn Joy’ sedum around the post’s opposite side
- Edge the bed with a tight ring of dwarf mondo grass for a finished line
- Mulch with fine pine bark to keep the small bed looking tidy year-round
- Keep the planting under 24 inches tall so the mailbox stays fully visible
Why this works: Dwarf fothergilla produces one of the most reliable multi-color fall displays of any compact shrub — yellow, orange, and red often appearing on the same branch at once, a trait tied to how unevenly its leaves lose chlorophyll as temperatures drop.
The bare grass ring around a mailbox post is one of the smallest, most overlooked spots in a yard, and it’s also one of the easiest to transform in an afternoon. Dwarf fothergilla is the plant that does the heaviest lifting here — it’s compact enough to stay in scale with a mailbox post, but its fall color rivals shrubs three times its size, often showing yellow, orange, and red simultaneously on the same branch. Planted now, it settles into the cooling soil and will be fully rooted well before next summer’s heat arrives, giving it a strong first full growing season.
Sedum ‘Autumn Joy’ on the post’s opposite side balances the composition and adds rust-pink color that holds through several frosts, while a tight ring of dwarf mondo grass finishes the bed’s edge with a clean, deliberate line instead of a ragged mulch border. Keeping everything under two feet tall matters practically, too — mail carriers and visitors need a clear sightline to the box itself, so restraint here isn’t just aesthetic, it’s functional.
Front Steps Planter Pairing
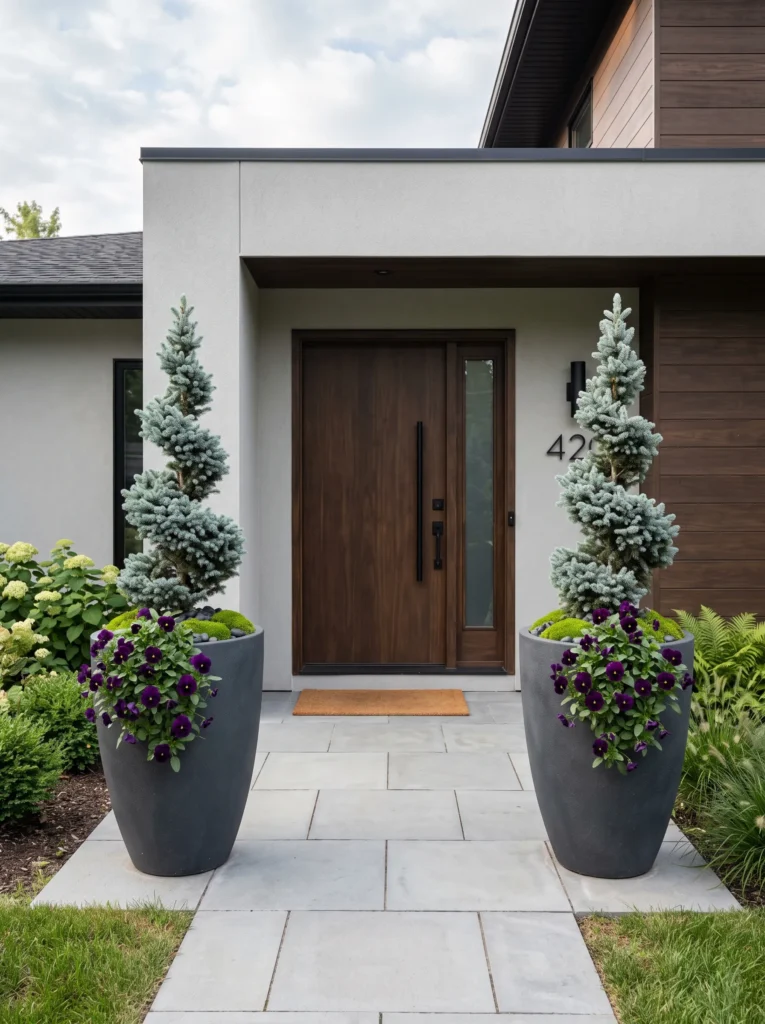
- Flank front entry steps with matching tall ceramic planters in a deep charcoal glaze
- Fill each with a spiral dwarf blue spruce as a structured evergreen centerpiece
- Underplant the base of each pot with trailing violas in deep purple and white
- Add a thin layer of sheet moss over visible soil for a finished look
- Water twice weekly until the first hard frost, then reduce to once weekly
- Keep both planters identical for visual symmetry framing the doorway
Why this works: Violas tolerate temperatures down into the low 20s Fahrenheit without dying back, which is why they’re one of the few flowering annuals that genuinely hold color through a real fall and into winter rather than fading at the first frost.
Front steps with nothing framing them tend to make an entire entrance feel unfinished, no matter how nice the door itself is. A matched pair of tall charcoal planters solves that instantly, giving the entry the kind of symmetry that reads as intentional from the street. Spiral dwarf blue spruce as the centerpiece stays structured and green through the entire year, so the planters never go through an empty or bare stretch the way seasonal-only arrangements do. That evergreen backbone means the display looks finished in July and in January, not just during peak bloom weeks.
Trailing violas underplanted at the base are the detail that keeps the arrangement feeling current through fall, since they tolerate real cold — down into the low 20s Fahrenheit — without collapsing the way more delicate annuals do at the first frost. A thin layer of sheet moss over the visible soil gives the whole planter a tidier, more finished surface than bare dirt ever does, and it’s a five-minute detail that makes a noticeable difference in how polished the entry looks in photos.
Backyard Fire Circle Upgrade
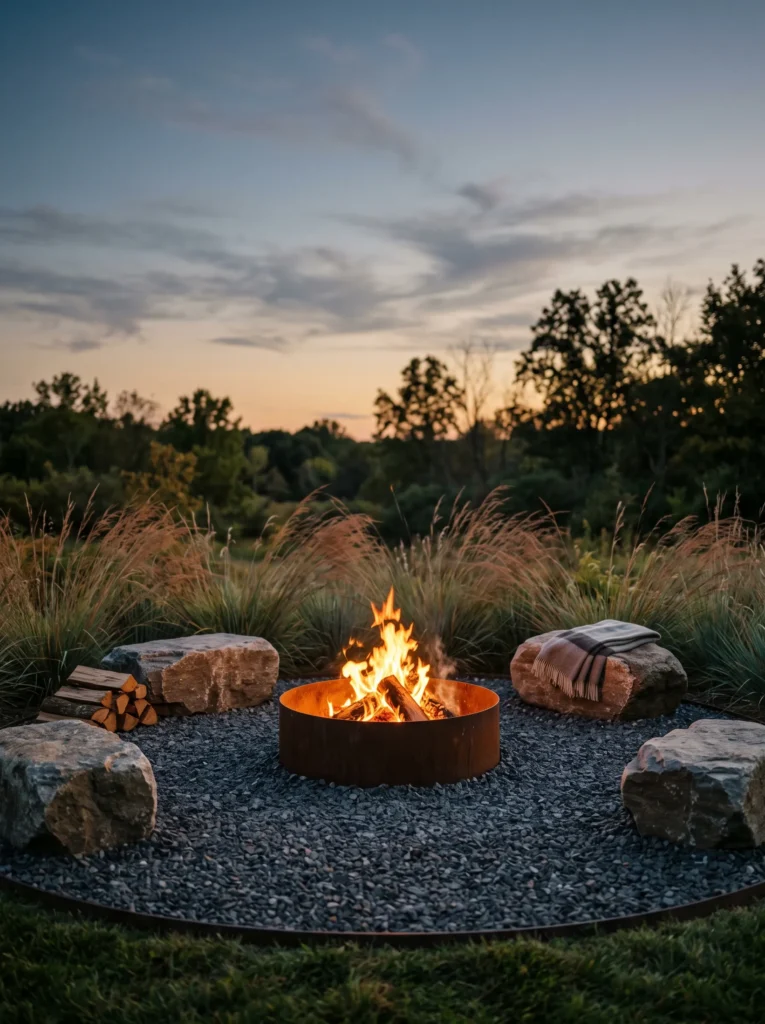
- Replace a bare dirt fire pit area with a circular bluestone gravel base
- Ring the circle with low fieldstone seating boulders spaced for casual gathering
- Plant a loose perimeter of little bluestem and ‘Karl Foerster’ grass for movement
- Set a simple corten steel fire ring at the center for a modern edge
- Keep a 5-foot clearance from any planting to the fire ring itself
- Add low-voltage path lights leading from the patio to the circle’s edge
Why this works: Corten steel develops a stable protective rust layer within its first year outdoors, which is why it can sit in direct fire exposure without the flaking or structural breakdown that painted or untreated steel eventually suffers.
A fire pit surrounded by bare, trampled dirt is one of the most common half-finished backyard features, usually because the planning stopped at “put a ring here” and never went further. Bluestone gravel underfoot solves the mud problem immediately and drains well through fall’s heavier rain. A corten steel fire ring at the center is worth the slightly higher upfront cost over painted steel, since its rust patina is a stable, self-protecting layer rather than a sign of failure — it actually gets more attractive with age and heat exposure, not less.
Fieldstone boulders set loosely around the circle give real seating without the formality of matched furniture, and they hold heat from the fire well into the evening, which extends how long the space stays comfortable to sit in. Little bluestem and feather reed grass planted just outside the clearance zone catch firelight beautifully after dark, their movement and copper tones adding atmosphere without ever posing a fire risk, since the required five-foot buffer keeps them a safe distance from any spark.
Narrow Side-Gate Entry
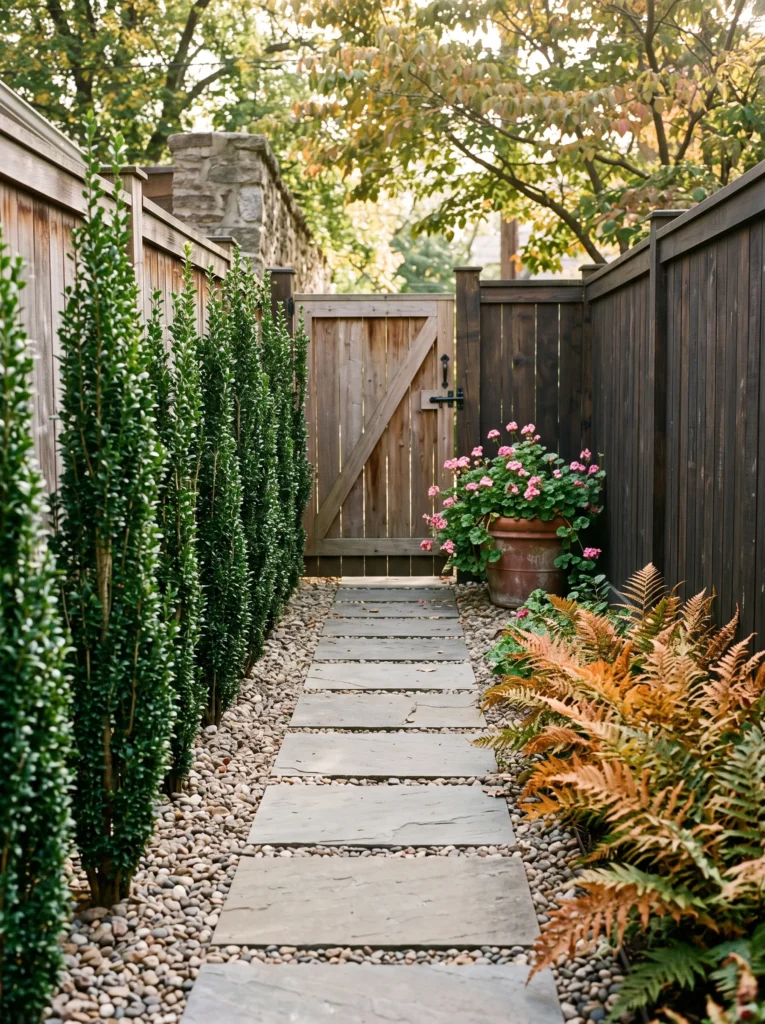
- Replace a bare dirt strip beside a side gate with a tight, layered planting
- Plant a columnar ‘Sky Pencil’ holly directly beside the gate post for vertical structure
- Underplant with a low run of autumn fern along the shaded fence line
- Add a single terracotta pot of trailing ivy geranium at the gate’s latch side
- Set a narrow flagstone stepping path through the strip to the gate itself
- Keep all plantings under 12 inches from the fence for full gate swing clearance
Why this works: Columnar hollies like ‘Sky Pencil’ were bred specifically for width-restricted spaces, staying under 3 feet wide at maturity, which is why they work in gaps too narrow for almost any other structured evergreen.
The narrow strip beside a side gate is one of the most awkward spaces in any yard — too tight for a real garden bed, so it usually sits as bare dirt or gets used to stash trash cans. ‘Sky Pencil’ holly solves the width problem directly; it was bred to stay narrow and upright, rarely exceeding three feet across even at full maturity, so it adds real vertical structure without ever interfering with the gate’s swing. Planted in fall, it settles into cooler soil and establishes before facing next summer’s heat, which matters in a tight spot with limited soil volume to draw moisture from.
Autumn fern along the shaded fence line fills the lower gaps where grass never grows anyway, and a single terracotta pot of trailing ivy geranium at the latch side adds a soft, welcoming detail right where a hand reaches for the gate. A narrow flagstone path through the strip keeps foot traffic off the planted soil, so what used to be a forgotten utility gap becomes a small, deliberate entrance moment instead.
Overgrown Corner Lot Fix

- Clear a tangled, weedy corner lot section down to bare graded soil
- Layer a naturalistic meadow planting: little bluestem, purple coneflower, and black-eyed Susan
- Mow a single curved path through the meadow to make it feel intentional, not wild
- Frame the meadow’s street-facing edge with a low, clipped boxwood border
- Add one flowering crabapple as a single specimen tree near the path’s start
- Leave seed heads standing through winter for structure and wildlife value
Why this works: A clipped border along the front edge of a naturalistic planting is what separates an intentional meadow garden from an untended lot in most viewers’ eyes, since a defined edge signals design even when the interior planting looks wild.
Corner lots often end up neglected because they’re awkward to mow and too visible to ignore, leaving a tangle of weeds that never gets addressed. Rather than fighting that space with turf grass that struggles in the same conditions, a naturalistic meadow planting works with it. Little bluestem, coneflower, and black-eyed Susan are all regionally adapted, low-water plants that outcompete weeds once established, and fall planting lets their root systems develop through the dormant season, ahead of a full growing season next year.
The detail that keeps this from reading as an abandoned lot is the framing. A clipped boxwood border along the street-facing edge gives the whole planting a defined boundary, which visually signals “this is designed” even though the interior is intentionally loose and naturalistic. A single flowering crabapple near the mowed path’s entrance adds a focal point and spring interest, while leaving seed heads standing through winter keeps the meadow feeding birds and looking textural even in the coldest months.
Bare Pool Fence Line
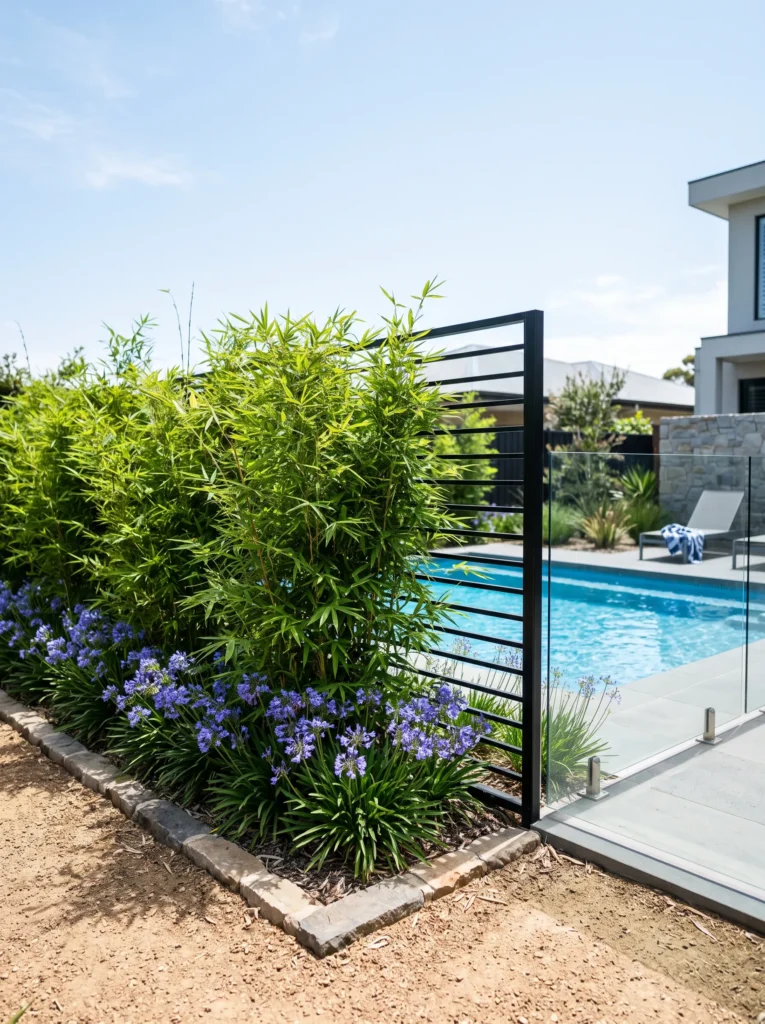
- Soften a stark metal pool fence with a layered planting just outside the perimeter
- Plant clumping (non-invasive) bamboo for a dense, evergreen privacy screen
- Add dwarf agapanthus along the base for strappy texture and late color
- Keep all plantings 12 inches back from the fence line for maintenance access
- Choose thornless, low-litter species near the pool deck to keep debris minimal
- Mulch with decomposed granite instead of bark, which tracks less into pool water
Why this works: Clumping bamboo spreads outward slowly through tight rhizome growth rather than sending runners, which is why it can screen a fence line densely without the invasive spread that running bamboo varieties are notorious for.
A stark metal pool fence, required by code in most areas, rarely gets styled because homeowners assume plantings near a pool mean constant cleanup. Choosing the right species changes that. Clumping bamboo grows in tight, controlled masses rather than spreading through invasive runners, so it screens the fence densely without the maintenance nightmare running bamboo creates. Planted with a 12-inch buffer from the fence itself, it still leaves room to access and maintain the fence line without fighting through dense growth, and fall planting lets it establish before next summer’s peak pool season.
Dwarf agapanthus along the base adds strappy texture and a late round of blue-purple blooms that extend well into fall. Choosing low-litter, thornless species throughout is a practical necessity here — anything that drops significant leaf litter or seed pods becomes a pool-skimming chore. Decomposed granite mulch finishes the bed instead of bark, since it doesn’t float or track into pool water the way loose bark mulch does after a hard rain.
Tired Raised Bed Reset for Fall
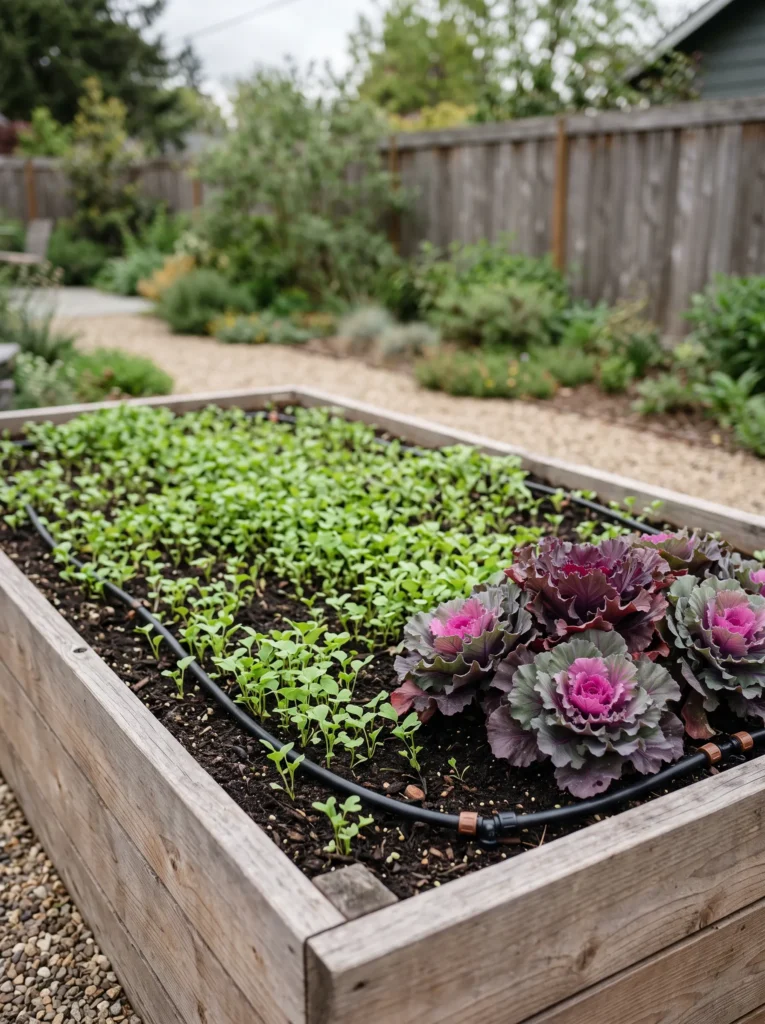
- Remove spent summer vegetables and amend soil with 2 inches of fresh compost
- Plant a fall cover crop of crimson clover to rebuild nitrogen through winter
- Border one corner with a small block of ornamental cabbage for late color
- Rebuild any warped cedar sides with rot-resistant, naturally durable cedar or redwood
- Add a simple drip line along the bed’s length for consistent winter moisture
- Cap open soil areas with straw mulch to prevent nutrient loss from rain
Why this works: Crimson clover is a nitrogen-fixing cover crop, meaning bacteria in its root nodules pull nitrogen from the air and convert it into a form growing plants can use — a fall-planted clover crop can meaningfully replenish a summer vegetable bed’s depleted soil before spring planting begins.
A raised bed that’s produced all summer usually ends the season depleted, and most people just clear it and leave bare soil exposed until spring — which invites erosion and nutrient loss with every fall rain. Planting a crimson clover cover crop instead solves that directly. Clover partners with soil bacteria to pull nitrogen from the air and fix it into the soil in a usable form, so by the time it’s tilled under in spring, the bed has meaningfully more fertility than it would sitting bare all winter. It’s a genuine before-spring investment, not just a decorative fall gesture.
My husband’s rule for raised bed lumber is simple: untreated pine warps and rots within a few seasons, while cedar or redwood naturally resists decay without chemical treatment, which matters most in a structure holding constantly moist soil. A small corner planted with ornamental cabbage adds color while the clover fills in elsewhere, and a simple drip line keeps the bed consistently moist through fall without daily attention, right up until the ground goes fully dormant.
Fall Garden Styling Principles
Great fall landscaping isn’t about adding more — it’s about combining seasonal beauty with plant choices that are actually correct for the time of year. A bed can look stunning in a photo and still be functionally wrong if the plants inside it won’t survive the season or were installed at the wrong time to establish properly.
A few principles to keep in mind as you plan:
- Structure first, color second. Evergreens, hardscape, and defined edges hold a landscape together through winter, long after seasonal color fades. Style around permanent bones, then layer fall interest on top.
- Match the plant to the site’s real conditions — sun exposure, drainage, foot traffic, wind — rather than choosing based on appearance alone. A plant suited to its spot will always outperform and outlast one chosen for looks first.
- Fall’s cooler air and still-warm soil is a genuine planting advantage, not just a styling window. Anything installed now gets a head start on root development before next year’s growing season even begins.
- Defined edges signal intention. Whether it’s steel edging, a mowed path through a meadow, or a clipped border framing a looser planting, a clear boundary is often what separates a “designed” space from one that just looks unmanaged.
- Leave some structure standing through winter. Seed heads, ornamental grasses, and evergreen shrubs keep a landscape from going flat and lifeless once perennials die back, and many also support birds and pollinators through the colder months.
Frequently Asked Questions
When should I start fall garden prep? Most fall garden tasks are best started once nighttime temperatures consistently drop into the 50s Fahrenheit, typically several weeks before the first expected frost in your area. This timing allows newly planted perennials, shrubs, and trees enough time to establish roots before the ground fully freezes.
What are the best plants to add to a garden in fall? Perennials, trees, and shrubs are excellent fall additions because cooler air combined with still-warm soil reduces transplant stress and supports strong root establishment. Spring-flowering bulbs also need to go in during fall, since they require a sustained cold period underground to bloom correctly the following spring.
How do I make a fall garden look styled instead of just seasonal? Focus on structure — defined edges, layered heights, and a consistent color palette — rather than scattering seasonal decor items like pumpkins or mums without a plan. A styled fall garden reads as intentional because the hardscape and plant layering do the visual work, with seasonal color layered on top rather than standing alone.
What are some budget-friendly fall garden ideas? Dividing existing perennials rather than buying new ones, using gravel or mulch instead of pavers for pathways, and choosing a few structural plants paired with inexpensive seasonal annuals like violas can create real impact without a large budget. Cover crops like crimson clover are also an inexpensive way to improve soil for next season.
What are good fall garden ideas for small spaces or patios? Raised planters, matched container pairings, and vertical elements like trained vines or columnar shrubs work well in small spaces because they add structure and seasonal color without requiring in-ground bed space. A single well-styled container arrangement can have as much visual impact as a full garden bed.
Does fall gardening actually work in warm climates like Texas? Yes — in warm-winter climates like much of Texas, fall is often an even better planting window than in colder regions, since the ground rarely freezes solid and plants can continue developing roots through most of the winter months. Many Texas gardeners find their fall-planted perennials and shrubs outperform spring-planted ones for exactly this reason.
Conclusion
A beautiful fall garden isn’t about doing more — it’s about doing the right things at the right time. Every idea in this post pairs real horticultural reasoning with a look worth saving, whether that’s a sunken patio anchored by a Japanese maple or a simple mailbox bed transformed by one well-chosen shrub. Fall’s cooling soil gives every one of these projects a genuine head start most people never take advantage of.
Save this post to Pinterest, pick one corner of your yard that’s been bothering you, and start there. I’ve seen how much a single well-planned fall garden idea can change the way a whole yard feels — small changes, done at the right time, really do add up.