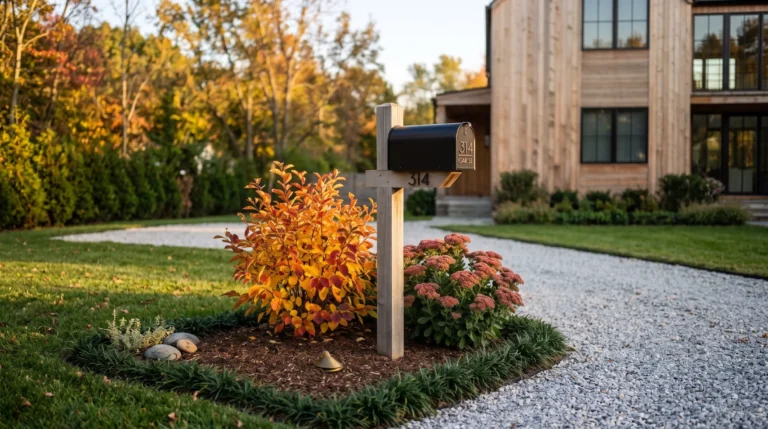
15 Gutter Downspout Drainage Ideas for Your Yard
A downspout has one simple job: move rainwater away from your roof. But where that water ends up can make a surprising difference to your foundation, lawn, planting beds, and the overall look of your yard.
The good news is that drainage doesn’t have to look like an afterthought. With the right combination of grading, stone, plants, underground piping, and architectural materials, even an ordinary downspout can become part of a thoughtfully designed landscape.
I’ve become especially interested in this because my husband’s construction work has shown me how often small drainage decisions affect the bigger picture. A beautifully landscaped yard can still struggle when water is directed toward the wrong place.
These 15 gutter downspout drainage ideas explore ways to move and manage runoff while making the drainage detail feel intentional—from copper rain chains and natural creek beds to hidden pop-up emitters and planted rain gardens.
Why Downspout Drainage Matters
Downspout drainage matters because roof runoff can affect the structure beneath your landscaping, not just the appearance of your yard. Poorly directed water is a common contributor to foundation cracking and basement moisture because pooling saturates soil and creates hydrostatic pressure against foundation walls. That is a construction issue, not simply a landscaping inconvenience.
My husband sees this firsthand on home projects: a beautiful planting bed can still perform badly when the downspout empties beside the footing. I wrote these gutter downspout drainage ideas to bridge that gap, pairing sound water management with materials, plants, and layouts that feel intentionally designed.
A good drainage detail should disappear into the landscape—or become part of it.
1. Charcoal Concrete Splash Block
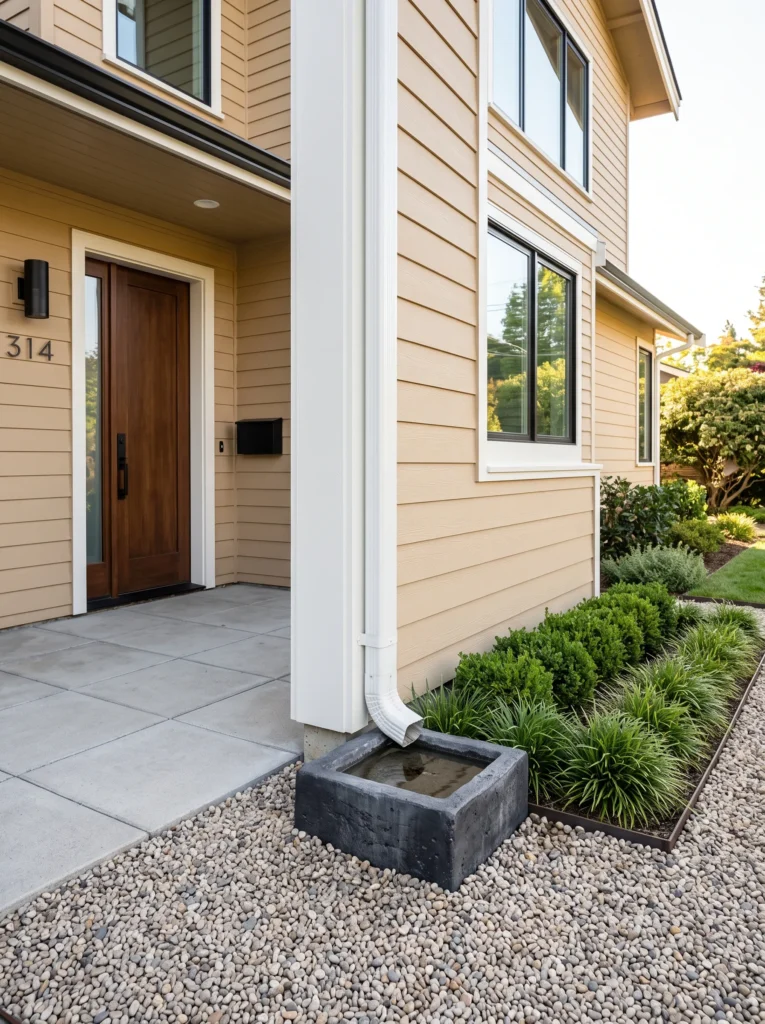
- Drainage solution: Decorative cast-concrete splash block beneath the downspout.
- Material: Stained cast concrete with a matte charcoal finish.
- Size: Choose a block approximately 18–24 inches long for a typical residential discharge.
- Placement: Set it on compacted soil or a thin gravel base, pitched away from the foundation.
- Grade: Maintain visible positive slope so water continues moving away from the house.
- Landscape integration: Surround it with pale pea gravel and clipped ornamental grass.
- Style: Best for modern, contemporary, stucco, or dark-brick exteriors.
Why this works: A splash block is effective when its receiving grade continues the water’s path instead of creating a low spot.
A decorative splash block works best when the discharge area is visible and carefully graded. I prefer stained cast concrete with a shallow channel pattern because it reads as an architectural detail rather than a temporary accessory. Set it on compacted soil or a thin gravel bed, with the outlet pitched away from the foundation. For short surface runs, a 4-inch extension is common, but the receiving grade still matters. My husband regularly sees otherwise polished landscapes where water simply stops beside the house. A restrained splash block can redirect that flow while giving the entry garden a deliberate, finished edge.
Choose a charcoal cast-concrete block with a geometric or ribbed face for a contemporary yard. Place it beneath the downspout and continue the surrounding hardscape with matching rectangular pavers, leaving a narrow gravel margin around the drainage point. Keep the block slightly lower than adjacent planting so water follows its intended route instead of crossing a walkway. A matte sealer keeps the concrete understated, while pale gravel creates contrast. This pairing works particularly well beside stucco, fiber-cement siding, or dark-painted brick, where strong architectural lines already define the exterior and the drainage element can echo those shapes.
2. Copper Rain Chain Feature
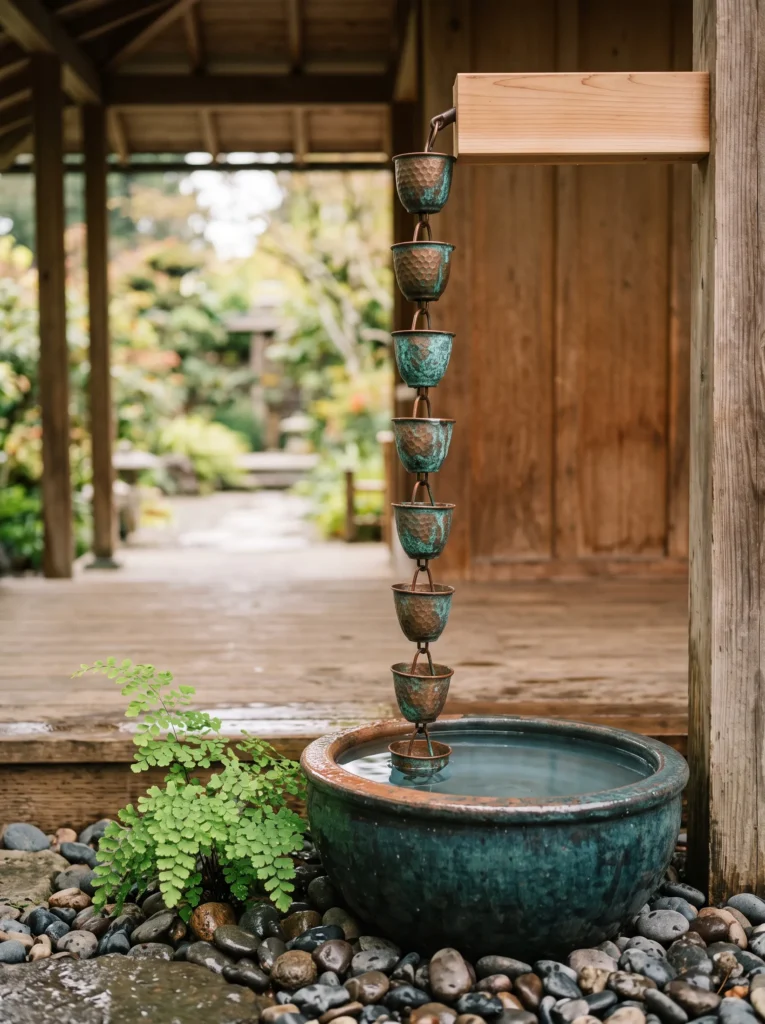
- Drainage solution: Copper rain chain directing roof runoff vertically into a collection basin.
- Material: Solid copper chain with natural weathering and blue-green patina.
- Collection area: Use a 24–36-inch-wide basin or gravel receiving zone beneath it.
- Water control: Grade the collection area away from the foundation.
- Heavy runoff: Connect the basin to an appropriately sized drain when roof volume exceeds the soil’s infiltration capacity.
- Landscape integration: Use rounded river stone, evergreen foliage, and weathered wood.
- Style: Particularly suited to craftsman, Japanese-inspired, cottage, and courtyard gardens.
Why this works: A rain chain makes the water’s vertical path visible while directing runoff into a controlled receiving area.
Copper rain chains turn vertical runoff into a controlled visual feature, especially beside porches, courtyards, and entry gardens. Use a 24- to 36-inch-wide basin or gravel collection area beneath the chain, then grade that area away from the foundation. For heavier roof sections, the chain should discharge into a properly sized catchment rather than relying on open soil alone. Copper develops a blue-green patina outdoors, so it pairs naturally with stone, weathered wood, and evergreen foliage. I have watched my husband use rain chains where a conventional elbow would have looked awkward, particularly on homes with exposed porch details.
For a softer Japanese-inspired composition, let the copper chain descend beside a timber post and terminate above rounded river rock. Choose stones in varied natural sizes rather than uniformly manufactured gravel; the irregular texture makes the water collection point feel more organic. A single sculptural evergreen, such as dwarf yaupon holly, can anchor one side without hiding the chain. Leave enough open space for maintenance and inspection. The copper itself becomes the standout detail, gradually shifting from bright metal to a muted patina that complements natural wood, stone pathways, and restrained architectural planting.
3. Terracotta Drainage Channel
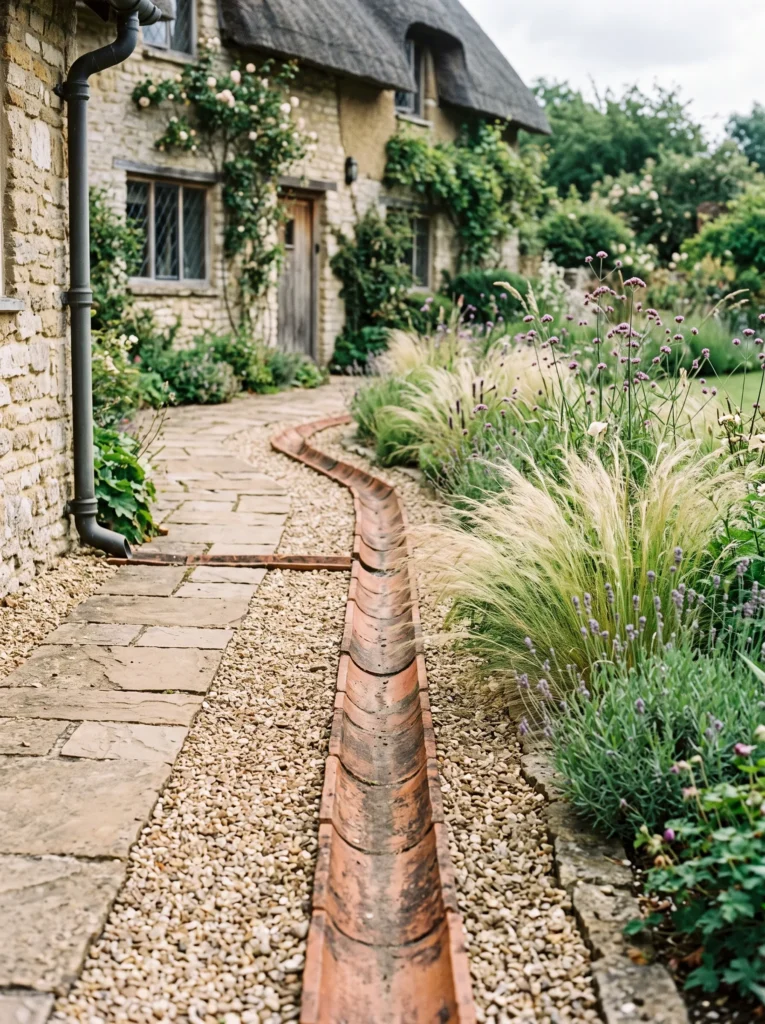
- Drainage solution: Open ceramic-lined channel carrying surface runoff toward a safe receiving area.
- Material: Frost-rated terracotta or glazed ceramic channel tiles.
- Base: Install over compacted gravel to reduce shifting and settlement.
- Slope: Maintain continuous fall toward the outlet; avoid flat sections that trap sediment.
- Difference: Unlike a French drain, this system intentionally carries water at the surface.
- Landscape integration: Border the channel with fine gravel and airy ornamental grasses.
- Style: Ideal for cottage, Mediterranean, Spanish, and relaxed farmhouse landscapes.
Why this works: An open drainage channel is appropriate when water can safely travel across the landscape without needing to disappear underground.
A ceramic-lined channel is a good choice when runoff needs to travel several feet across a visible garden edge. Use frost-rated terracotta or glazed ceramic tiles as the channel lining, with a compacted gravel subbase beneath them. The channel should maintain continuous fall toward its receiving area; avoid creating flat pockets where sediment can collect. Unlike a French drain, this is an open conveyance system, so it is best where surface water can safely remain visible. A narrow border of fine gravel and low ornamental grasses makes the drainage path resemble intentional garden edging rather than an exposed utility trench.
For a cottage garden, warm terracotta creates an especially natural transition between masonry, soil, and planting. Keep the surrounding palette restrained: fine limestone gravel, soft ornamental grasses, and one or two low flowering perennials are enough. The ceramic should remain visible because covering it with mulch defeats the visual and functional purpose of the channel. If your region experiences freeze-thaw cycles, choose outdoor-rated ceramic specifically manufactured for those conditions. The result is a drainage route that reads more like a purposeful garden border than an exposed piece of infrastructure.
4. Hidden Pop-Up Emitter
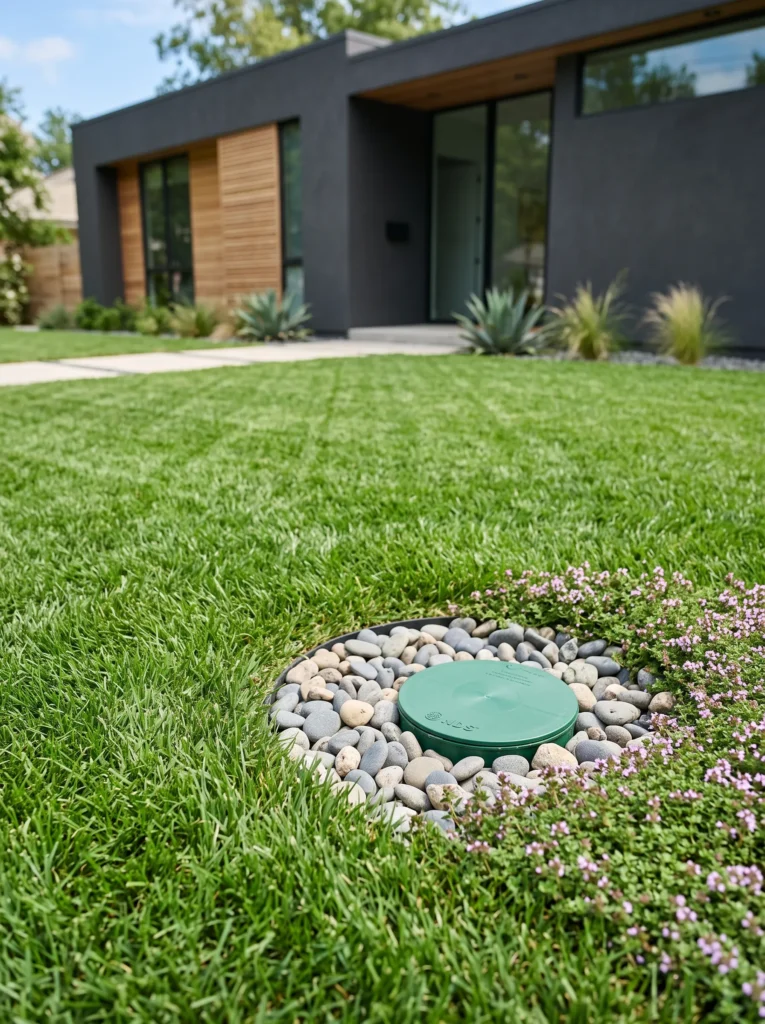
- Drainage solution: Underground 4-inch solid-wall drainage pipe terminating at a pop-up emitter.
- Material: Smooth PVC pipe with a low-profile polymer emitter cap.
- Pipe route: Carry runoff underground to a lawn or planting area safely away from the foundation.
- Technical detail: Maintain approximately 1–2% slope where site conditions allow reliable gravity flow.
- Emitter placement: Position the cap in turf or a low planting zone where it can discharge without creating erosion.
- Landscape integration: Conceal the emitter visually among low groundcover while keeping its lid accessible.
- Style: Excellent for minimalist and contemporary landscapes where visible drainage hardware is distracting.
Why this works: A pop-up emitter keeps most of the drainage infrastructure underground while releasing runoff only when water reaches the outlet.
A hidden pop-up emitter is one of my favorite options for a clean modern yard because almost nothing remains visible after installation. A 4-inch solid-wall PVC pipe can carry water underground from the downspout to a suitable discharge point, while a spring-loaded emitter rises when water reaches it and closes afterward. A roughly 1–2 percent slope provides useful gravity flow when the site permits it. My husband is particularly careful about the pipe route because buried drainage should not create a new problem by crossing utility lines, collecting sediment, or terminating too close to another structure.
The landscaping around the emitter should be intentionally sparse enough to allow inspection. I like placing the cap within a low mat of mondo grass or another tidy groundcover, leaving a small ring of fine crushed stone around the lid. Avoid burying the emitter under mulch, because debris can interfere with its movement. The surrounding planting can soften the mechanical appearance without preventing maintenance. From a few feet away, the drainage point becomes almost invisible, which makes this approach especially effective along crisp concrete paths, contemporary garden beds, and uncluttered foundation plantings.
5. River Rock Creek Bed
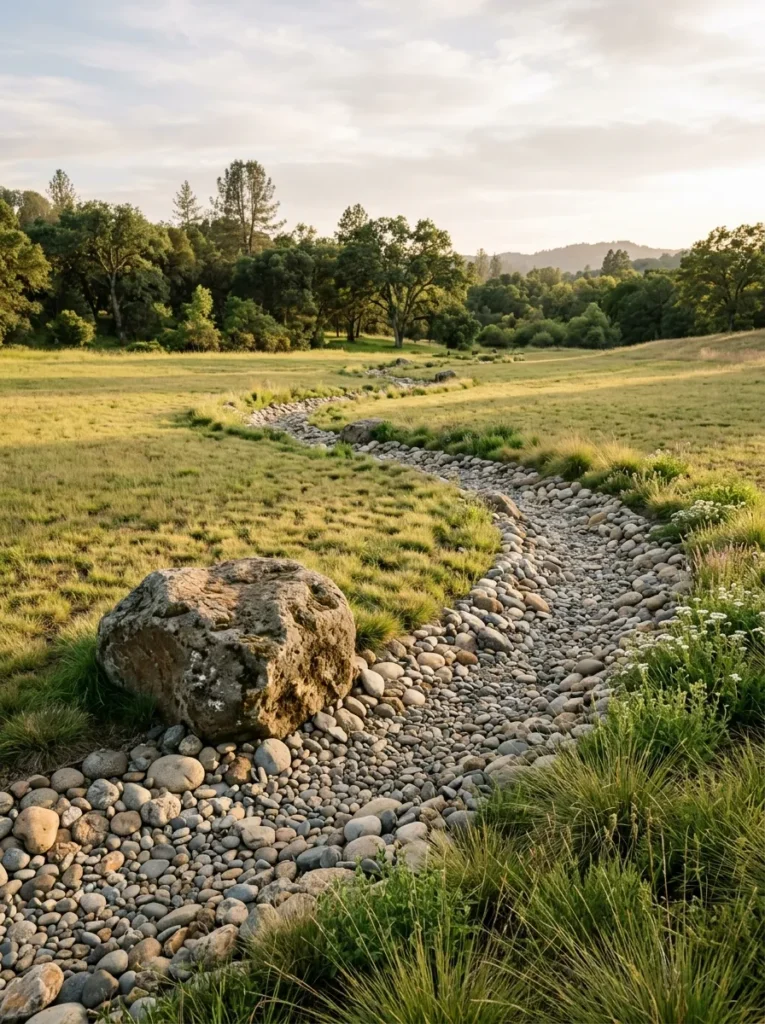
- Drainage solution: Shallow dry creek bed receiving and guiding concentrated downspout runoff.
- Material: Mixed-size natural river rock in gray, tan, and muted brown tones.
- Channel shape: Create a gently curving swale rather than a perfectly straight trench.
- Base: Use compacted soil with landscape fabric only where appropriate for erosion control.
- Rock placement: Set larger stones along bends and smaller rounded stones through the center.
- Landscape integration: Add sedges, ornamental grasses, and drought-tolerant perennials along the edges.
- Style: Works beautifully with natural, farmhouse, woodland, and Japanese-inspired gardens.
Why this works: A properly graded dry creek bed slows concentrated runoff while turning its route into a deliberate landscape feature.
A dry creek bed is more than a decorative line of rocks when its shape follows the actual movement of water. The channel should be shallow, continuously graded, and wide enough to handle the expected runoff without overflowing into nearby planting beds. I like using mixed-size river rock because larger stones can anchor curves while smaller stones fill the central flow path. Where erosion is a concern, the channel can be reinforced beneath the stone rather than simply placing decorative rock over loose soil. The finished feature should look naturally irregular, but its underlying grade should be carefully planned.
For a softer farmhouse landscape, curve the creek bed through a broad planting area instead of running it directly toward the street. Use larger tan and gray stones at bends, then transition to smaller rounded rock through the center. Plant the edges with blue fescue, native sedges, or airy switchgrass so the greenery partially overlaps the stone without blocking water movement. The contrast between flowing stone, fine foliage, and open soil makes the drainage route feel established rather than newly installed. Keep the center relatively open so leaves and sediment can be removed easily after heavy rain.
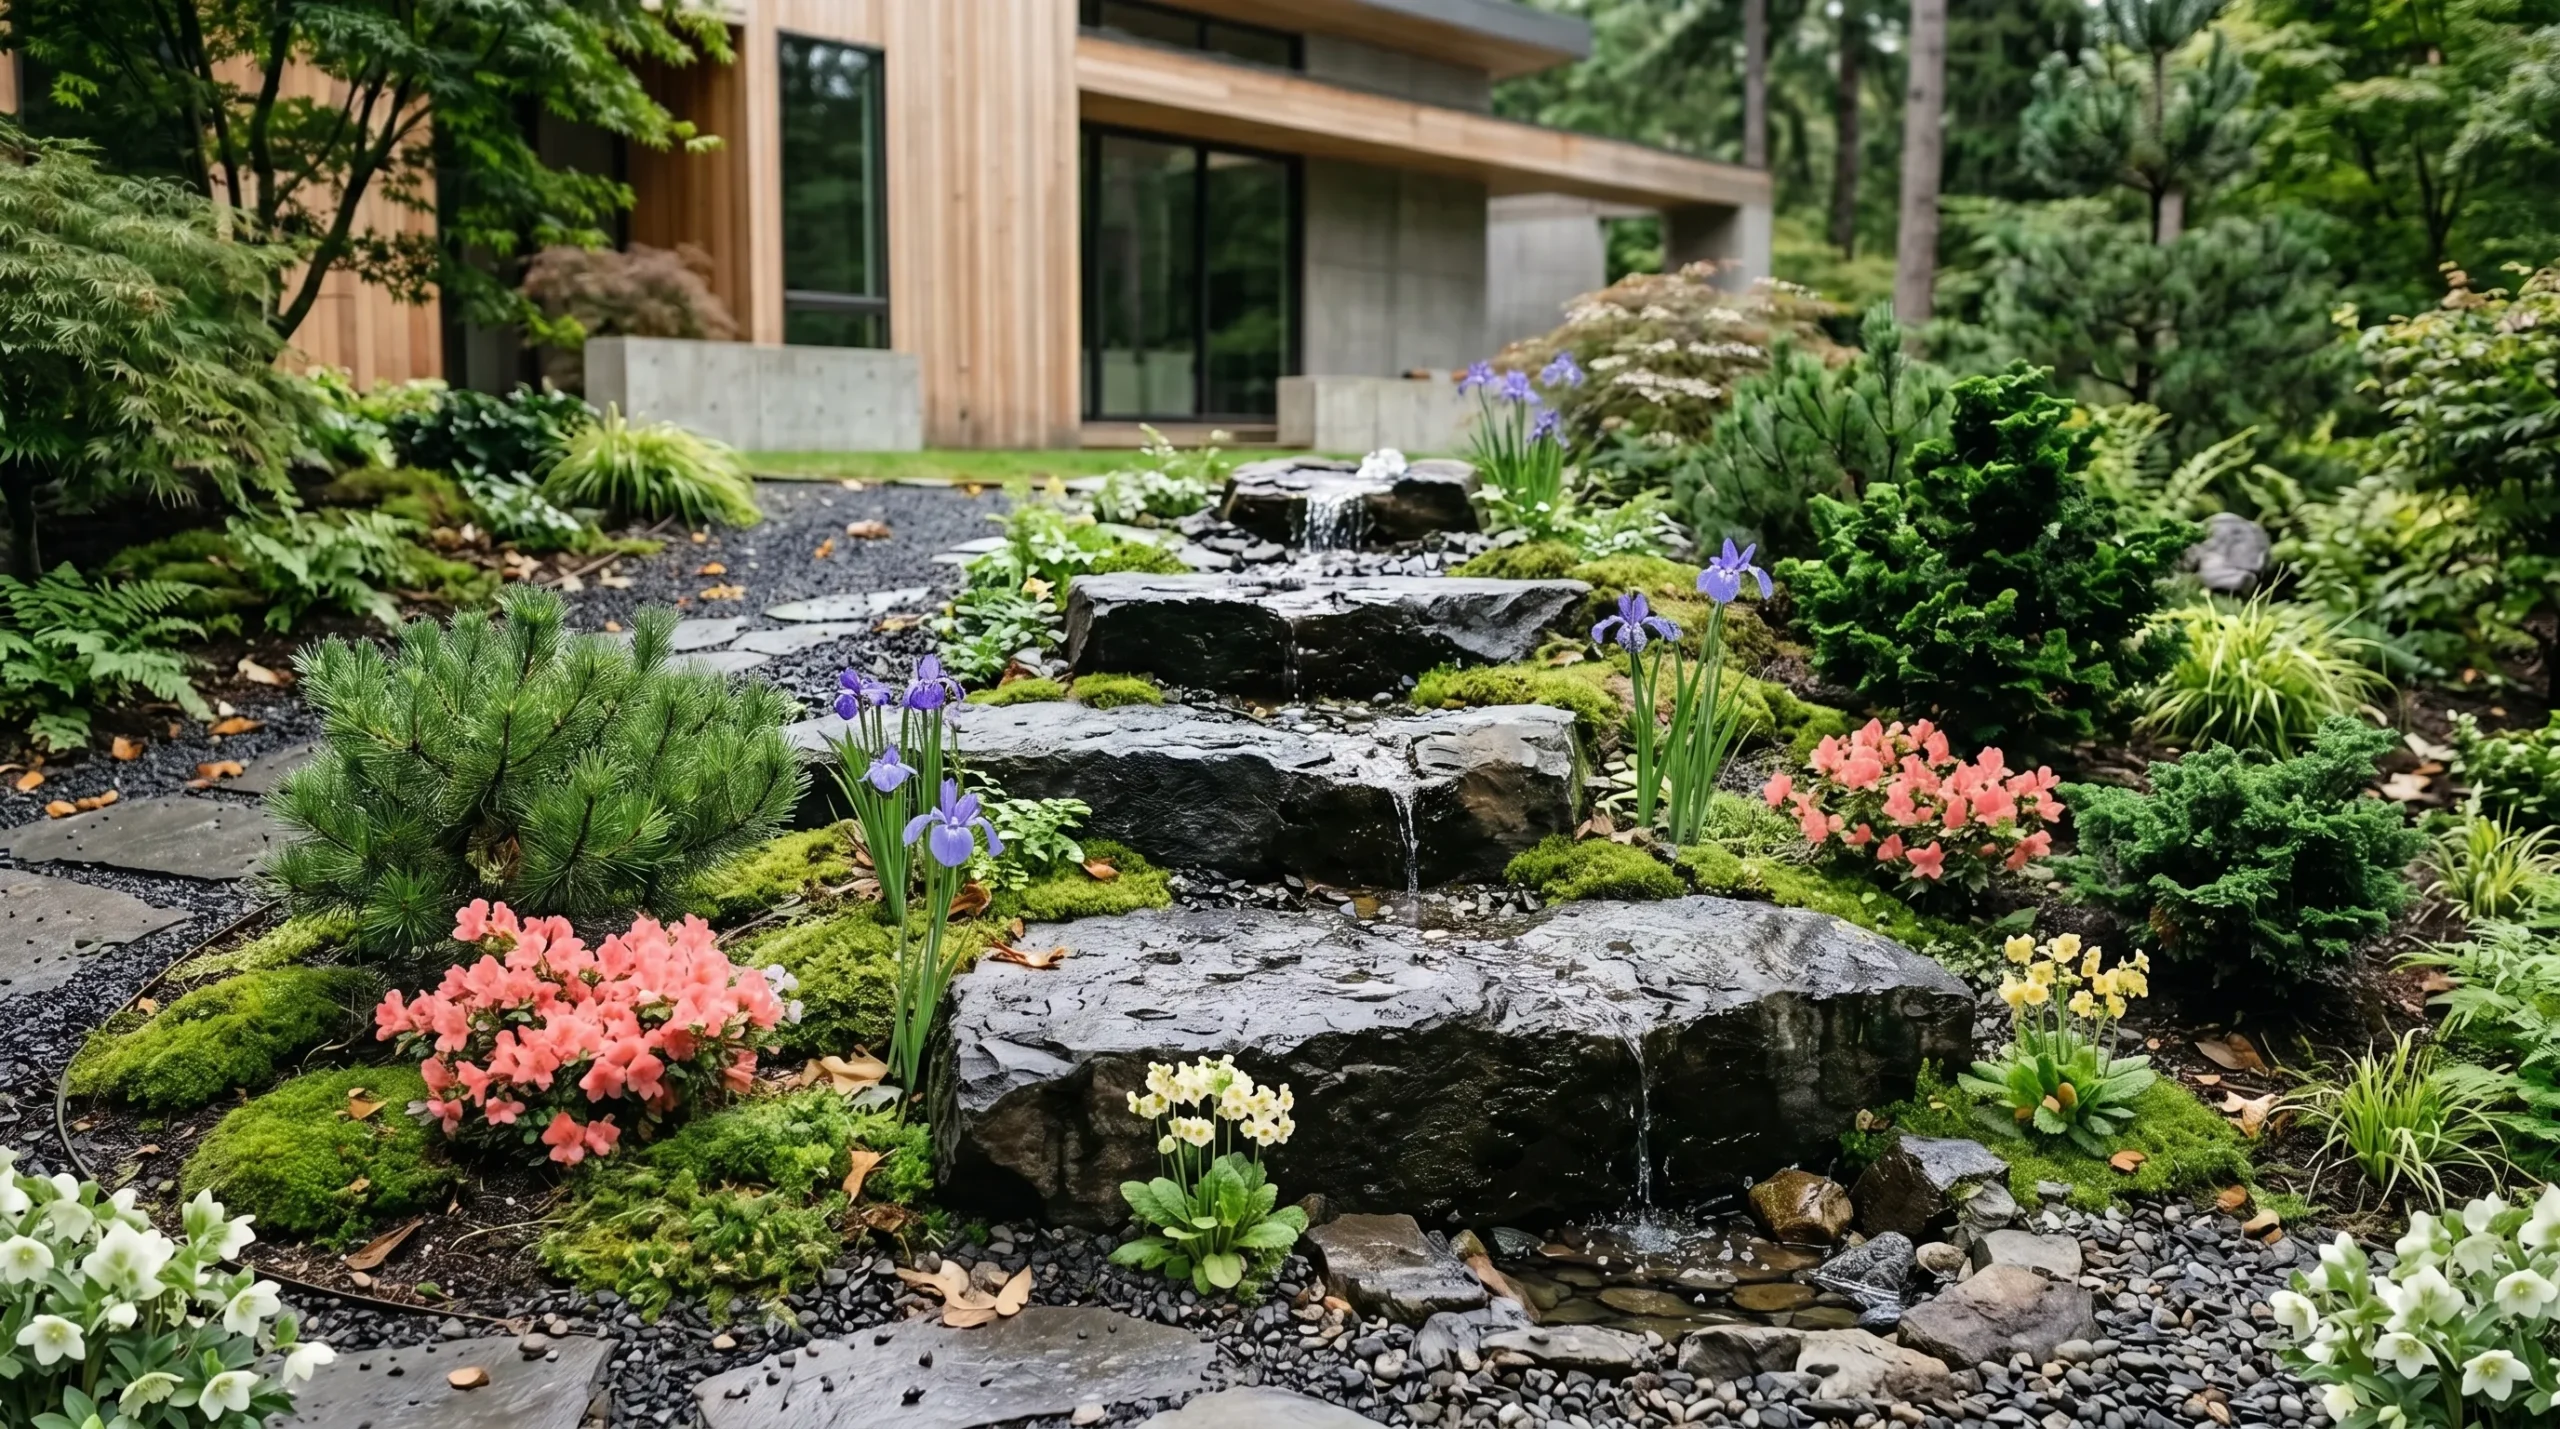
6. Basalt Spillway Steps
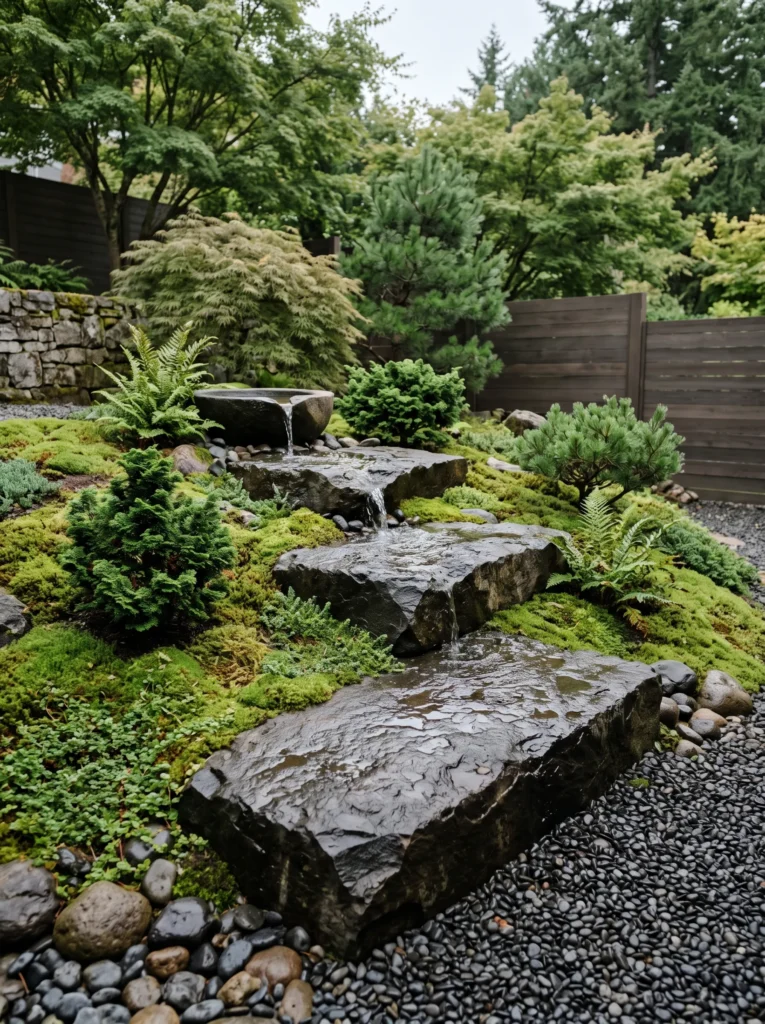
- Drainage solution: Stepped surface spillway moving concentrated runoff through a sloped garden.
- Material: Dark natural basalt slabs with rough-cut edges.
- Construction: Place slabs on a stable compacted aggregate base to limit movement.
- Water movement: Use overlapping stones to create controlled drops rather than one steep descent.
- Erosion control: Secure side edges with additional aggregate and appropriately sized stone.
- Landscape integration: Pair with moss, dwarf conifers, and restrained foliage.
- Style: Suited to Japanese-inspired, modern woodland, and architectural gardens.
Why this works: Stepped stone breaks a steep water path into shorter drops, reducing the force of runoff before it reaches the lower garden.
A basalt spillway can be especially effective when a downspout discharges onto a noticeably sloped property. Instead of allowing water to race downhill, a series of overlapping basalt slabs creates controlled changes in elevation. Each slab needs a stable compacted aggregate base so seasonal movement does not alter the drainage path. The stones should overlap enough to direct water forward while resisting erosion around their edges. This approach is different from a dry creek bed because the stone itself forms the stepped conveyance system. It is best suited to landscapes where elevation change is already part of the site.
I first noticed how beautiful this approach could be on a project my husband was working around a sloped foundation garden. The solution did not need to be hidden; the dark stone became an architectural extension of the house. For a quieter Japanese-inspired look, combine rough basalt with dwarf conifers, mossy groundcover, and restrained green foliage. Keep the planting sparse around the spillway so the stone remains legible. At the bottom, transition into a wider gravel receiving area rather than allowing the final drop to empty directly into bare soil.
7. Sculpted Metal Grate
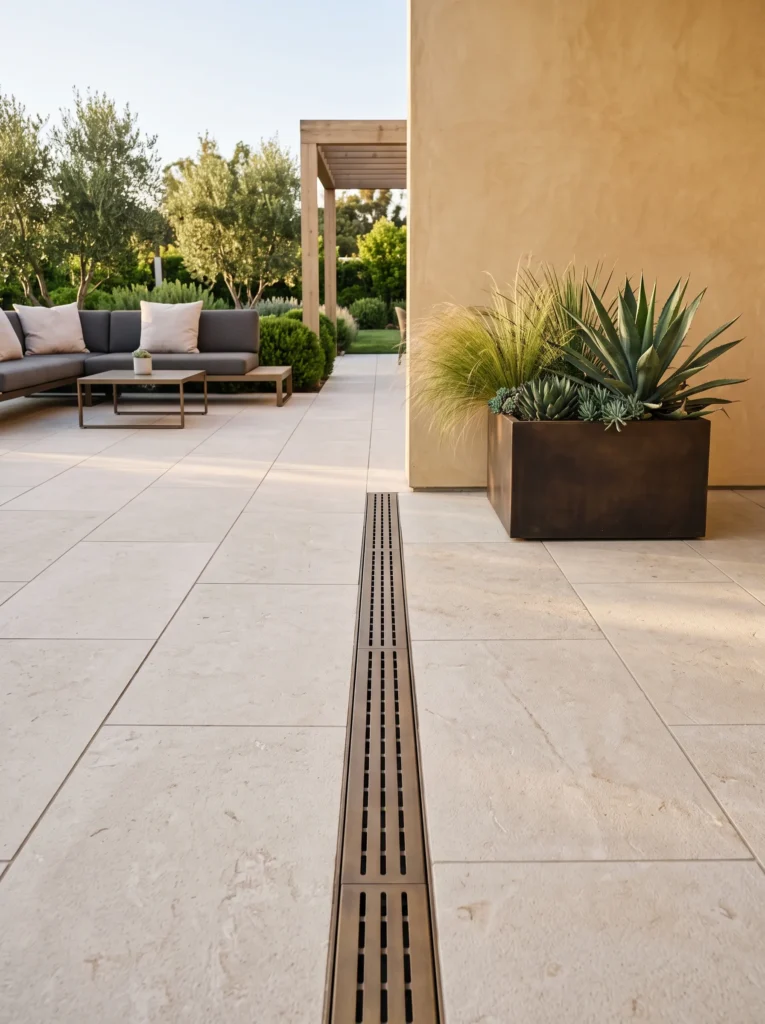
- Drainage solution: Catch basin connected to an underground drainage line.
- Material: Powder-coated steel grate with a bronze architectural finish.
- Grate design: Choose narrow linear slots rather than a visually busy utility pattern.
- Placement: Install at a genuine low point where surface runoff naturally collects.
- Pipe connection: Connect the basin to solid drainage pipe sized for the expected water volume.
- Landscape integration: Frame the grate with large-format porcelain pavers and narrow gravel joints.
- Style: Particularly effective for modern, transitional, and luxury outdoor spaces.
Why this works: A drainage grate becomes visually intentional when its geometry echoes the hardscape surrounding it.
A catch basin is the better choice when water naturally concentrates at a low point instead of simply flowing away from the house. For a refined exterior, I like a bronze-finished steel grate with narrow linear slots installed over the basin. The basin collects surface water before sending it through an underground pipe. My husband often checks the elevation around these installations carefully because the grate must sit at the actual collection point, not merely where it looks convenient. The surrounding grade should guide water toward the basin without allowing soil or mulch to wash across the grate.
To make the drainage detail feel architectural, align the grate with nearby paver joints. Large-format porcelain paving in a warm limestone tone creates a crisp contrast with the dark bronze metal. Keep the joint around the basin clean and narrow, and avoid surrounding it with loose mulch that can migrate into the openings. A linear grate is particularly attractive along a patio edge or beside a retaining wall because it follows the geometry of the hardscape. The result feels considered from every angle while remaining accessible for cleaning and inspection.
8. Coastal Shell Swale
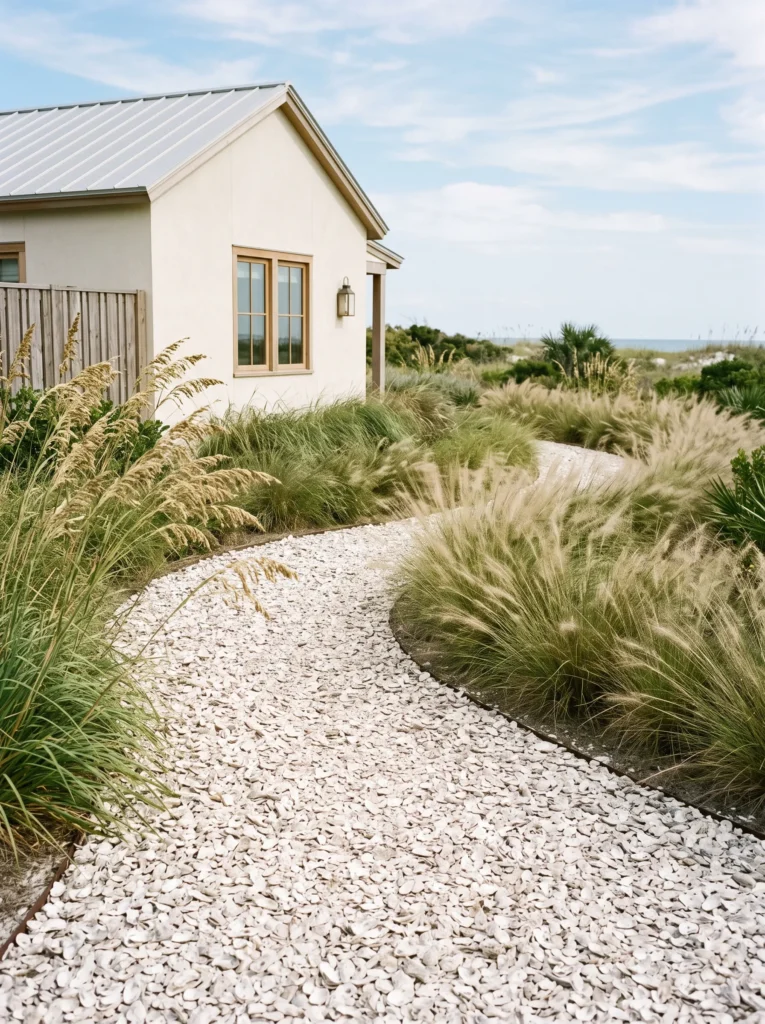
- Drainage solution: Shallow vegetated swale carrying roof runoff through a gently sloped side yard.
- Material: Crushed oyster shell aggregate as the visible drainage surface.
- Channel depth: Keep the swale broad and shallow rather than creating a deep trench.
- Soil consideration: Particularly useful in sandy or fast-draining coastal soils where infiltration is naturally strong.
- Water path: Shape the grade so runoff travels through the swale before dispersing.
- Landscape integration: Add sea oats, beach grass, and salt-tolerant native plants where appropriate.
- Style: Designed for coastal, low-country, and relaxed beach-house landscapes.
Why this works: A shallow swale can spread concentrated roof runoff across a wider area, reducing the intensity of discharge at one point.
A shallow swale works beautifully when a property has enough side-yard space for water to travel gradually. Rather than burying the runoff immediately, shape a broad depression with gentle side slopes and cover the flow path with crushed oyster shell. This approach is especially suitable for sandy soils that infiltrate water readily, although local soil conditions still need to be evaluated. The important part is the grade: water should have a clear route through the swale without backing toward the foundation. The shell surface also makes the drainage feature visually appropriate for coastal architecture instead of looking like an exposed trench.
For planting, I would lean into the coastal character rather than disguising the swale completely. Where locally appropriate, sea oats, beach grasses, muhly grass, or other salt-tolerant native species can soften the edges while leaving the central flow route open. The pale shell creates a natural transition between sandy soil, weathered wood, and light siding. Because plant performance depends heavily on regional conditions, choose species suited to your specific coastal zone rather than copying a plant list from another state. A wide, gently curved swale can become one of the most distinctive elements in a beach-inspired side yard.
9. Granite Channel Edge
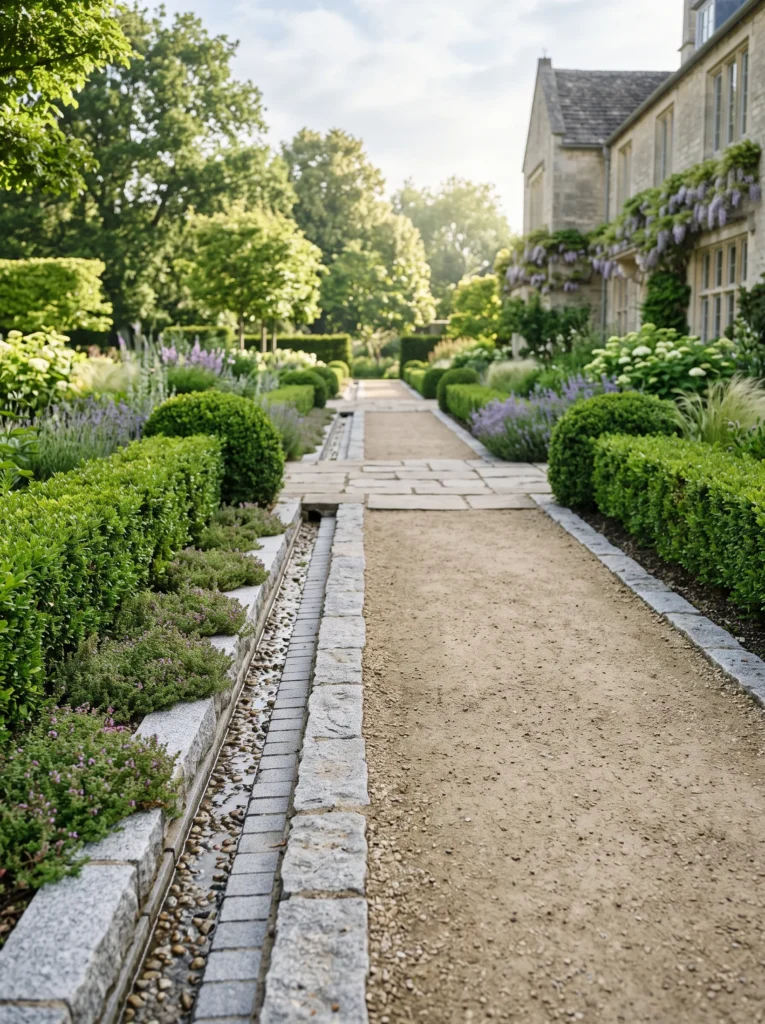
- Drainage solution: Narrow linear rock-lined channel guiding runoff beside a garden path.
- Material: Hand-set split granite edging stones.
- Channel construction: Form a shallow V-shaped or gently concave channel between the stone borders.
- Surface: Use compacted decomposed granite through the center for a cohesive mineral finish.
- Slope: Maintain consistent fall so water does not pool between individual stones.
- Landscape integration: Border with clipped boxwood alternatives, thyme, or low native groundcovers.
- Style: Works with formal cottage, European-inspired, and structured garden designs.
Why this works: A defined stone edge gives surface runoff a predictable route while visually separating water movement from planting areas.
A granite-edged drainage channel is useful when runoff needs to travel alongside a path but you do not want a buried system. Set split granite stones along both sides of a shallow channel, then use compacted decomposed granite through the center. The channel should maintain a continuous fall toward its discharge point, with no isolated depressions between stones. Because this is an open drainage feature, the outlet must lead to a safe receiving area rather than directly toward a foundation or neighboring property. The granite creates a durable transition between hardscape and planting without introducing another visually dominant material.
I like this approach for structured gardens because the stone can echo existing masonry without becoming overly decorative. Keep the planting immediately beside the channel low so its shape remains visible throughout the year. Creeping thyme, compact native groundcovers, or finely textured grasses can soften the granite edges while leaving the center unobstructed. If the house already uses gray stone, granite creates continuity; if the architecture is warmer, choose stones with subtle tan mineral variation. The key is restraint: the drainage channel should look like it belongs to the original garden plan.
10. Cedar Rain Barrel
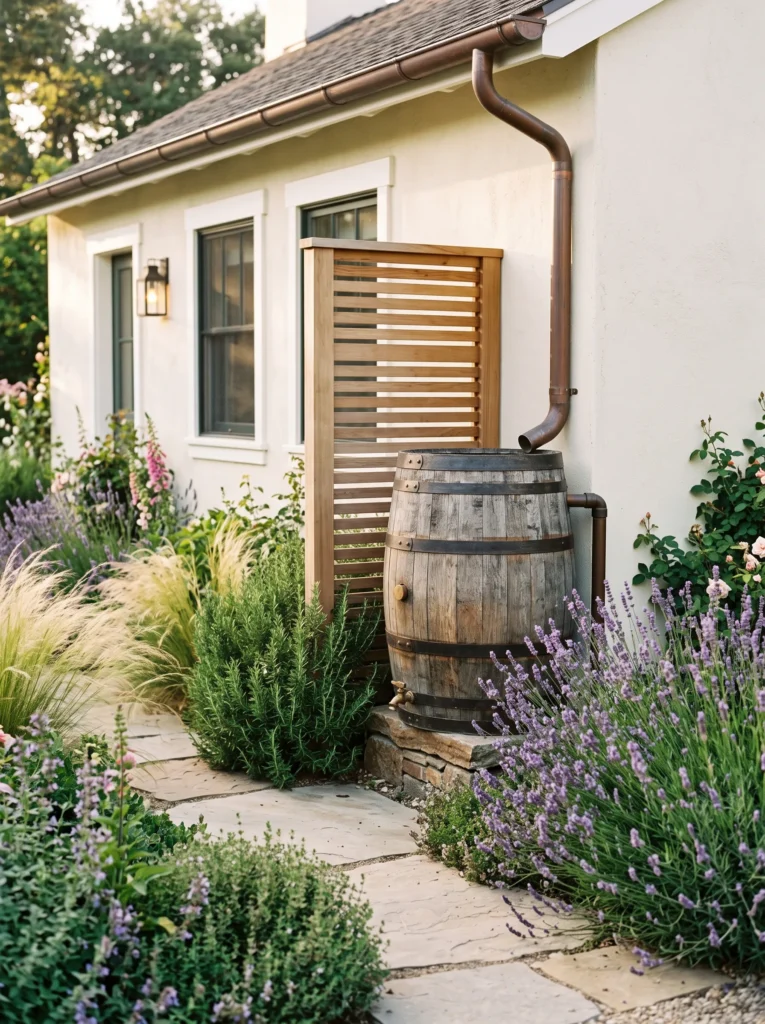
- Drainage solution: Downspout diverter feeding a sealed rain barrel with an overflow connection.
- Material: Naturally weathering cedar barrel with a dark bronze diverter.
- Capacity: A 50–65 gallon barrel suits many residential garden applications.
- Overflow: Route overflow to a planted area or separate drainage system.
- Placement: Keep the barrel on a stable, level base and away from foundation walls.
- Landscape integration: Surround it with herbs, flowering perennials, and a narrow cedar privacy screen.
- Style: Beautiful for farmhouse, cottage, and warm modern gardens.
Why this works: Capturing roof runoff gives you a controlled water source while reducing the volume discharged beside the house.
My husband often points out that the simplest drainage improvement is sometimes reducing the amount of water reaching the ground in the first place. A rain barrel does exactly that by intercepting roof runoff before it reaches the downspout outlet. A 50- to 65-gallon barrel works well for many residential gardens, but the overflow still needs a deliberate destination. I like naturally weathering cedar because it looks like garden furniture rather than drainage equipment. Set the barrel level on a stable base, and keep enough clearance around the fittings for seasonal inspection and cleaning.
For a farmhouse-inspired yard, place the cedar barrel beside a small planting bed rather than hiding it behind the house. Let rosemary, lavender, salvia, or ornamental grasses soften the base while leaving the spigot accessible. A simple cedar screen behind it can visually connect the barrel with a fence or raised planter. My favorite detail is matching the barrel’s wood tone to another outdoor element, such as a gate or raised planter. The drainage component then becomes part of the garden’s material story instead of looking like something added after the landscaping was finished.
11. Limestone French Drain
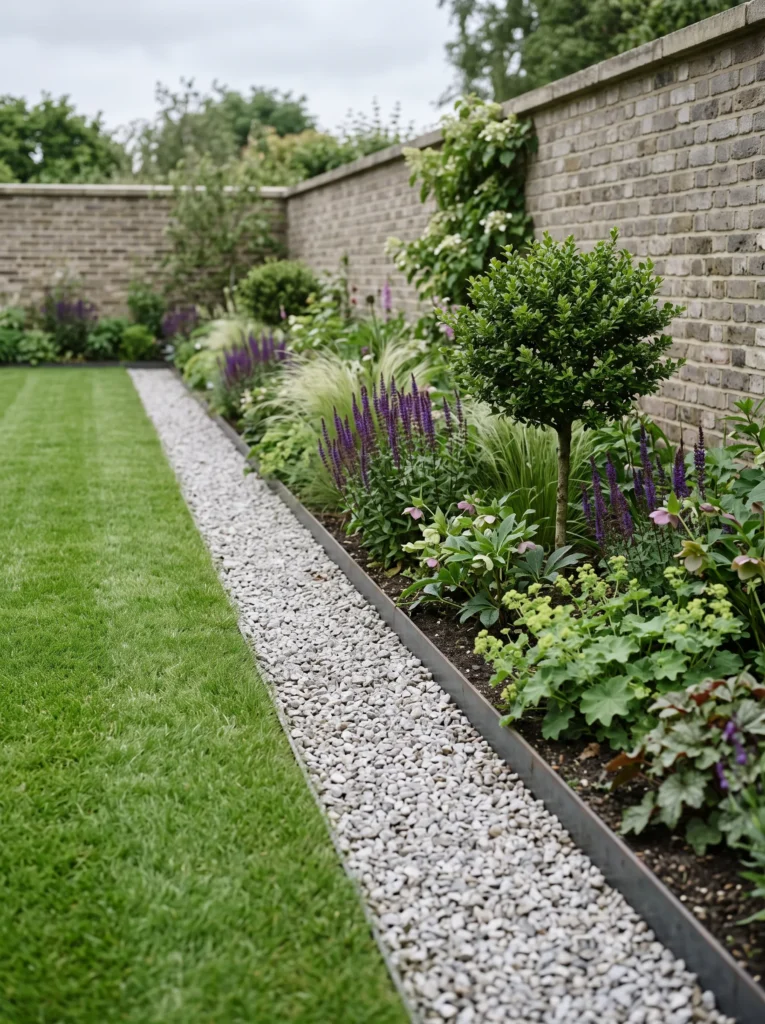
- Drainage solution: French drain receiving persistent subsurface or surface runoff.
- Material: Clean angular limestone gravel surrounding a perforated drain pipe.
- Pipe: Use perforated 4-inch pipe where residential flow requirements permit.
- Installation: Wrap appropriate geotextile around the gravel/soil interface to reduce sediment migration.
- Slope: A French drain may work by infiltration when properly designed; otherwise connect it to a suitable outlet.
- Soil consideration: Particularly useful where clay soil holds water near the surface.
- Style: Keep the visible gravel border crisp beside lawn or planting beds.
Why this works: A French drain is valuable when water needs to be intercepted below the surface rather than simply redirected across it.
A French drain is not automatically the answer to every wet yard. My husband is careful about this distinction because he has seen homeowners install one when a simple downspout extension would have solved the problem. A French drain becomes more appropriate when groundwater or persistent subsurface water needs interception. A typical residential installation may use 4-inch perforated pipe surrounded by clean drainage stone, with geotextile helping separate surrounding soil from the aggregate. The exact design depends on soil permeability, site grade, groundwater conditions, and where the collected water can legally and safely discharge.
Limestone gives the installation a more intentional appearance when the French drain runs through a visible garden edge. Instead of burying the stone beneath mulch, create a crisp 12- to 18-inch-wide gravel strip bordered by lawn, steel edging, or planting. Keep shrubs from growing directly over the drainage zone so the system remains serviceable. On a property with dense clay, this kind of subsurface interception can be far more useful than repeatedly adding surface mulch. The finished strip resembles a deliberate gravel garden border while quietly performing a much more important drainage role underneath.
12. Native Rain Garden
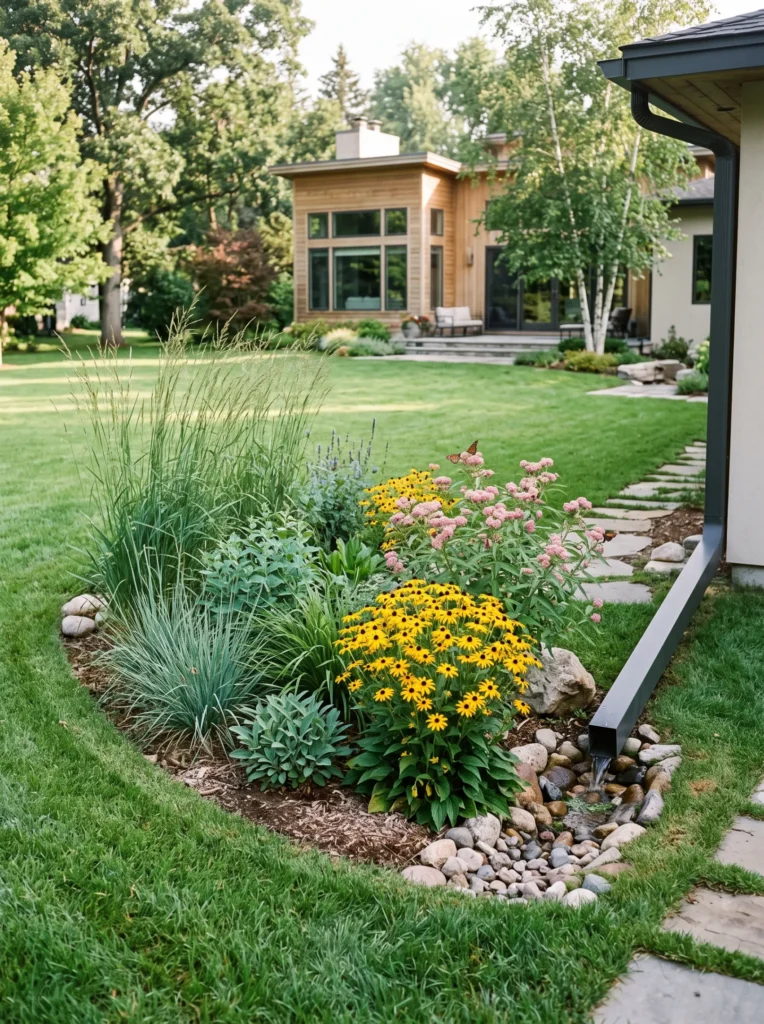
- Drainage solution: Shallow rain garden receiving redirected downspout runoff.
- Material: Native plants and natural soil amendments form the primary visual system.
- Planting: Use species adapted to alternating wet and dry conditions.
- Examples: Switchgrass, swamp milkweed, blue flag iris, black-eyed Susan, and cardinal flower where regionally appropriate.
- Location: Keep the basin well away from the foundation and utility infrastructure.
- Soil: Test drainage before planting; compacted clay may require soil improvement or engineered overflow.
- Style: Naturalistic, pollinator-friendly, and especially suited to cottage or ecological landscapes.
Why this works: A rain garden transforms concentrated roof runoff into a planted infiltration area designed around changing moisture levels.
Rain gardens are where my plant-science background becomes especially useful. The mistake I see most often is choosing plants simply because they “like water.” A good rain garden needs species that tolerate both saturated periods and drying between storms. Depending on your region, plants such as switchgrass, swamp milkweed, blue flag iris, black-eyed Susan, and cardinal flower can work beautifully. The basin should sit safely away from the foundation, and the soil needs to be evaluated before planting. If compacted clay prevents infiltration, the garden may require amended soil or a controlled overflow rather than relying on natural absorption.
I love designing the planting in three layers: taller moisture-tolerant plants toward the center, medium perennials around them, and lower groundcovers around the outer edge. That creates a naturalistic composition while allowing the basin itself to remain recognizable. On one of my husband’s projects, the drainage area initially looked like wasted lawn; once shaped and planted, it became one of the most interesting parts of the yard. Give the rain garden a defined edge with natural curves rather than a rigid circle, and it will feel like it was always part of the landscape.
You’ll Also Love: 25 Fall Garden Ideas That Actually Transform Your Yard
13. Porcelain Drainage Strip
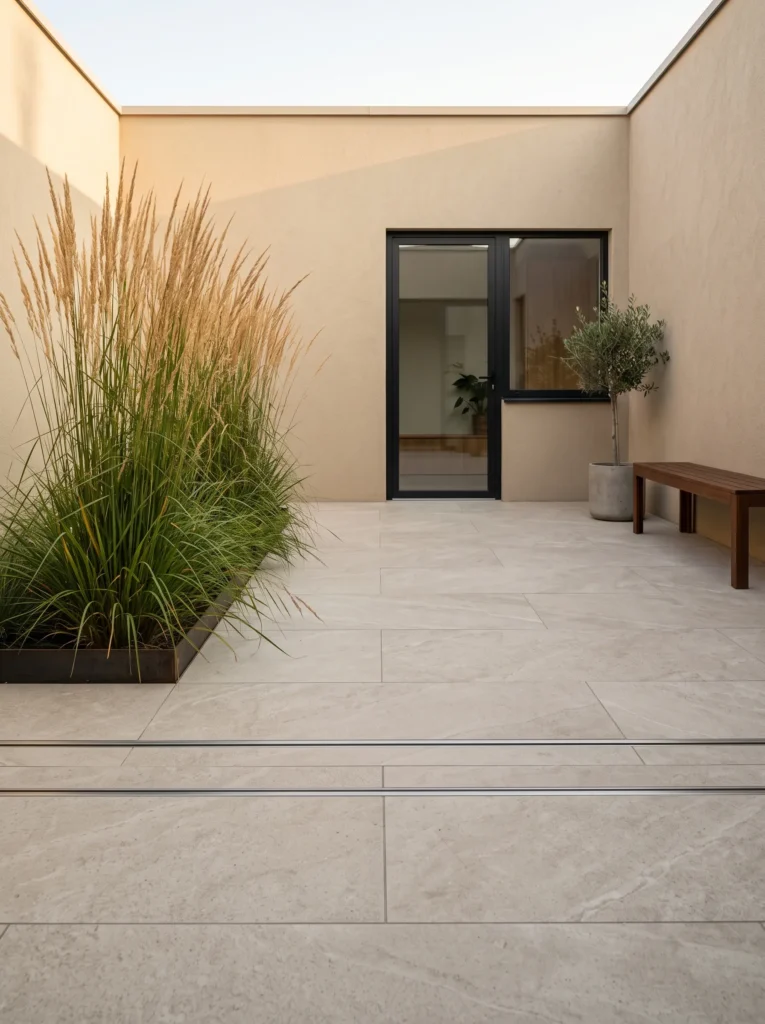
- Drainage solution: Linear surface drainage channel running alongside a patio.
- Material: Textured porcelain pavers with a matching removable drainage channel.
- Design: Use a narrow linear opening between paving zones to collect runoff.
- Grade: Patio surfaces should slope consistently toward the drain rather than toward the house.
- Installation: Maintain the drainage channel at the designed low point and keep access for cleaning.
- Landscape integration: Continue the same porcelain finish into a small terrace or walkway.
- Style: Ideal for contemporary courtyards and high-end outdoor kitchens.
Why this works: A linear drainage strip can become part of the patio geometry when its position follows the architecture instead of interrupting it.
My husband pays close attention to patio drainage because beautiful paving can fail visually and structurally when water is allowed to sit against the house. A linear drain works particularly well when the patio already has a planned fall toward one edge. The surface should slope consistently toward the channel, while the drain remains at the designed low point. I prefer a narrow porcelain-lined drainage strip because it can visually disappear into the paving pattern. Removable access sections are important, too, because even well-designed outdoor drains eventually collect leaves, grit, and small debris.
For a modern courtyard, choose large-format porcelain in a limestone or warm concrete appearance and run a slim drainage opening parallel to the patio edge. Instead of treating the drain as a separate feature, align it with a paving joint. That small decision makes an enormous difference visually. Continue the porcelain onto a nearby step or outdoor kitchen terrace so the material feels cohesive. Keep planting outside the immediate drainage line, using architectural grasses or clipped shrubs to frame the patio. The result is crisp, quiet, and especially effective around contemporary homes.
14. Fieldstone Gabion Channel
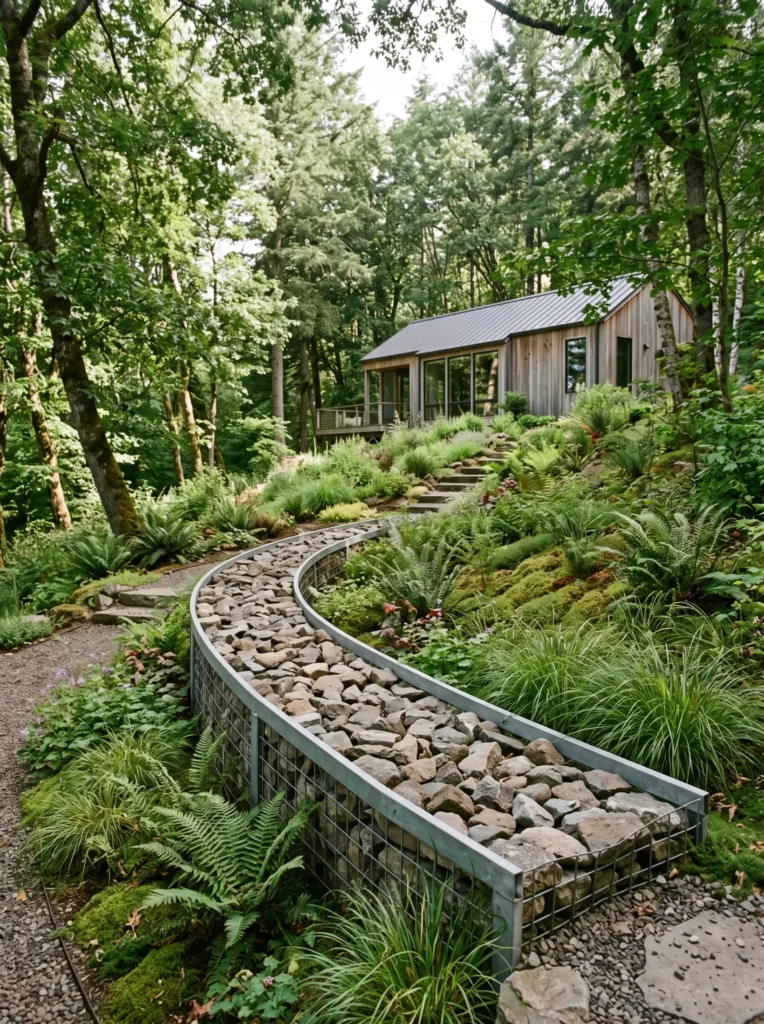
- Drainage solution: Open rock-filled channel carrying runoff through a sloped landscape.
- Material: Galvanized steel gabion baskets filled with locally sourced fieldstone.
- Construction: Anchor baskets securely and provide a stable base beneath the channel.
- Water control: Use the stone-filled structure to slow and spread concentrated flow.
- Erosion protection: Reinforce the outlet where water leaves the channel.
- Landscape integration: Surround with ferns, native grasses, and woodland perennials.
- Style: Strong choice for rustic-modern, woodland, and contemporary farmhouse properties.
Why this works: A gabion channel combines mass, texture, and controlled water movement in landscapes where ordinary edging would erode.
A gabion drainage channel is one of the more architectural solutions I would consider for a property with noticeable grade changes. Galvanized steel baskets filled with fieldstone create a heavy, stable structure that can slow concentrated runoff while giving the drainage route a defined shape. My husband particularly likes systems where the drainage detail acknowledges the site’s slope instead of pretending the property is flat. The baskets need a stable foundation and secure connections, while the outlet must be protected against erosion. This is a construction-oriented installation, not simply a decorative rock arrangement.
For a rustic-modern yard, use locally sourced fieldstone with varied shapes and muted gray-brown tones. Let the gabion structure run beside a lawn or descend through a woodland planting bed, then soften its edges with ferns, native grasses, and shade-tolerant perennials. Keep enough clearance around the baskets for inspection and vegetation control. I would not try to make the structure disappear; its strength is the visual honesty of the materials. Against timber siding, natural stone walls, or dark metal fencing, it can look like an intentional architectural landscape feature.
15. Underground Dry Well
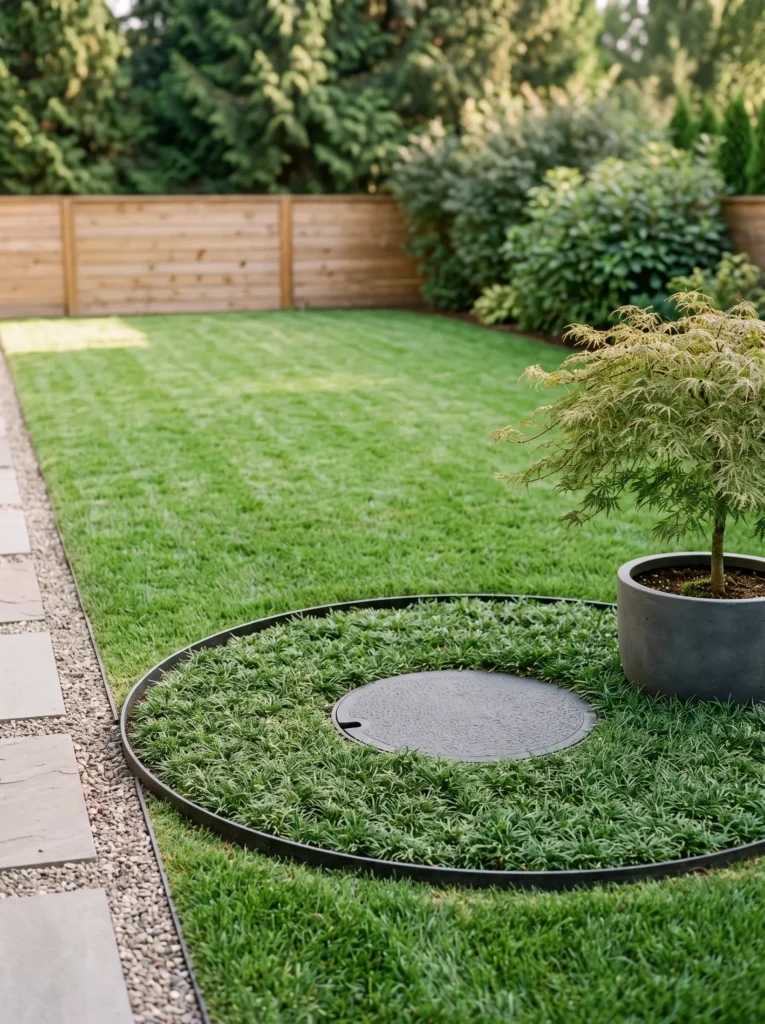
- Drainage solution: Underground dry well receiving runoff from a solid-wall downspout extension.
- Material: High-strength underground infiltration chamber made from structural polymer.
- Placement: Locate it well away from foundations and other sensitive structures.
- Soil test: Confirm that surrounding soil can infiltrate water before installation.
- Sizing: Chamber volume should be calculated from roof area, rainfall intensity, and soil infiltration rate.
- Access: Include a service access point for inspection and maintenance.
- Style: Finish the surface with lawn, groundcover, or a simple gravel garden.
Why this works: A properly sized dry well can store and gradually infiltrate roof runoff underground when site conditions allow it.
An underground dry well is useful when there is no attractive or practical surface route for downspout water. My husband always emphasizes that the invisible nature of the system does not mean the engineering can be invisible, too. The chamber needs to be sized according to contributing roof area, expected rainfall, and the soil’s infiltration rate. It also needs adequate separation from the foundation and other site constraints. Before installing one, confirm that the surrounding soil actually accepts water. Dense clay or a high seasonal water table can make a dry well ineffective without additional engineering.
Once installed correctly, the surface can be landscaped almost any way you like. That is what makes this option so appealing for a carefully designed garden. Cover the area with lawn, a restrained groundcover, or a small gravel garden, while keeping the access point serviceable. I like using a circular planting composition around the inspection lid so the maintenance point feels intentional rather than randomly placed. From the finished garden, there may be no visible drainage equipment at all. The important work happens underground, while the landscape above remains calm, open, and visually uninterrupted.
Styling Principles for Beautiful Drainage
Good drainage starts underground or at the grade, but the visual plan should begin at the same time. Before choosing a material, watch where water naturally travels during a heavy rain. A beautiful drainage feature placed in the wrong location will still fail.
Match the Solution to the Slope
A nearly flat yard may benefit from a rain garden, catch basin, or properly designed underground system for effective gutter downspout drainage. A sloped property can often use a swale, dry creek bed, or stepped spillway to slow water naturally.
Respect Your Soil
Clay-heavy soil drains slowly, so simply extending a downspout into a planting bed may create another soggy area. Sandy soil generally infiltrates faster, making certain swales and rain gardens more practical. A simple infiltration test can reveal a lot before you spend money on materials.
Follow the Water
Don’t design the landscape first and force drainage into whatever space remains. Trace the water from the downspout to its final destination. The drainage route should have a continuous, intentional path with no accidental low points.
Know When to Go Underground
A short surface extension may be enough when the yard already slopes away from the house. Underground piping becomes more useful when the discharge would cross a walkway, patio, planting bed, or frequently used lawn area.
Keep Foundation Water Moving
As a general construction principle, downspout discharge should be directed away from the foundation rather than allowed to pool beside the house. The exact distance depends on site grading, soil, drainage design, local requirements, and whether the water is being discharged into another drainage system.
Repeat Architectural Materials
If your home uses natural stone, consider carrying that stone into a creek bed. If the patio uses porcelain, a matching linear drain can disappear into the paving pattern. Copper works beautifully with wood and masonry, while concrete suits contemporary architecture.
Leave Drainage Accessible
One lesson I hear repeatedly from my husband is that drainage should never be designed as something you install and forget. Catch basins need cleaning, pop-up emitters need inspection, and channels collect leaves and sediment. Leave access points visible and easy to reach.
Let Plants Soften, Not Block
Plants should frame drainage rather than obstruct it. For rain gardens, choose species adapted to both wet and dry periods. For surface channels, keep the central water path relatively open and place taller plants along the edges.
Design for Heavy Rain
The drainage system needs to handle more than an average drizzle. Consider what happens during a major storm: where does overflow go, can the soil absorb it, and could water reach a foundation, walkway, basement, or neighboring property?
The prettiest drainage feature is the one whose route makes sense before you ever choose the decorative materials.
Frequently Asked Questions
How do I know if I have a drainage problem?
Look for recurring puddles, soil erosion beneath downspouts, water flowing toward the foundation, muddy areas that remain wet after rain, basement moisture, or mulch and soil repeatedly washing away. One isolated puddle after an unusually heavy storm isn’t necessarily a drainage failure, but repeated pooling deserves investigation.
When do I need a French drain instead of a simple downspout extension?
A simple extension is usually appropriate when roof runoff can be carried across the surface to a safe discharge area with adequate slope. A French drain is more appropriate when persistent subsurface water or poor surface drainage requires interception below grade. Soil type, groundwater, elevation, and the available outlet should all be considered before choosing one.
What are the most budget-friendly drainage solutions?
Start with grading and simple extensions. A well-placed surface extension, inexpensive splash block, shallow swale, or carefully constructed dry creek bed can sometimes solve runoff issues without major excavation. The most economical solution is usually the one that works with the property’s existing slope instead of fighting it.
What are the best plants for a rain garden?
Choose plants that tolerate alternating wet and dry conditions rather than plants that require constantly wet soil. Depending on your region, options can include switchgrass, swamp milkweed, black-eyed Susan, cardinal flower, sedges, and blue flag iris. Always verify that a species is native or well-adapted to your specific region before planting.
How far should downspout water be directed from the foundation?
There isn’t one universal distance that works for every property. The correct discharge point depends on grading, soil, foundation type, local drainage requirements, and the destination of the water. The key is preventing concentrated runoff from pooling beside the foundation. When space is limited, an underground drainage system or engineered discharge may be preferable to a short surface extension.
Can I hide a downspout without causing drainage problems?
Yes, but the water still needs a clearly engineered route. Underground solid-wall piping with a suitable outlet, a pop-up emitter, a rain garden, or a carefully designed surface channel can reduce the visual impact. Never bury a downspout and assume the water will simply disappear; the system needs a defined destination and adequate capacity.
Final Thoughts
The best drainage solution is rarely the most complicated one. Sometimes a carefully graded splash block or surface channel is enough. Other properties need underground piping, a French drain, a rain garden, or a properly sized dry well.
What matters most is understanding how water behaves on your specific property before choosing the finish. Soil type, slope, roof area, rainfall, foundation location, and the final discharge point all influence what will work.
I’ve learned from watching my husband approach construction projects that the details people don’t notice are often the ones doing the most important work. Good drainage should feel almost effortless when you look at the finished landscape.
Once the engineering is right, that’s where the fun begins. Choose stone that echoes your architecture, plants that suit your soil, or metal and concrete details that complement your home’s exterior. The goal isn’t to hide every drainage feature. Sometimes the smartest solution is to make it beautiful enough that you don’t want to hide it at all.